• Skip to primary navigation
  • Skip to main content
  • Skip to primary sidebar
  • Home
  • Reviews
    • Book Index
    • Fiction
    • Non-Fiction
    • Top Ten Tuesdays
The Hungry Bookworm

The Hungry Bookworm

reading + eating

  • Recipes
    • Drinks
    • Snacks, Sides & Apps
    • Main Dishes
    • Desserts
    • 5 Ingredients or Less
  • About
    • Meet Megan
    • How I Rate
    • Review Policy
    • Contact

fiction

When Dimple Met Rishi + Chicken Tikka Masala Pizza

September 19, 2017 by Megan Leave a Comment

In many ways, Sandhya Menon’s When Dimple Met Rishi follows the same formula as many time-tested and beloved romantic comedies. And, honestly, that’s part of what made it so enjoyable. It is unabashedly a young adult love story, and a clever, funny one at that. Dimple is a future-minded high school graduate, hoping to enroll in a web development program and forget about her mother’s matchmaking for the summer. Rishi is also a future-minded recent graduate, though he’s focused more on meeting and wooing his fated wife before heading off to MIT.

Rishi is traditional where Dimple is modern. He learned Hindi before English, strives to be a good son, and is willing to put his dreams of being a comic book artist aside to do so. Dimple wants to code apps and can’t wait to take a break from her traditional Indian parents to make her own way in the world. Rishi is looking forward to meeting the girl his parents have chosen for him to marry, and Dimple has no idea such an arrangement has been made.

In fact, when they do meet, it doesn’t go exactly as Rishi had planned. He’s a bit overzealous, to say the least. It’s hardly a meet-cute, but it’s hilarious. Somehow, Rishi recovers and gets another chance to make an impression. During their first official “hangout” at a pizza shop, a relationship between Dimple and Rishi doesn’t seem meant to be, but as we all know, some people are born to defy expectations.

In true rom-com fashion, the novel is full of ups and downs and obstacles the young couple must overcome to end up happily ever after. That said, it’s well-done, enjoyable and not as expected as you may think. As a bonus, the entire novel is quite amusing - funnier than I expected. I often found myself laughing out loud (even while Scott slept next to me, oops). I wholeheartedly recommend this to anyone looking for something lighthearted and entertaining. It’s a lovely choice to wrap up the summer.

One other thing I found quite interesting was the fact that A Wrinkle in Time, which Dimple considers one of her favorite childhood stories, played such an integral role within the story. Funnily enough, I had just read A Wrinkle in Time before picking up this book. The constant mentions of Meg and her journey stood out to me a little bit more, and it was cool that I had so recently become familiar with the story myself. Since something like that had never happened to me before, I was excited to share the coincidence. Like Dimple and Rishi, it almost seemed fated that I read them in this order.

To accompany Dimple and Rishi’s story, I decided to make pizza with an Indian spin. I knew I wanted to use naan as a crust (something I’ve done in the past with leftover pieces) and wanted to bring in the flavor of chicken tikka masala. I found a recipe from Raya Malaysia to use as a base.

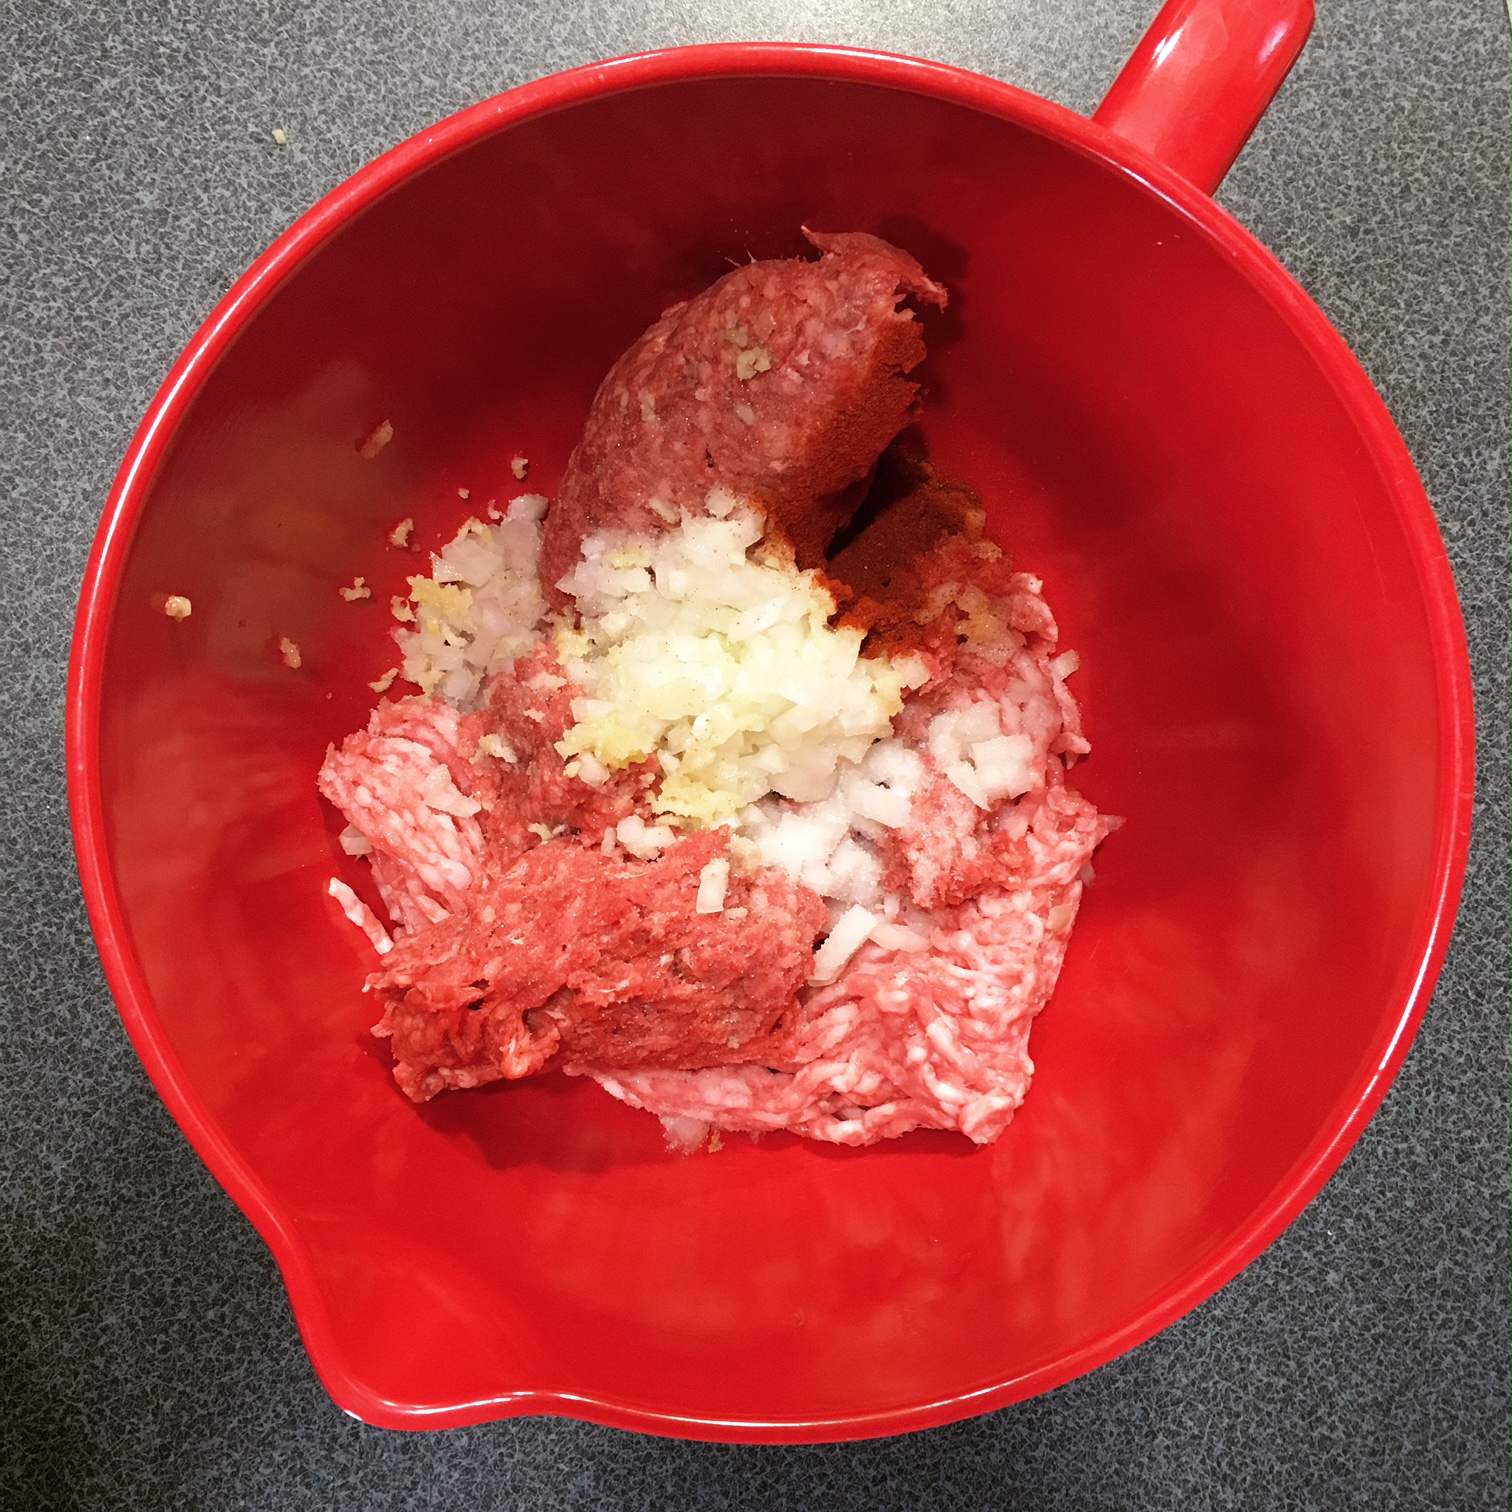
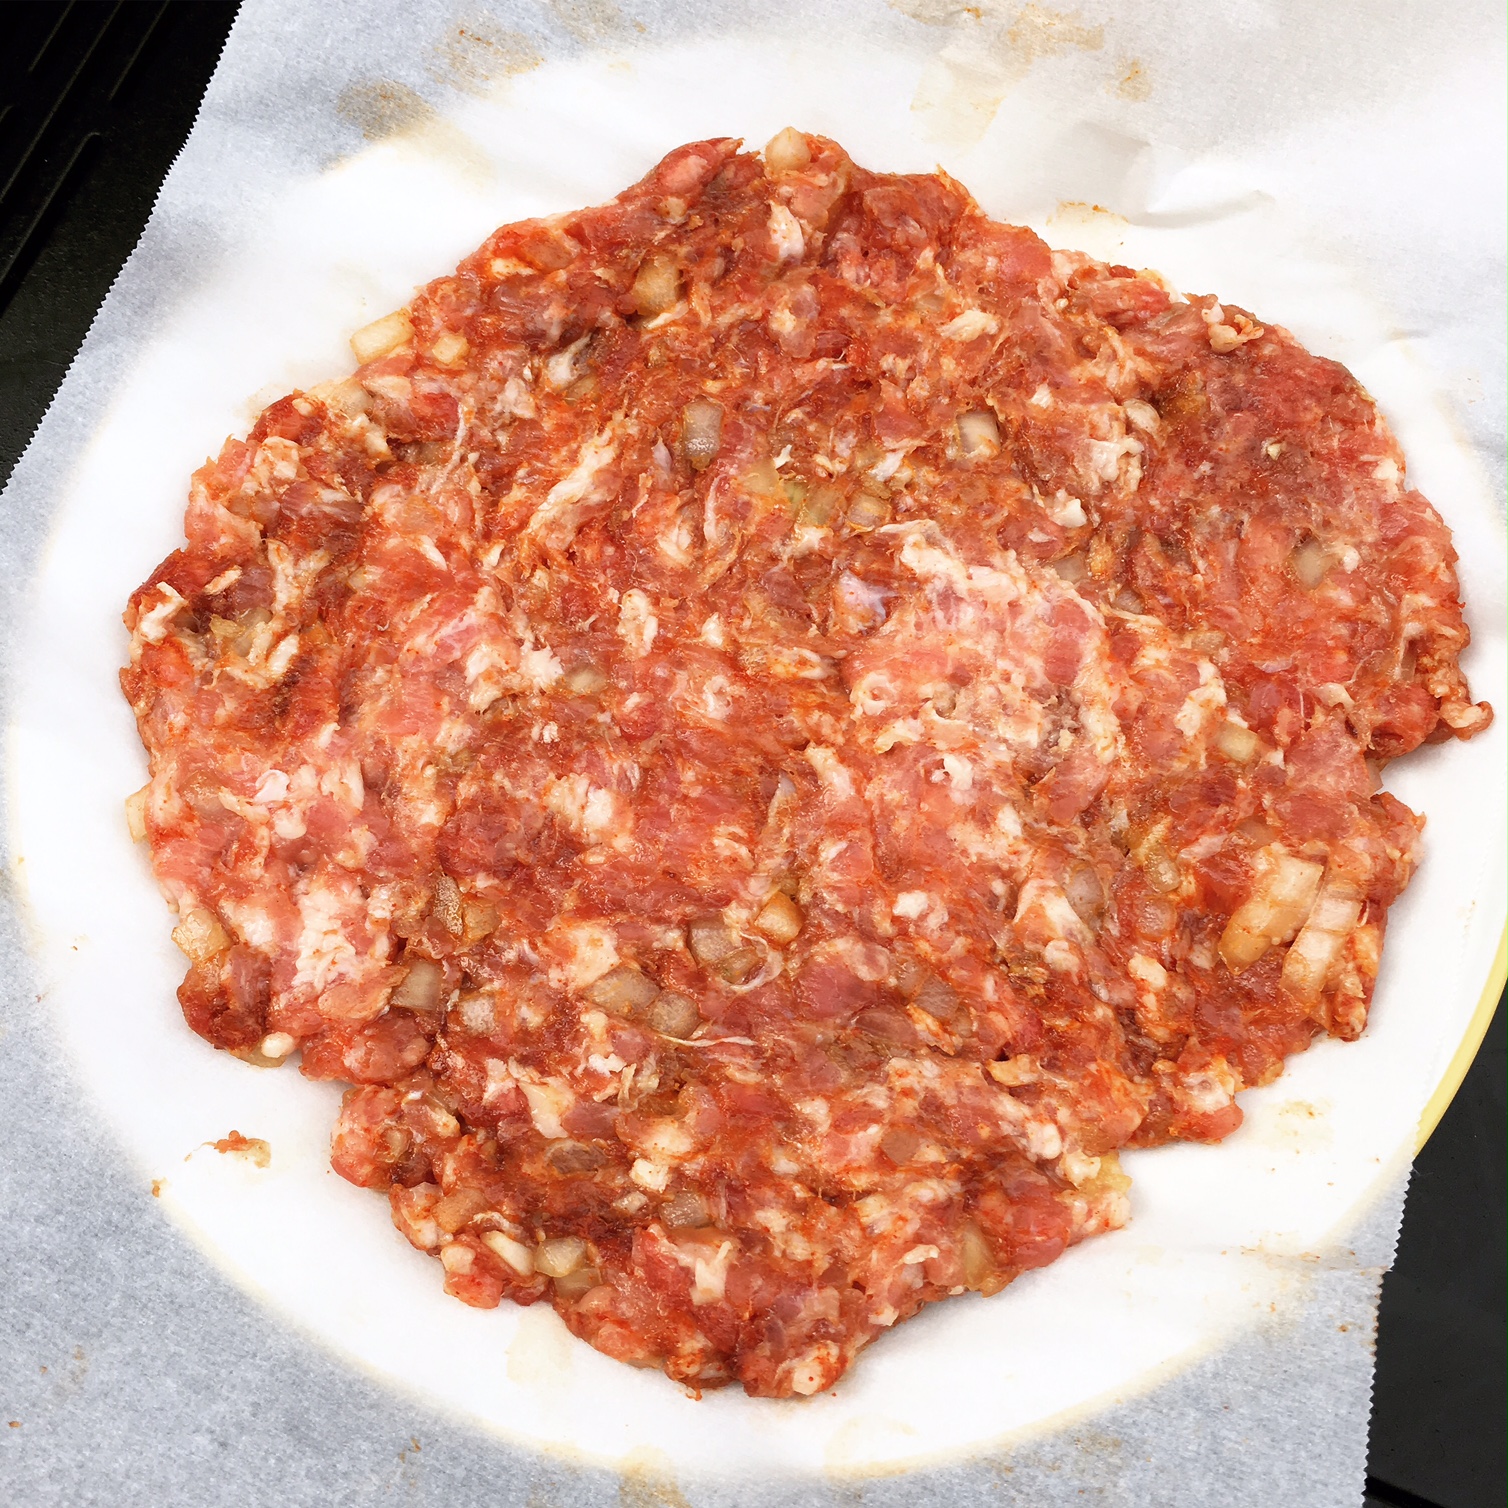
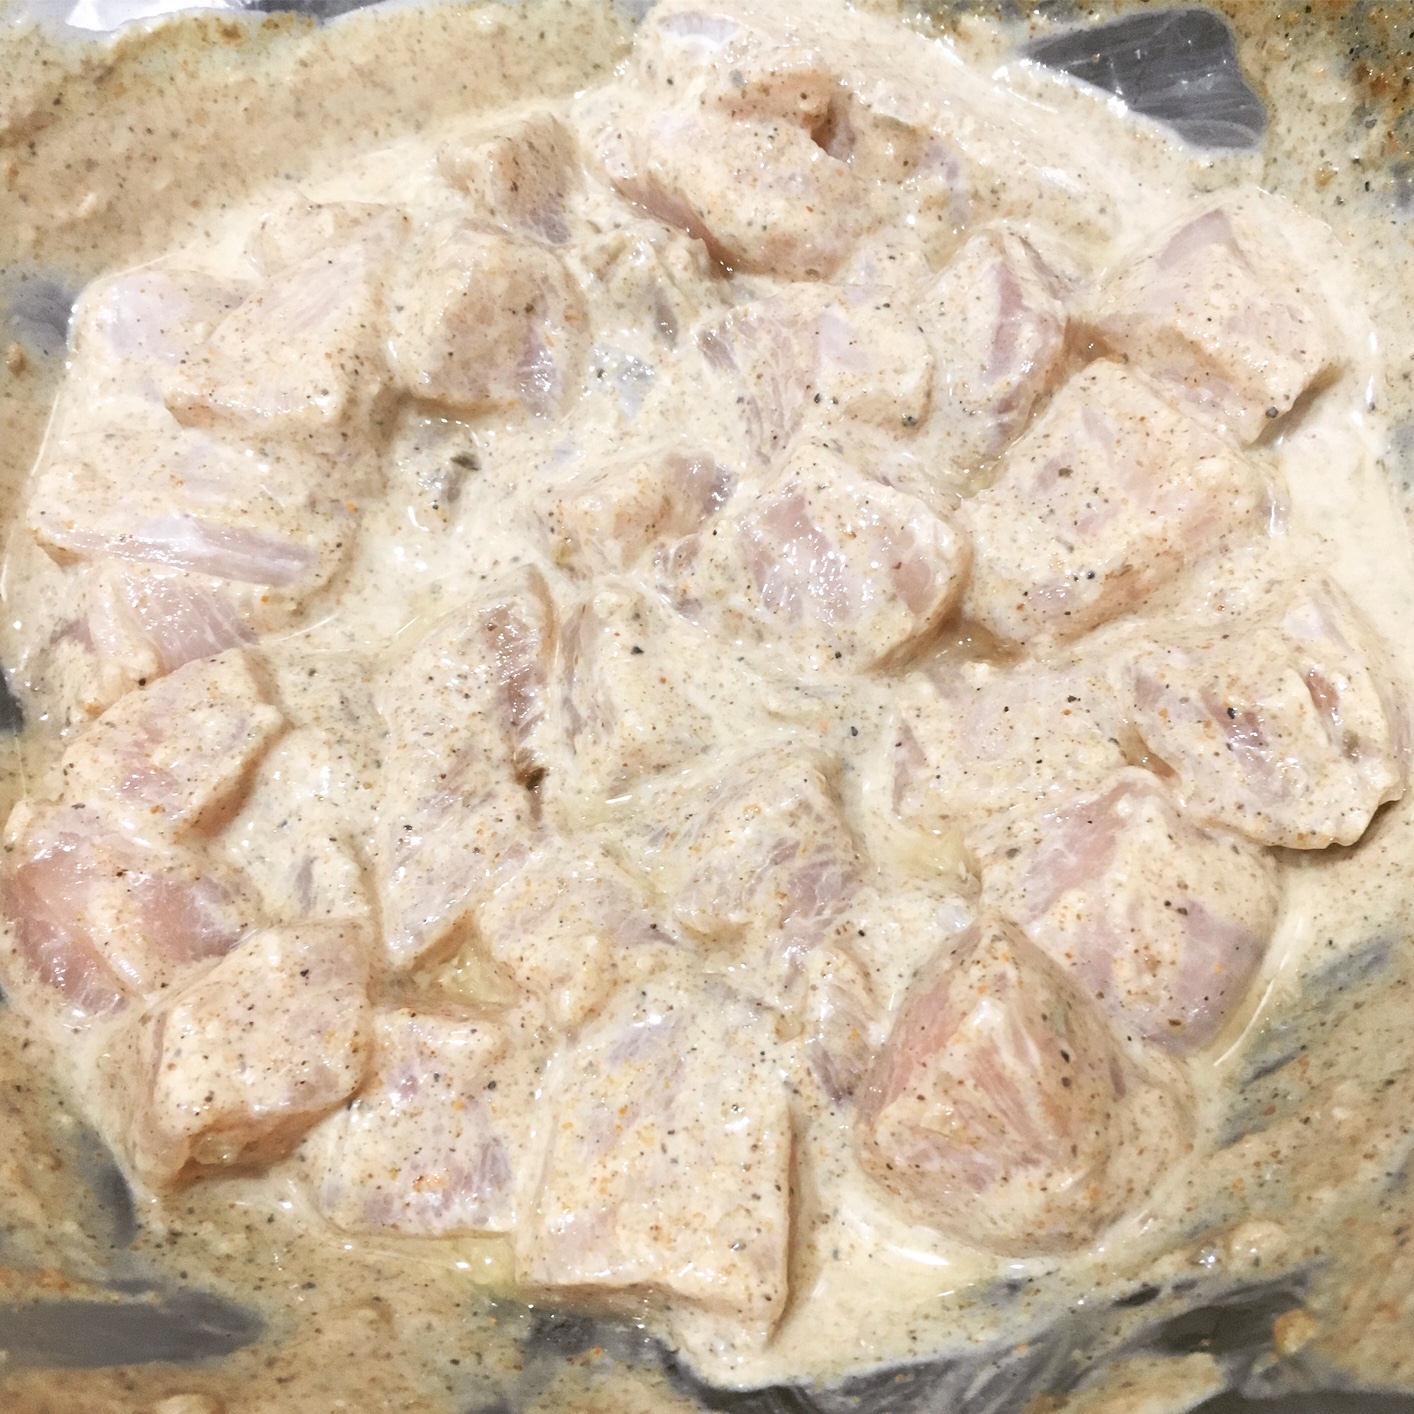
First, I created the marinade for the chicken, combining a half teaspoon each of ground cumin, cayenne pepper, garam masala and minced fresh ginger; a quarter teaspoon each of salt and black pepper; one Tablespoon of lemon juice; two Tablespoons of plain yogurt; and a pinch of cinnamon. Then, I tossed the chicken in the marinade until it was well-coated, covered the bowl with plastic wrap, and set it in the fridge for about an hour.

It’s a lot of ingredients, yes, but I had all of them at home already. Most of the spices are common, especially if you cook any type of ethnic food with regularity in your home. Hopefully you won't have to buy many to make this marinade, but then again if you do, you'll have everything handy to just make it more often. 🙂

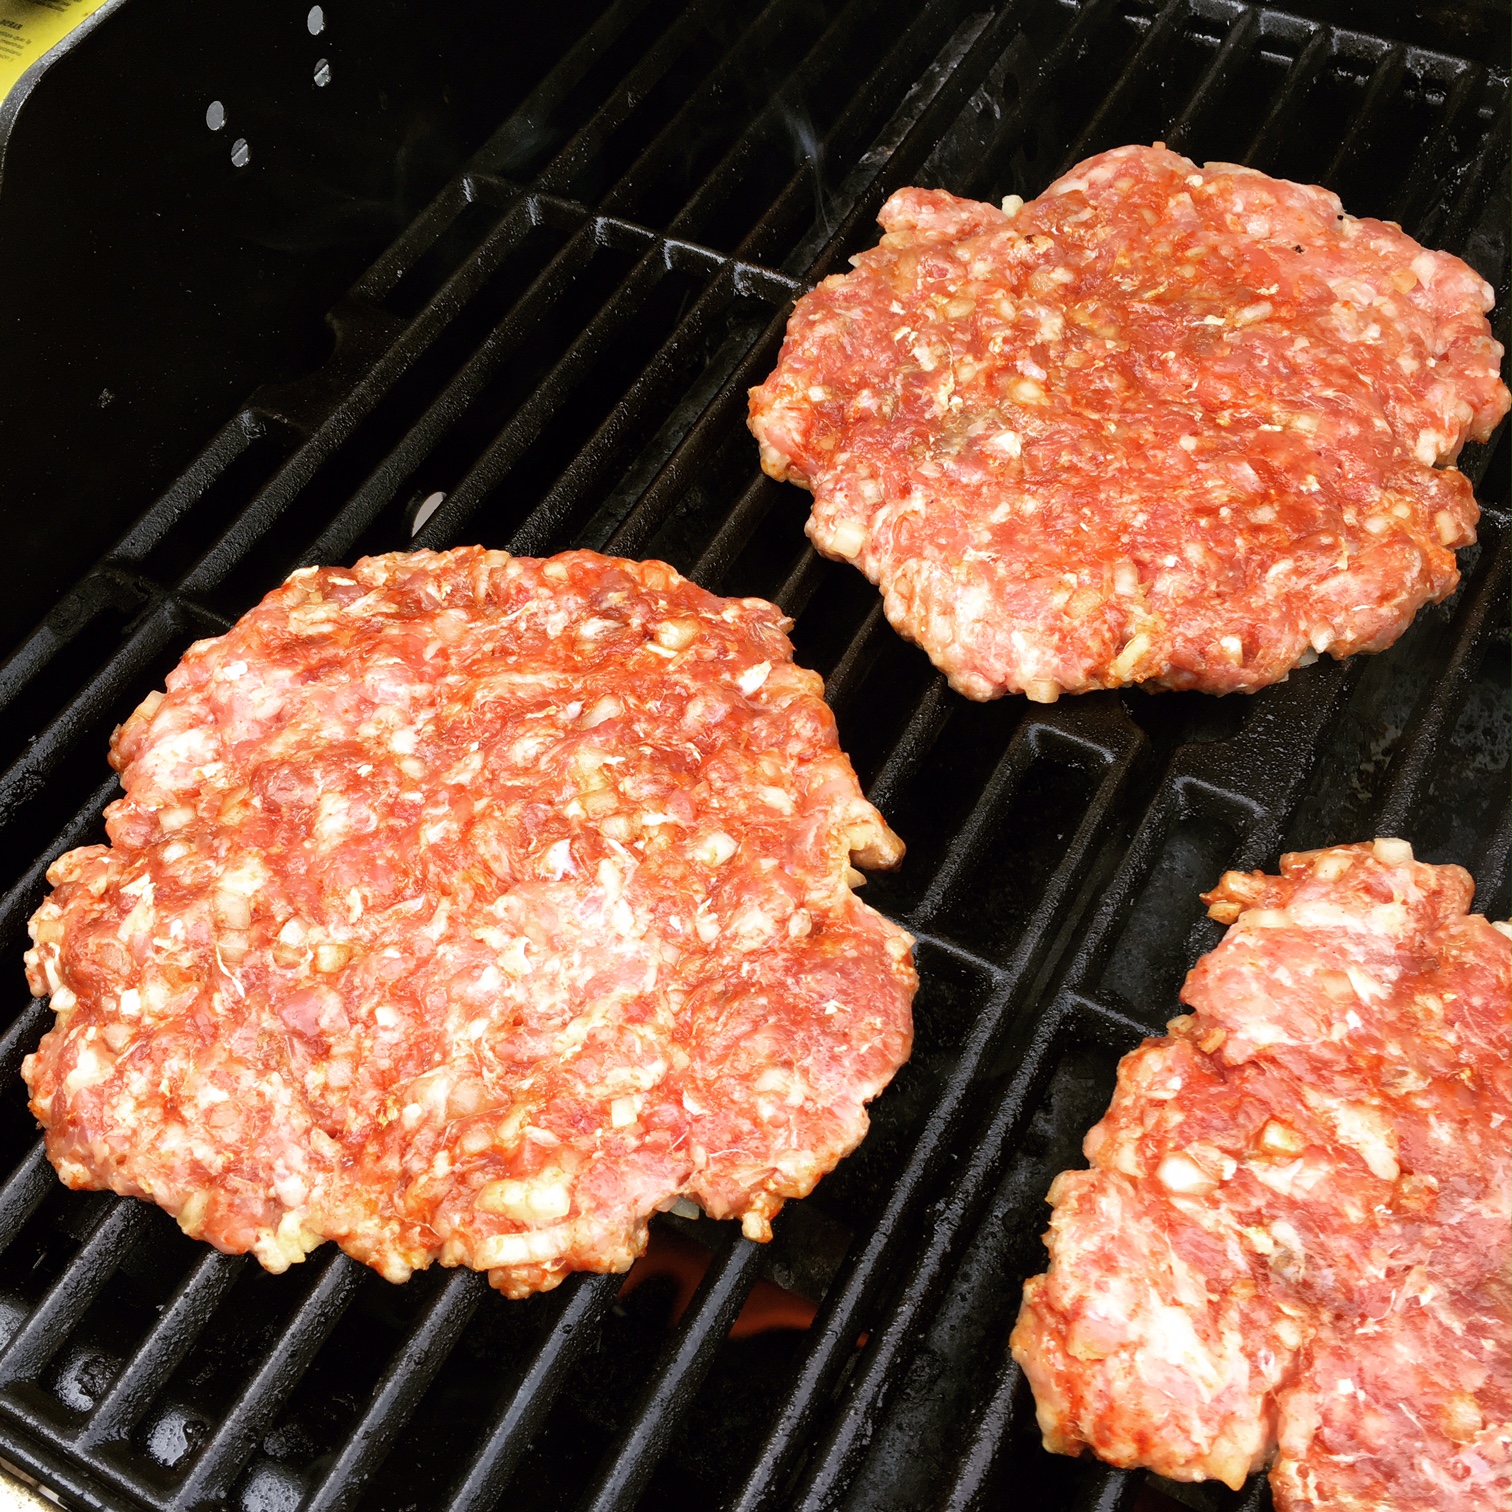
To cook the chicken, I preheated the oven to 450 degrees F. I lined a baking pan with foil and arranged the chicken in a single layer. I allowed it to bake for 6-7 minutes.

While that baked, I made the pizza sauce. First, I mixed cumin, paprika and garam masala in a small bowl. In a separate bowl, I combined the tomato sauce, yogurt and heavy cream.

In a small saucepan, I melted/warmed the ghee and added minced garlic and finely diced jalapeños, sautéing for a few minutes, until aromatic. Then I added my spice mixture and continued to heat for 1-2 minutes, stirring often.

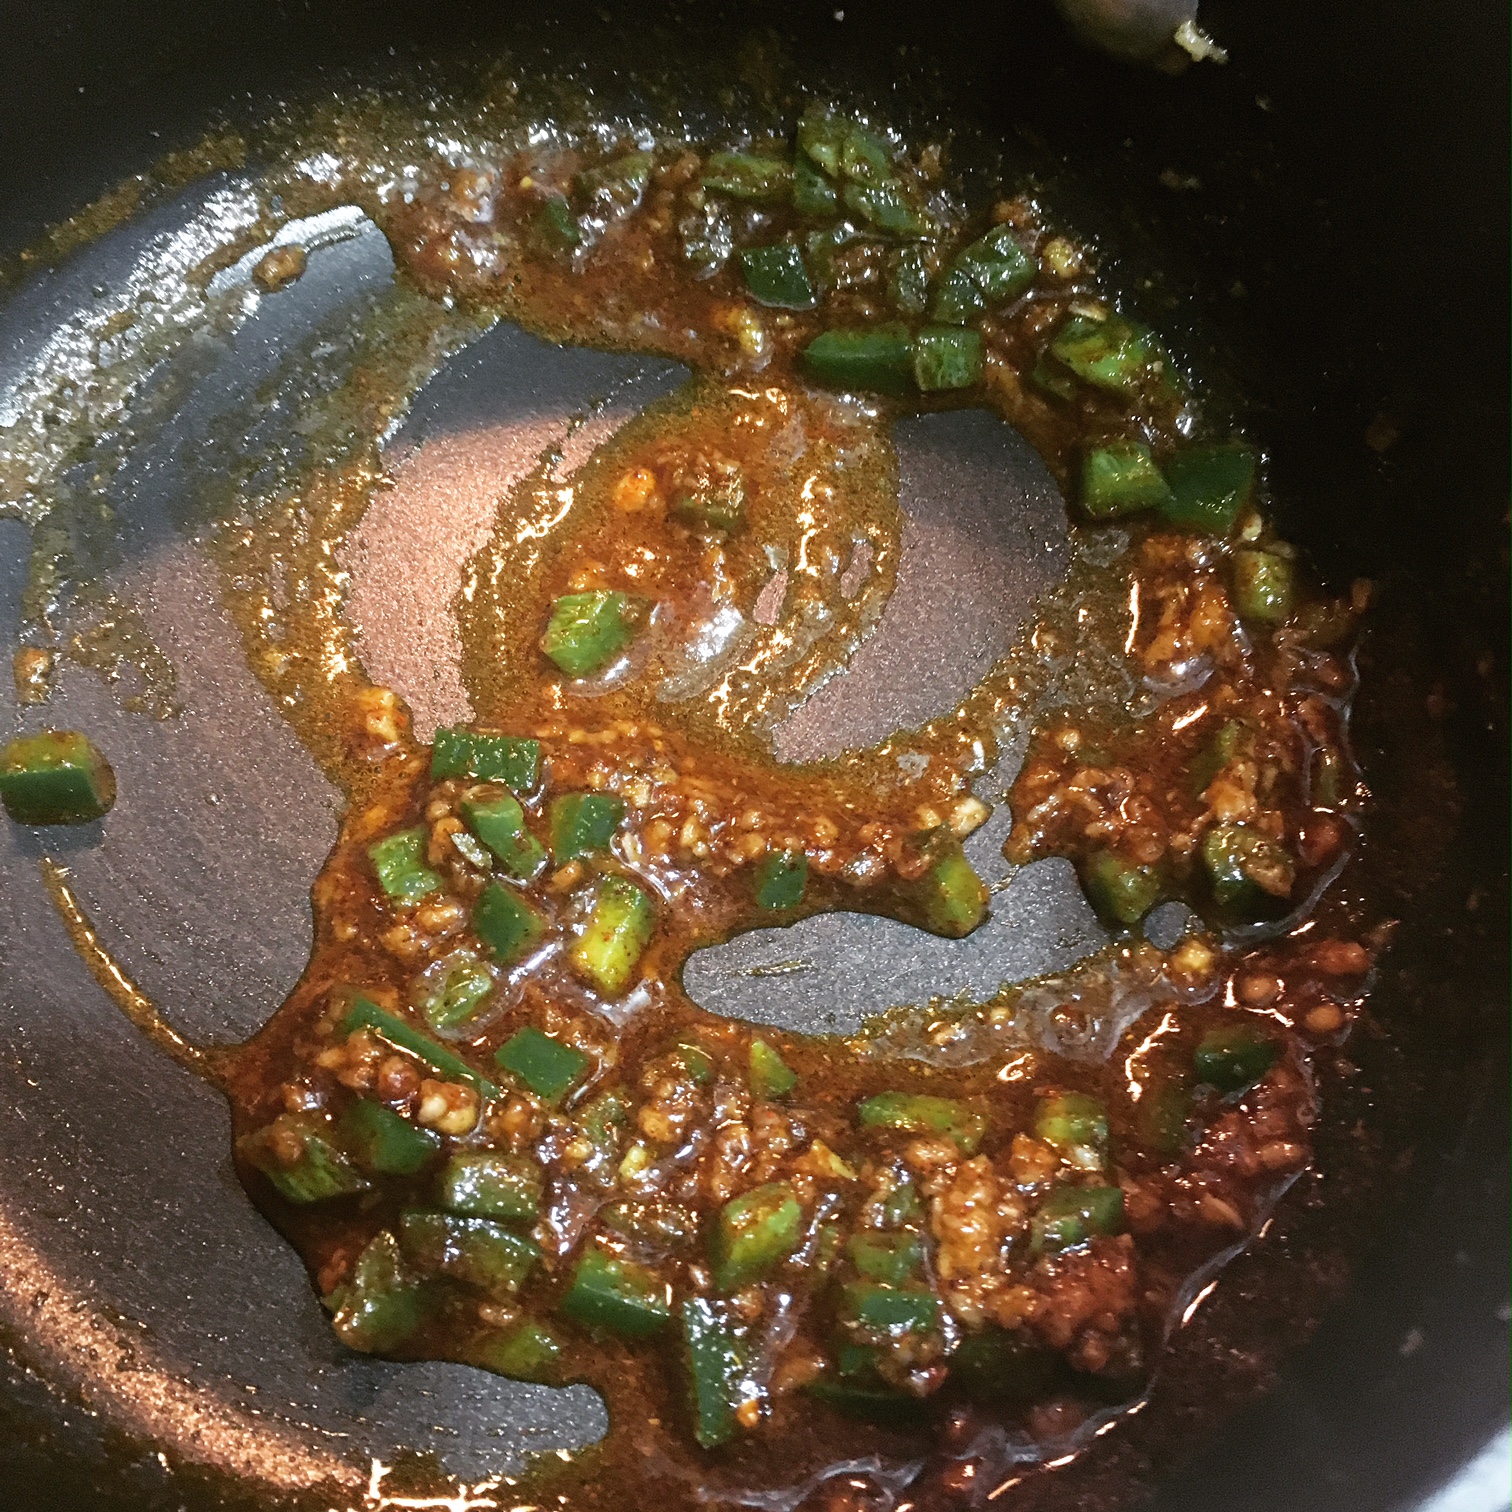
I removed as much of the jalapeño as I could, per the original directions (see my notes with the recipe), before adding the tomato sauce mixture. I added some salt and allowed it to thicken a bit, cooking for about 2 more minutes.

At this point the chicken was finished cooking in the oven, so I took it out and began assembling my pizzas. To start, I brushed each piece of naan lightly with olive oil. Then, using a spoon, I dolloped sauce into the center of each piece of naan, and with a circular motion outward, spread the sauce until each piece was completely covered.

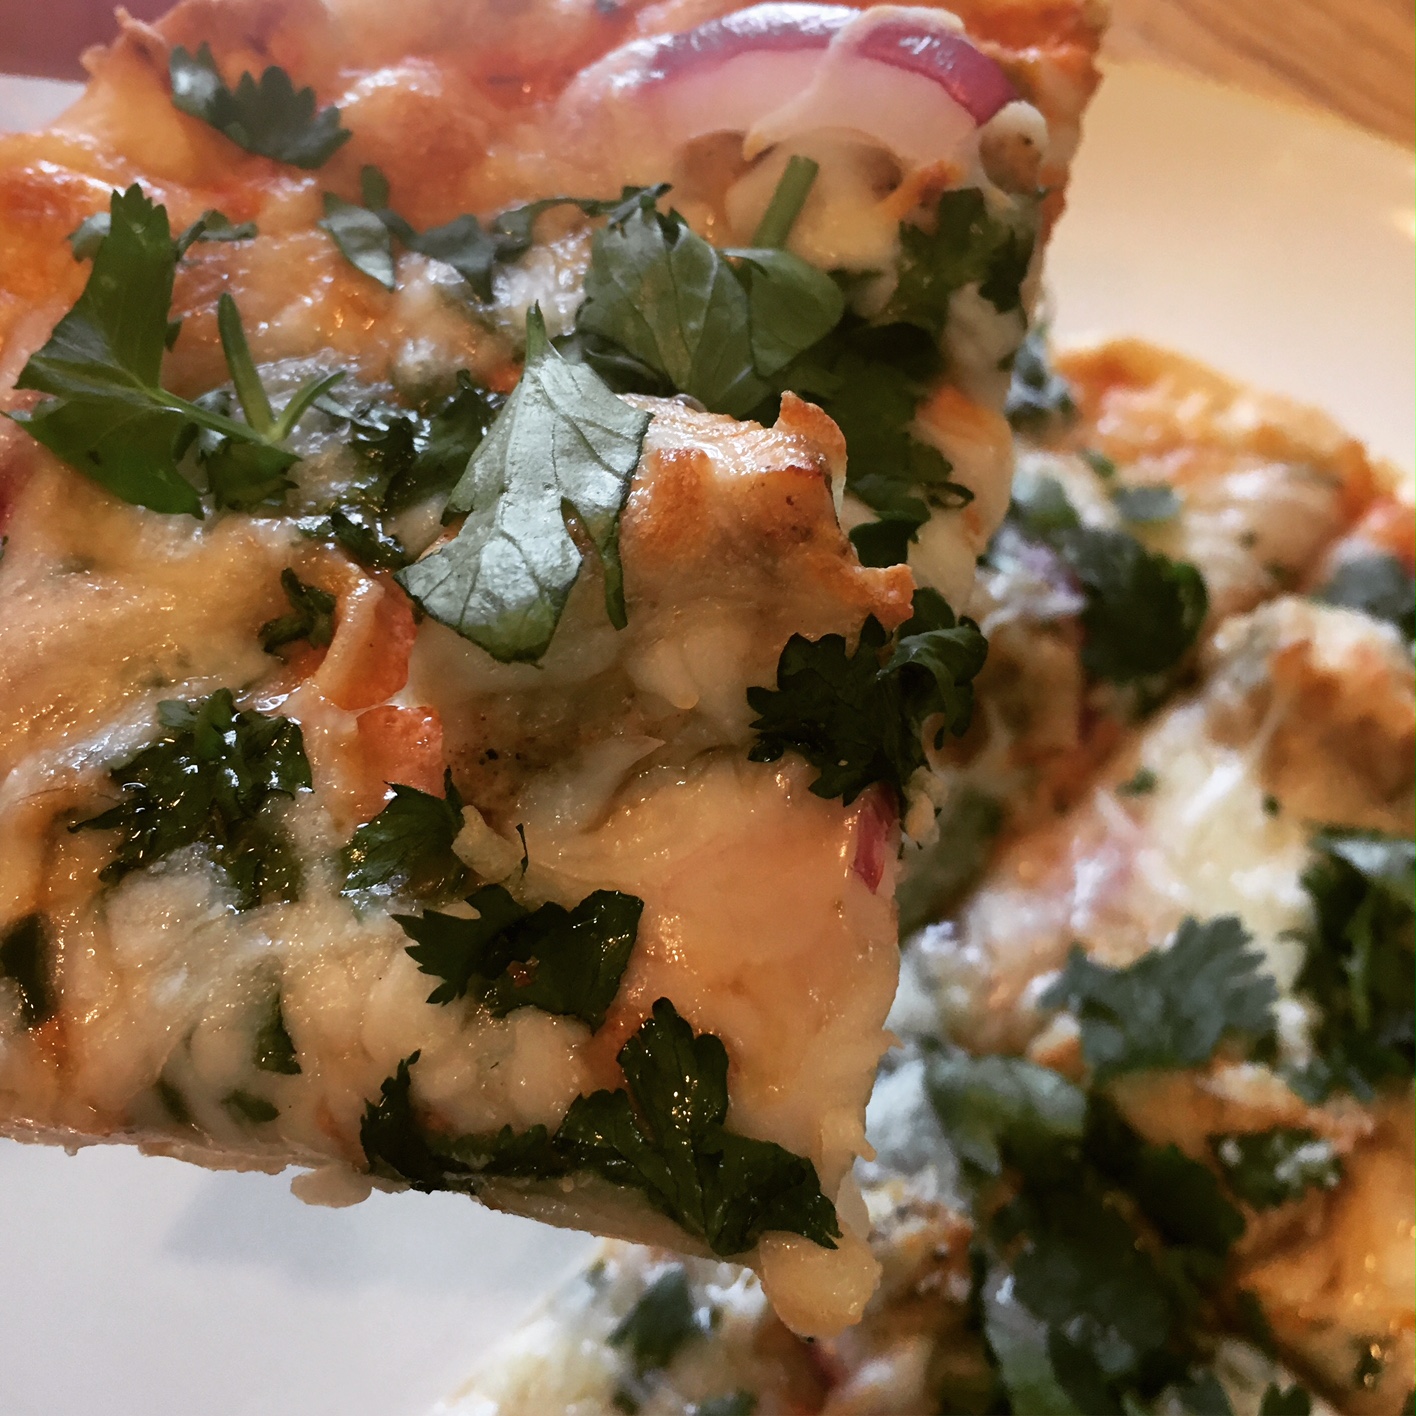
Then, I topped the sauce with a little less than half of the shredded cheese, before adding the chicken, thinly sliced red onion and cilantro. Finally, I added another layer of cheese, using the rest of it.

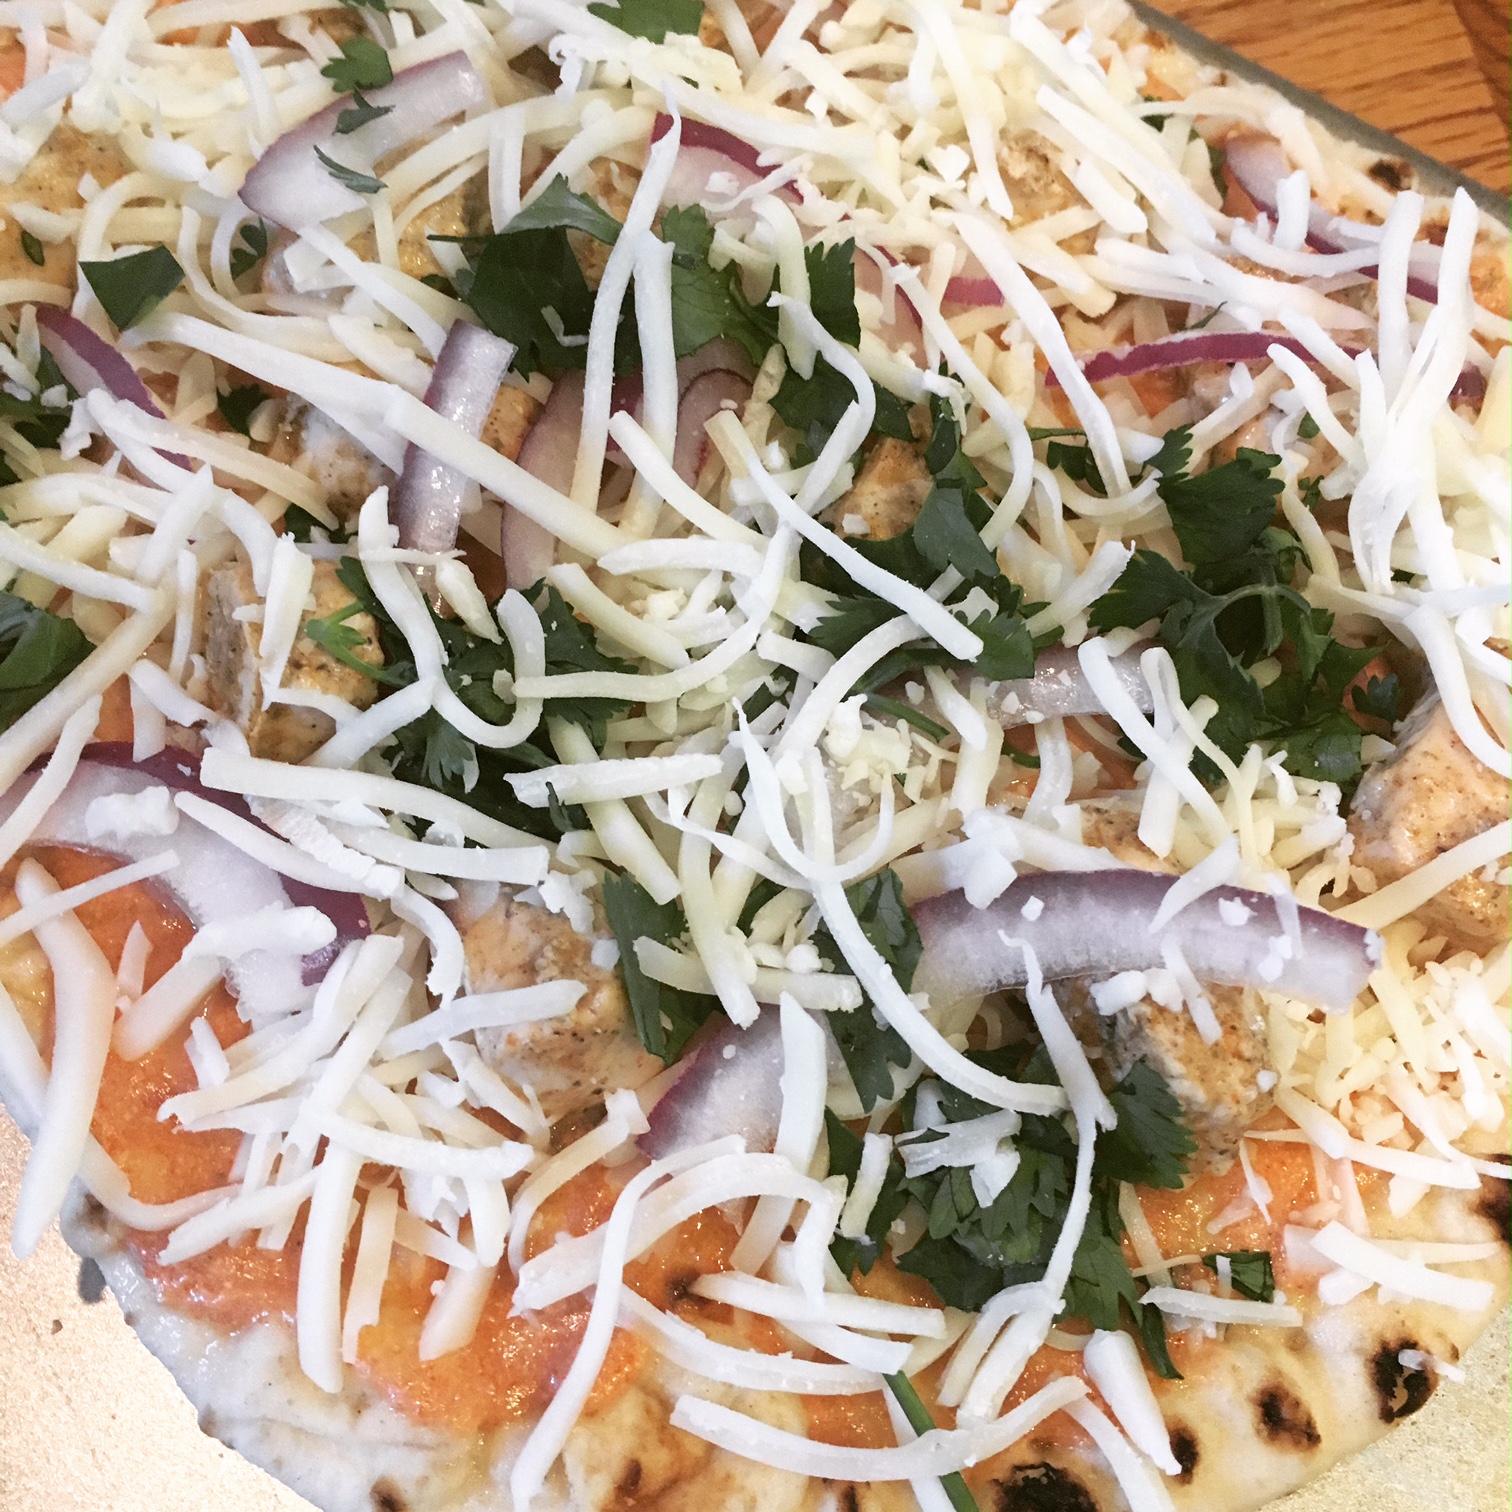
I baked the pizzas for about 10 minutes each. Since the chicken is already cooked, the pizzas are done when the cheese is melted and the naan is a bit more firm. For garnish, I added the remaining chopped cilantro to each pizza before serving.

These pizzas were absolutely delicious! If you’re a fan of Indian food and a fan of pizza, there’s no reason not to give this a try. It’s easy and so flavorful! This is definitely going down as one of my favorite recipes this year and it will absolutely be making some additional appearances in our kitchen. (I can’t wait!)

Chicken Tikka Masala Pizza

  • Servings: 3-4 personal pizzas
  • Time: 30 minutes
  • Print

Pizza Ingredients

  • 10 oz skinless and boneless (1 large) chicken breast, cut into 1/2-inch cubes and marinated
  • 3 or 4 pieces of naan (traditional or garlic; I used traditional)
  • olive oil for brushing
  • pizza sauce, recipe below
  • ¼ red onion, thinly sliced
  • 1 to 1 ½ cup shredded mozzarella cheese
  • handful of cilantro, chopped (plus some for garnish)

Chicken Marinade Ingredients

  • ½ teaspoon ground cumin
  • ½ teaspoon ground cayenne pepper
  • ½ teaspoon ground garam masala
  • ½ teaspoon minced fresh ginger
  • ¼ teaspoon salt
  • ¼ teaspoon ground black pepper
  • 1 Tablespoon lemon juice
  • 2 Tablespoons plain yogurt
  • pinch of cinnamon

Pizza Sauce Ingredients

  • 2 cloves garlic, minced
  • ½ jalapeño, deseeded and finely diced
  • 1 tablespoon ghee (or butter)
  • salt to taste
  • ½ teaspoon cumin
  • ½ teaspoon paprika
  • ½ teaspoon garam masala
  • 4 oz tomato sauce
  • 2 Tablespoons plain yogurt
  • 2 Tablespoons heavy cream

Directions

  1. In a bowl, cover the chicken with the prepared marinade and allow to marinate for at least an hour in the refrigerator.
  2. Preheat the oven to 450 degrees F and line a baking pan with foil and spread the marinated chicken in a single layer on the pan. Discard the remaining marinade. Bake for 6-7 minutes, turning halfway through if desired.
  3. While the chicken is cooking, begin to prepare the pizza sauce. Combine the cumin, paprika and garam masala in a small bowl. In a separate small bowl, combine the tomato sauce with 2 Tablespoons of yogurt and 2 Tablespoons of heavy cream.
  4. Heat a small saucepan and warm/melt the ghee (or butter). Sauté the garlic and jalapeño until aromatic. Pour in the combined spices from step 3 and sauté until fragrant over medium heat, stirring often, for about 1-2 minutes. Remove the jalapeño and discard. (If you prefer it spicier, you may leave in the jalapeño.)
  5. Add in the tomato sauce mixture and stir well to mix. Sprinkle salt to taste and continue to simmer until the sauce thickens, about 2 minutes. Turn off the heat.
  6. To prep the pizzas, lay the naan on foil-covered cookie sheets. Brush lightly with olive oil. Spread the pizza sauce onto the naan “crust,” covering evenly. Sprinkle with about half (erring on the side of less) of the mozzarella cheese. Arrange the chicken, red onions and chopped cilantro on pizza and cover with the remaining cheese.
  7. Reduce the temperature to 425 degrees F and bake the pizzas for 8-10 minutes. Remove the pizza from the oven and garnish with the remaining chopped cilantro.

Adapted from: Raya Malaysia

Notes: Pertaining to fishing the jalapeños out of the spice mixture, I don’t think this is entirely necessary - unless you’re extremely averse to spice. In that case, perhaps leave them out altogether, but if you do use them and want to remove them, it’s okay if you don’t get them all. This task can be somewhat annoying, based on my own experience. I removed about half before I decided we probably wouldn’t mind the jalapeños. Use your own judgment, based on your spice preference.

When I made my pizza sauce, I doubled amounts of tomato sauce, yogurt and cream within the pizza sauce because typically store bought cans of tomato sauce come in 8 oz and the recipe said it made up to 3 pizzas but I planned to make 4. I had quite a lot of sauce leftover after covering the pizzas to our liking, so I think as-is should be sufficient for 4 pizzas, but if you like your pizzas on the saucier side, this may be necessary.


This post contains affiliate links. Full disclosure here.

Filed Under: book review, recipe Tagged With: chicken, contemporary, dinner, fiction, quick read, spicy, young adult

A Wrinkle in Time + Hot Chocolate

September 16, 2017 by Megan 6 Comments

As you would probably expect, I read a lot when I was a kid. I remember reading my first chapter book (Black Beauty) in first grade, leading to a slight obsession with horses that continued into middle school. I have fond memories of my mom reading to my sister and me at night, with books like Stuart Little and The Borrowers that fueled my early interest in writing stories of my own. I also devoured The Baby-Sitters Club series and Nancy Drew novels, though honestly anything I could get my hands on was fair game. However, there were a few key books I’d missed (mostly because I watched the movies and/or didn’t realize they were based on books in the first place) such as The Little Princess, The Secret Garden, Little Women, and The Chronicles of Narnia. I’ve rectified many of those misses in recent years, but A Wrinkle in Time was still outstanding.

For those of you who don’t know, there’s a movie adaptation coming out next year starring Mindy Kaling, Reese Witherspoon and Oprah, which is what really prompted me to pick it up at last. That and the fact that I found out the main character is named Meg. She and her three brothers live at home with their mother, who is a scientist. Their father, also a scientist, is no longer home and (depending on who Meg is talking to, or perhaps it was how I read it) it’s implied that he’s just gone on some sort of scientific mission and will be back eventually, or that he’s dead. Two of her brothers are twins and quite athletic, and Charles, her youngest brother, has a unique way of reading people. It is because of this skill that three mysterious beings named Mrs. Whatsit, Mrs. Who and Mrs. Which come into their home and ultimately take Meg, Charles and their neighbor Calvin on an adventure that will change their lives forever.

Since it’s a children’s book, it didn’t take long to read - I think I read it in an afternoon. It was absolutely entertaining, but because it had quite a lot of science (real or otherwise) and had some really abstract concepts, I found myself wondering, “Is this something kids can really understand?” (If any of my readers who read this as a kid and as an adult can provide some perspective here, that would be helpful.)

I decided to make hot chocolate to go along with this book, because not only is it comforting, but it features prominently in the scene where Mrs. Whatsit first appears, on a dark and stormy night. It was actually quite dark and stormy the night I concocted the hot chocolate myself, so I think it worked out nicely. 🙂

I followed a recipe from Ashlee Marie for the World’s Best Hot Chocolate and thankfully it was very straightforward. (Nothing more frustrating than just wanting something quick and comforting and finding out you don't have the right ingredients or it's a hassle to make.)

First, I combined the cocoa, sugar and salt in a saucepan. Then, I added the water and brought the mixture to a boil. I allowed it to boil for 1 minute, before adding the milk. Then, I continued heating the hot chocolate until it was the temperature we like - not too hot, not too cold. Probably a few more minutes is ideal, at most.

I poured it into our mugs and topped them with whipped cream, which I always like to cool it down and break up the richness of the chocolate. We settled down in the living room while the storm boomed around us and enjoyed!

World’s Best Hot Chocolate

  • Servings: 2-4
  • Time: 10 minutes
  • Print

Ingredients

  • ¼ cup cocoa
  • ½ cup sugar
  • ½ tsp salt
  • ⅓ cup water
  • 4 cup milk
  • 1 tsp vanilla

Directions

  1. In a saucepan, mix the dry ingredients.
  2. Add the water and bring to a boil, keep boiling for one min.
  3. Then add the milk and heat until it's the temperature you like.
  4. Remove from heat. Add the vanilla, stir and serve. Top with marshmallows, whipped cream, or your preference. Enjoy!

From: Ashlee Marie

This post contains affiliate links. Full disclosure here.

Filed Under: book review, recipe Tagged With: 5 ingredients or less, children's, drink, fiction

The Art of Racing in the Rain + Chicken Dog Treats

September 9, 2017 by Megan 1 Comment

Garth Stein’s novel The Art of Racing in the Rain had a lot of promise when it was chosen as our most recent book club selection - it had a cute dog on the cover, it has over four stars on Goodreads, and oh yeah, it’s an international bestseller. Honestly, my biggest concern when I started it was that the dog would die, and after the Lily and the Octopus crying-on-a-plane debacle, I wasn’t sure I could handle that.

From the start, however, it’s quite clear that Enzo the dog (and narrator) may die. As a very old dog with what seems to be hip dysplasia, he is suffering quite a lot in the opening chapter. However, as a highly enlightened animal, Enzo doesn't seem bothered and spends much of the book talking about his ultimate goal of becoming a human through reincarnation upon his death. And, for much of the rest of the novel, he spends his time making comparisons between life and racing that were a bit of a stretch at best and boring distractions from the rest of the story at worst.

For me, honestly, the downfall of this novel was not that the dog was narrating nor that the majority of the characters were unlikeable - including Enzo, who I thought could not have been more pompous and un-doglike if he was a cat - but that it tried way too hard and missed the mark. And while all of us in book club didn’t feel exactly the same way, three of us (including the lovely lady who chose it) absolutely hated it.

It’s an interesting concept, and who doesn’t love a good dog story? But it could have been so much more. It could have felt like a dog and not a philosophy professor was leading us on this journey. It could have been packed with just slightly less drama. I guess I didn’t think the title would be so literal, but I didn’t care for the racing comparisons. Overall, though, it just didn’t feel genuine.

On the plus side, lots of dogs got to enjoy treats because of this novel, and so that brings me lots of happiness. In the novel, Enzo’s owner Denny always gives him some chicken “bedtime treats” at the end of every day, and so I set out to find a chicken treat I could make myself. I found one from Use Real Butter that is extremely homemade, fresh and delicious. I chose to make it more semi-homemade, using both canned chicken and canned sweet potato, which required less prep time.

First, I drained the chicken and popped it into my food processor, pulsing it a few times to break it down into smaller pieces.

Then, I added everything to the bowl of my standing mixer - chicken, sweet potato puree, shredded cheddar cheese, an egg and half of the flour. I used the paddle attachment to combine the ingredients partially before adding the rest of the flour. This is where you’ll need to eyeball it and likely add more flour to get a less sticky consistency. Once the dough comes together, put it on a lightly floured work surface and roll it out to a thickness of about ¼”.

I found this adorable paw-shaped cookie cutter on Amazon, but you can really use any shape you have on-hand.

Once I had 2 cookie sheets full of treats, I put them in the oven to bake. (I ended up covering 3 cookies sheets in total and made somewhere between 175 and 200 treats.) I opted for treats on the chewy side, but I have included the directions from the original recipe below so you can make them crispier if you’d like to.

Once they were cool, I gave some to Beta to taste test. She absolutely approved! In fact, she liked the smell of them so much that she had a hard time holding back while I tried to snap some pictures.

Almost 200 treats is a lot! So I also wrapped them up in little gift bags to give to my coworkers who have dogs and asked them all to take photos of their dogs enjoying them too. Quite a good looking bunch! It seemed the treats got puppy approval all around.

Chicken

  • Servings: 150+
  • Time: 40
  • Print

Ingredients

  • 12.5 oz, or one large can, of canned chicken (Premium Chunk White Chicken Meat), pulsed in a food processor
  • 10 oz (approx.) canned sweet potato purée
  • 1 cup cheddar cheese, shredded
  • 3 cups all-purpose flour (and more as needed, plus extra for rolling out)
  • 1 large egg

Directions

  1. Preheat oven to 350°F. Mix all of the ingredients together until the dough is well blended. The dough should come together without being too sticky. Add more flour as needed (by the ¼ cup) until you achieve a consistency that holds together but isn’t wet. (Additionally, more egg or sweet potato could be added if, for some reason, the dough is too dry.)
  2. Roll the dough out on a lightly floured work surface to 1/4-inch thickness. Cut out shapes and arrange on a foil- or parchment-lined baking sheet. Bake time will depend on size of the treats. For 1-inch diameter treats, start testing doneness after 15 minutes by lightly poking the center of a treat with your finger. For larger treats, allow for more baking time (but keep an eye on it the first time around). Treats should be slightly soft in the middle at which point you can remove them for soft treats. For crunchy treats, shut off the heat and leave the oven door closed. Let the treats dry out in the residual heat, but check to see that they aren’t burning at the edges.
  3. Store soft treats in a sealed container in the refrigerator for up to a week. Store hard treats in an air-tight container for up to a week. If storing for longer, refrigerate or freeze them. Makes 150+ 1-inch treats.

Adapted from: Use Real Butter

Notes: I didn’t do an exact count, but my recipe made well more than I expected. Definitely in the 150-200 range, but probably closer to 200. This will depend most of all on the size of the cookie cutter, but also on how thickly you roll the dough. The large quantity makes this a great recipe to save money and stock up on homemade treats for your own dog, or to give as gifts to other dog owners!


This post contains affiliate links. Full disclosure here.

Filed Under: book review, recipe Tagged With: 5 ingredients or less, animals, baking, book club, chicken, dog treats, fiction, quick read

Goodbye, Vitamin + The Most Dangerous Chocolate Cake in the World

September 5, 2017 by Megan 2 Comments

I finally got around to reading my July Book of the Month selection, a debut novel by Rachel Khong titled Goodbye, Vitamin, and it was such a quick read that it felt like I barely had it open before I was finished. It is both funny and touching, following a year in the life of 30-year-old Ruth as she quits her job and moves back home to spend time with her father who was recently diagnosed with Alzheimer’s.

Khong’s writing style is unassuming, and the results are comical and endearing. Ruth’s struggle isn’t one that I personally relate to, but it felt truthful and hopeful at the same time. When she arrives home just after Christmas, Ruth unhappily discovers that her mom has become afraid of cooking at home, convinced that her husband’s memory loss was caused by not only the packaged ingredients but the pots and pans themselves. After taking some time to get her bearings (and get over the heartbreak of her recently called-off engagement), Ruth throws herself into caretaking and doing whatever she can to help improve her father’s memory.

At one point, Ruth attempts to make a jellyfish-centric meal to help stave off further dementia, and while it’s not a success, it doesn’t stop her culinary adventures. In an email forward, she stumbles across THE MOST DANGEROUS CHOCOLATE CAKE IN THE WORLD, so-named because “from the moment you decide to make it until you sit down to eat is above 5 minutes!” Armed with a mug and a microwave, she makes it one day and sends a picture of the results to her forward-happy friend. I knew I wanted to make it too.

I can’t be sure, but I may have found the exact recipe Khong references in the novel. Both the one in Goodbye, Vitamin and the one I found online from the lovely Ree Drummond require 3 Tablespoons of chocolate chips, and I knew I was on the right track. Though I suppose it’s entirely possible all mug cakes have the same requirement, I was still pretty excited about it.

I actually brought all of the ingredients (and mugs) over to my sister’s house last weekend to try it out. We were belatedly celebrating her birthday together, and I thought chocolate cake was the perfect addition to our already fun-filled Sister Day.

I used a separate bowl to combine all the ingredients before scraping them into each mug, but the recipe calls for them to go straight into the mug, so do whatever you think works best. I wanted to make sure everything was well-combined (no lumps), but on the other hand, I had slightly more cleanup.

First, I mixed my dry ingredients - 3 Tablespoons each of all-purpose flour and sugar, 2 Tablespoons of cocoa powder, ¼ teaspoon of baking powder and a pinch of salt - using a mini whisk. Then, I added the wet ingredients - 3 Tablespoons each of milk and vegetable oil followed by a splash of vanilla. I made sure those were well-combined before adding 3 Tablespoons of chocolate chips.

I poured the mixture into one of the waiting mugs and put it in the microwave for 90 seconds. As Ruth remarked in the novel, “they look[ed] like beautiful souffles fresh out of the microwave.” I made 3 all together, one for each of us (my brother-in-law included), and after snapping some pictures while they cooled for a few minutes, we dug in.

They were delicious, and yes, absolutely dangerous. We finished them in a hurry!

I’m not normally a huge chocolate cake fan, but this wasn’t too decadent nor too much. It would go great with a scoop of ice cream, and it’s super easy to make for just the 2 of us - no tempting leftovers! Also, if you’re craving some chocolate in the summer, there’s no need to heat up the whole house with the oven.

The Most Dangerous Chocolate Cake in the World

  • Servings: 1
  • Time: 5 minutes
  • Print

Ingredients

  • 3 Tablespoons all-purpose flour
  • 3 Tablespoons sugar
  • 2 Tablespoons cocoa powder
  • ¼ teaspoon baking powder
  • Pinch of salt
  • 3 Tablespoons milk
  • 3 Tablespoons vegetable oil
  • Splash of vanilla extract
  • 3 Tablespoons chocolate chips

Directions

  1. Put the flour, sugar, cocoa powder, baking powder and salt in a 12-ounce microwave-safe ceramic mug. Blend thoroughly with a fork or small whisk. Add the milk, vegetable oil and vanilla and blend until smooth. Stir in the chocolate chips.
  2. Microwave on high for 90 seconds. Do not overcook or the cake will be dry. Let cool for 2 to 3 minutes before eating.

From: Ree Drummond, The Pioneer Woman

If you like your cake a little less rich, feel free to reduce the chocolate chips to 2 Tablespoons instead.


This post contains affiliate links. Full disclosure here.

Filed Under: book review, recipe Tagged With: book of the month, contemporary, dessert, fiction, quick read

The Other Einstein + Serbian Hamburgers

August 31, 2017 by Megan 1 Comment

As the saying goes, beside every great man, there is a great woman. In many cases, those relationships are public and well-documented, as in the case of the Roosevelts. In the case of Albert Einstein, however, the life and accomplishments of his first wife Mileva are not widely known. A physicist and likely genius in her own right, her contributions to Albert’s theories has been debated in the physics world for decades. Marie Benedict’s novel The Other Einstein explores the life of this extraordinary woman a bit further.

Like the author before she dove into research, I hadn’t heard of this “other” Einstein before and I was intrigued when I learned about this novel last fall. The novel follows Mileva (or “Mitza”) from her time as the only female physics student at a Zurich university, where she meets Albert Einstein. Though she and Albert share dreams of living a bohemian life together of intellect and discovery, he doesn’t stand by her when his vision of success seems clearer without her.

As a feminist, the part of the novel I found the most particularly compelling was the meeting between Mitza and Madame Curie, where the differences between their husbands and situations could not be more clear. It is amazing how much can be accomplished by women when their husbands are not only supportive but treat them as true equals.

Mitza and her family were of Serbian descent and many new-to-me foods were mentioned through the novel. The one I bookmarked to make for today’s post was the pljeskavica, which when I looked it up later, was revealed to be a large hamburger. I found a few recipes, and though I borrowed from a few of them for inspiration, the one I most closely followed was from The Spruce.

First, I combined all of my ingredients to make the patties. I opted to use 1 pound each of ground beef and ground pork, but you can use a combination of beef, pork and lamb if you’d like (see recipe notes). To the meat, I added minced garlic, finely chopped onions, salt and paprika. I let the mixture sit in the refrigerator for a while before forming the patties.

I used a salad plate lined with parchment paper as my guide for sizing, using the paper to prevent the patties sticking to the plate or each other.

I grilled the burgers outside, approximately 7 minutes per side.

While they grilled, I prepared the pita bread by cutting it open partway to reveal the pocket. I also sliced some fresh tomato and lightly grilled some onions, being careful to not let them lose too much of their shape. Other serving suggestions include green onions, pickles and Kajmak cheese.

I slotted each cooked hamburger into a pita pocket and topped with my veggies and a dollop of quick homemade Kajmak.

Serbian Hamburger (Pljeskavica)

  • Servings: 4
  • Time: 30 minutes
  • Print

Ingredients

  • 1 pound ground beef chuck
  • ½ pound lean ground pork
  • ½ pound lean ground lamb
  • 2 cloves finely chopped garlic
  • ½ cup finely chopped onions
  • 1 ½ teaspoons salt
  • 1 tablespoon sweet or hot paprika

Directions

  1. In a large bowl, mix together ground beef, ground pork, ground lamb, garlic, onions, salt and sweet or hot paprika until thoroughly combined. Do not overmix because this will toughen the meat.
  2. Refrigerate meat mixture for several hours for the flavors to meld and for the mixture to firm.
  3. Heat a grill, indoor grill, broiler or skillet. Using slightly dampened hands, divide meat mixture into 6 portions. Form into thin patties, 9 inches by 1/2 inch or about the size of a small dinner plate.
  4. Cook pljeskavice about 7 minutes per side.
  5. Serve with green onions or chopped raw onion, tomatoes, ajvar, lepinje or pogacha bread and Serbian potato salad or cole slaw on the side. Some Serbs place the patty on a large bun like an American hamburger.

From: The Spruce

Note: Other recipes I read used the same amount of meat to make 4 patties, and so I ended up making just 4. This also kept the patties approximately as large as recommended - I used salad plates as my guide and did the best I could to get them that size.

If you can’t find ground lamb or don’t want to use it, I used a mixture of ground beef and ground pork, 1 pound each. The other recipes I found used only beef and pork as well.

Lastly, other recipes recommended using pita bread in place of lepinje, which is what I did. Though it made it slightly hard to photograph, I think it worked better than a traditional American bun would’ve given the size of the burger. The pita helped hold in all the toppings and didn’t fill us up too much with bread - the burger filled us up enough!


This post contains affiliate links. Full disclosure here.

Filed Under: book review, recipe Tagged With: dinner, fiction, historical fiction, lunch, meat

Pachinko + Kimchi

August 26, 2017 by Megan Leave a Comment

Pachinko, for those of you who don’t know (and I didn’t until I read Min Jin Lee’s novel of the same name), is a Japanese game of chance, a combination of pinball and a slot machine. Like the game it’s named for, Lee spins an epic tale that goes up and down, away and back again, all as the Korean family we follow move to Japan and either suffer or thrive there. The novel starts with the parents of our strong central female character Sunja and spans over seventy years and several generations.

I liked Pachinko, but despite being well-written, it wasn’t a particularly enjoyable read. Lee really put her characters through the ringer, and the suffering they experienced left me feeling very defeated. It was an interesting perspective on an immigration story - one we aren’t often exposed to here in the United States but one that didn’t leave me with much hope either.

It was a book we chose for our August book club, and I’ll admit I put it on the list because I already owned it (checking off that TBR!) and because I wanted to make and eat sushi. It turned out that while sushi did show up a couple of times in the novel, kimchi is what really made an impression. Sunja and her sister-in-law used their skills in the kitchen to make kimchi when times were tough, supporting their family the only way they could.

Kimchi, which is made of fermented vegetables - usually cabbage, requires about a minimum of a week to make. So, it was about two weeks ago that I set to work. I found a recipe that didn’t seem too intimidating and stopped by the trusty 168 Asian Mart (you may remember from my dumpling-making adventures) to gather all of the Korean-specific ingredients, such as salted shrimp and red pepper powder.

I chopped my cabbage into roughly 2-inch pieces, put them in a large bowl and sprinkled them with a generous amount of salt (half a cup), tossing the leaves to make sure they were well-coated. Then, I covered the cabbage with water - I ended up using about 15 cups - and covered the entire bowl with plastic wrap. I let it sit for about a day.

Then, I placed the cabbage in a colander, rinsed it and squeezed it out. While that sat, I combined all of the other ingredients in a large bowl - radish cut into matchsticks, scallions cut into 1-inch pieces, what seemed like a ton of Korean red pepper powder, fish sauce, minced ginger and garlic, Korean salted shrimp and a little bit of sugar.

Once it was well-combined, I added the cabbage and tossed it until it was well-coated and pretty red too. Then, I stuffed everything into my large glass jar and sealed it. I snapped a quick picture before I left it in the dark, cool basement for another full day.

Then, I opened the lid and allowed the gases to escape - the product of our fermentation process was quite pungent. I’d recommend doing this with the windows open, or in a very well-ventilated room. After about a half an hour, I sealed it back up and placed it in the fridge. The jar hung out in the fridge for about 10 days, until yesterday, when I opened it up to attempt to make kimchi fried rice.

You can use kimchi for a lot of different things, but the one I thought I might enjoy the most was kimchi fried rice. (Disclaimer: I’m not a huge kimchi fan to begin with.) Luckily, I was already familiar with fried rice from my Boston Girl blog entry earlier this year.

I ended up tweaking the recipe I found a little bit, but I loved the idea of serving it with an egg on top, so I had Scott fry some up while I put the finishing touches on the rice. The whole meal turned out really well - the kimchi added a little bit of an extra kick to the fried rice, and I liked it much more than I expected to! Now, we just have to figure out how to use the rest of the kimchi 🙂 Any suggestions, fellow foodies?

Basic Napa Cabbage Kimchi

  • Servings: 1½ quarts
  • Time: 25 minutes, plus about 4 days inactive soaking/fermenting time (up to one week)
  • Print

Ingredients

  • 1 (2-pound) napa cabbage
  • ½ cup kosher salt
  • about 12 cups cold water, plus more as needed
  • 8 ounces daikon radish, peeled and cut into 2-inch matchsticks
  • 4 medium scallions, ends trimmed, cut into 1-inch pieces (use all parts)
  • ⅓ cup Korean red pepper powder
  • ¼ cup fish sauce
  • ¼ cup peeled and minced fresh ginger (from about a 2-ounce piece)
  • 1 Tablespoon minced garlic cloves (from 6 to 8 medium cloves)
  • 2 teaspoons Korean salted shrimp, minced
  • 1½ teaspoons granulated sugar

Directions

  1. Cut the cabbage in half lengthwise, then crosswise into 2-inch pieces, discarding the root end. Place in a large bowl, sprinkle with the salt, and toss with your hands until the cabbage is coated. Add enough cold water to just cover (about 12 cups), making sure the cabbage is submerged (it’s OK if a few leaves break the surface). Cover with plastic wrap or a baking sheet and let sit at room temperature at least 12 hours and up to 24 hours.
  2. Place a colander in the sink, drain the cabbage, and rinse with cold water. Gently squeeze out the excess liquid and transfer to a medium bowl; set aside.
  3. Place the remaining ingredients in a large bowl and stir to combine. Add the cabbage and toss with your hands until evenly combined and the cabbage is thoroughly coated with the mixture.
  4. Pack the mixture tightly into a clean 2-quart or 2-liter glass jar with a tight-fitting lid and seal the jar. Let sit in a cool, dark place for 24 hours (the mixture may bubble). Open the jar to let the gases escape, then reseal and refrigerate at least 48 hours before eating. (Kimchi is best after fermenting about 1 week). Refrigerate for up to 1 month.

From: Chowhound

I used the kimchi to make Kimchi Fried Rice (from Rasa Malaysia), though it can be served as a side or in a variety of dishes.


This post contains affiliate links. Full disclosure here.

Filed Under: book review, recipe Tagged With: contemporary, cultural, drama, fiction, long read, side dish, spicy, veggies

  • « Go to Previous Page
  • Go to page 1
  • Interim pages omitted …
  • Go to page 20
  • Go to page 21
  • Go to page 22
  • Go to page 23
  • Go to page 24
  • Interim pages omitted …
  • Go to page 30
  • Go to Next Page »

Primary Sidebar

About

The Hungry Bookworm brings together literature and food. Megan has an insatiable appetite for both.

As C.S. Lewis said, “Eating and reading are two pleasures that combine admirably.” Enjoy!

  • Bloglovin
  • Facebook
  • Instagram
  • Pinterest

Subscribe

Don't miss out on bookish content, exclusive giveaways, and of course, book club-friendly recipes. Get notified of new posts via email.

Join 2879 subscribers.

Search for Ingredients, Recipes, or Books

Recent Posts

  • Subscriber Box Review: Literati Book Club - Roxane Gay's Audacious Book Club
  • Arsenic and Adobo + Ensaymada
  • Review of The Kindred Spirits Supper Club
  • Kids Edition: Sometimes I Like to Curl Up in a Ball + "Dirt" Pudding Cups
  • The Midnight Library + Broccoli and Ricotta Toast

Goodreads

Tags

5 ingredients or less appetizer baking book club book list book of the month books about food bread breakfast brunch chicken contemporary cookies cultural dessert dinner dinner party dystopia easy prep favorites fiction fruit historical fiction holiday ice cream linkup lunch meat memoir mini review nonfiction pasta quick read reading challenge science fiction seafood show us your books side dish snack soup TBR list thriller top ten tuesday vegetarian veggies

Archives

Other Great Book Blogs

Literary Quicksand
Never Enough Novels
Death by Tsundoku
Professional Reader 25 Book Reviews
Privacy & Cookies: This site uses cookies. By continuing to use this website, you agree to their use.
To find out more, including how to control cookies, see here: Cookie Policy

Footer Widget Header

Megan’s Instagram

Copyright © 2025 · Hungry Bookworm