• Skip to primary navigation
  • Skip to main content
  • Skip to primary sidebar
  • Home
  • Reviews
    • Book Index
    • Fiction
    • Non-Fiction
    • Top Ten Tuesdays
The Hungry Bookworm

The Hungry Bookworm

reading + eating

  • Recipes
    • Drinks
    • Snacks, Sides & Apps
    • Main Dishes
    • Desserts
    • 5 Ingredients or Less
  • About
    • Meet Megan
    • How I Rate
    • Review Policy
    • Contact

recipe

The Heart's Invisible Furies + Custard Slice

October 5, 2017 by Megan 4 Comments

Generally, I do enjoy most of what I read. Sometimes I don’t, but luckily, sometimes the opposite is true and I love a book so much that I can’t shut up about it. John Boyne’s The Heart’s Invisible Furies is one such book. Readers, my second 5-star book of the year is here, and I couldn’t be more excited to share it with you!

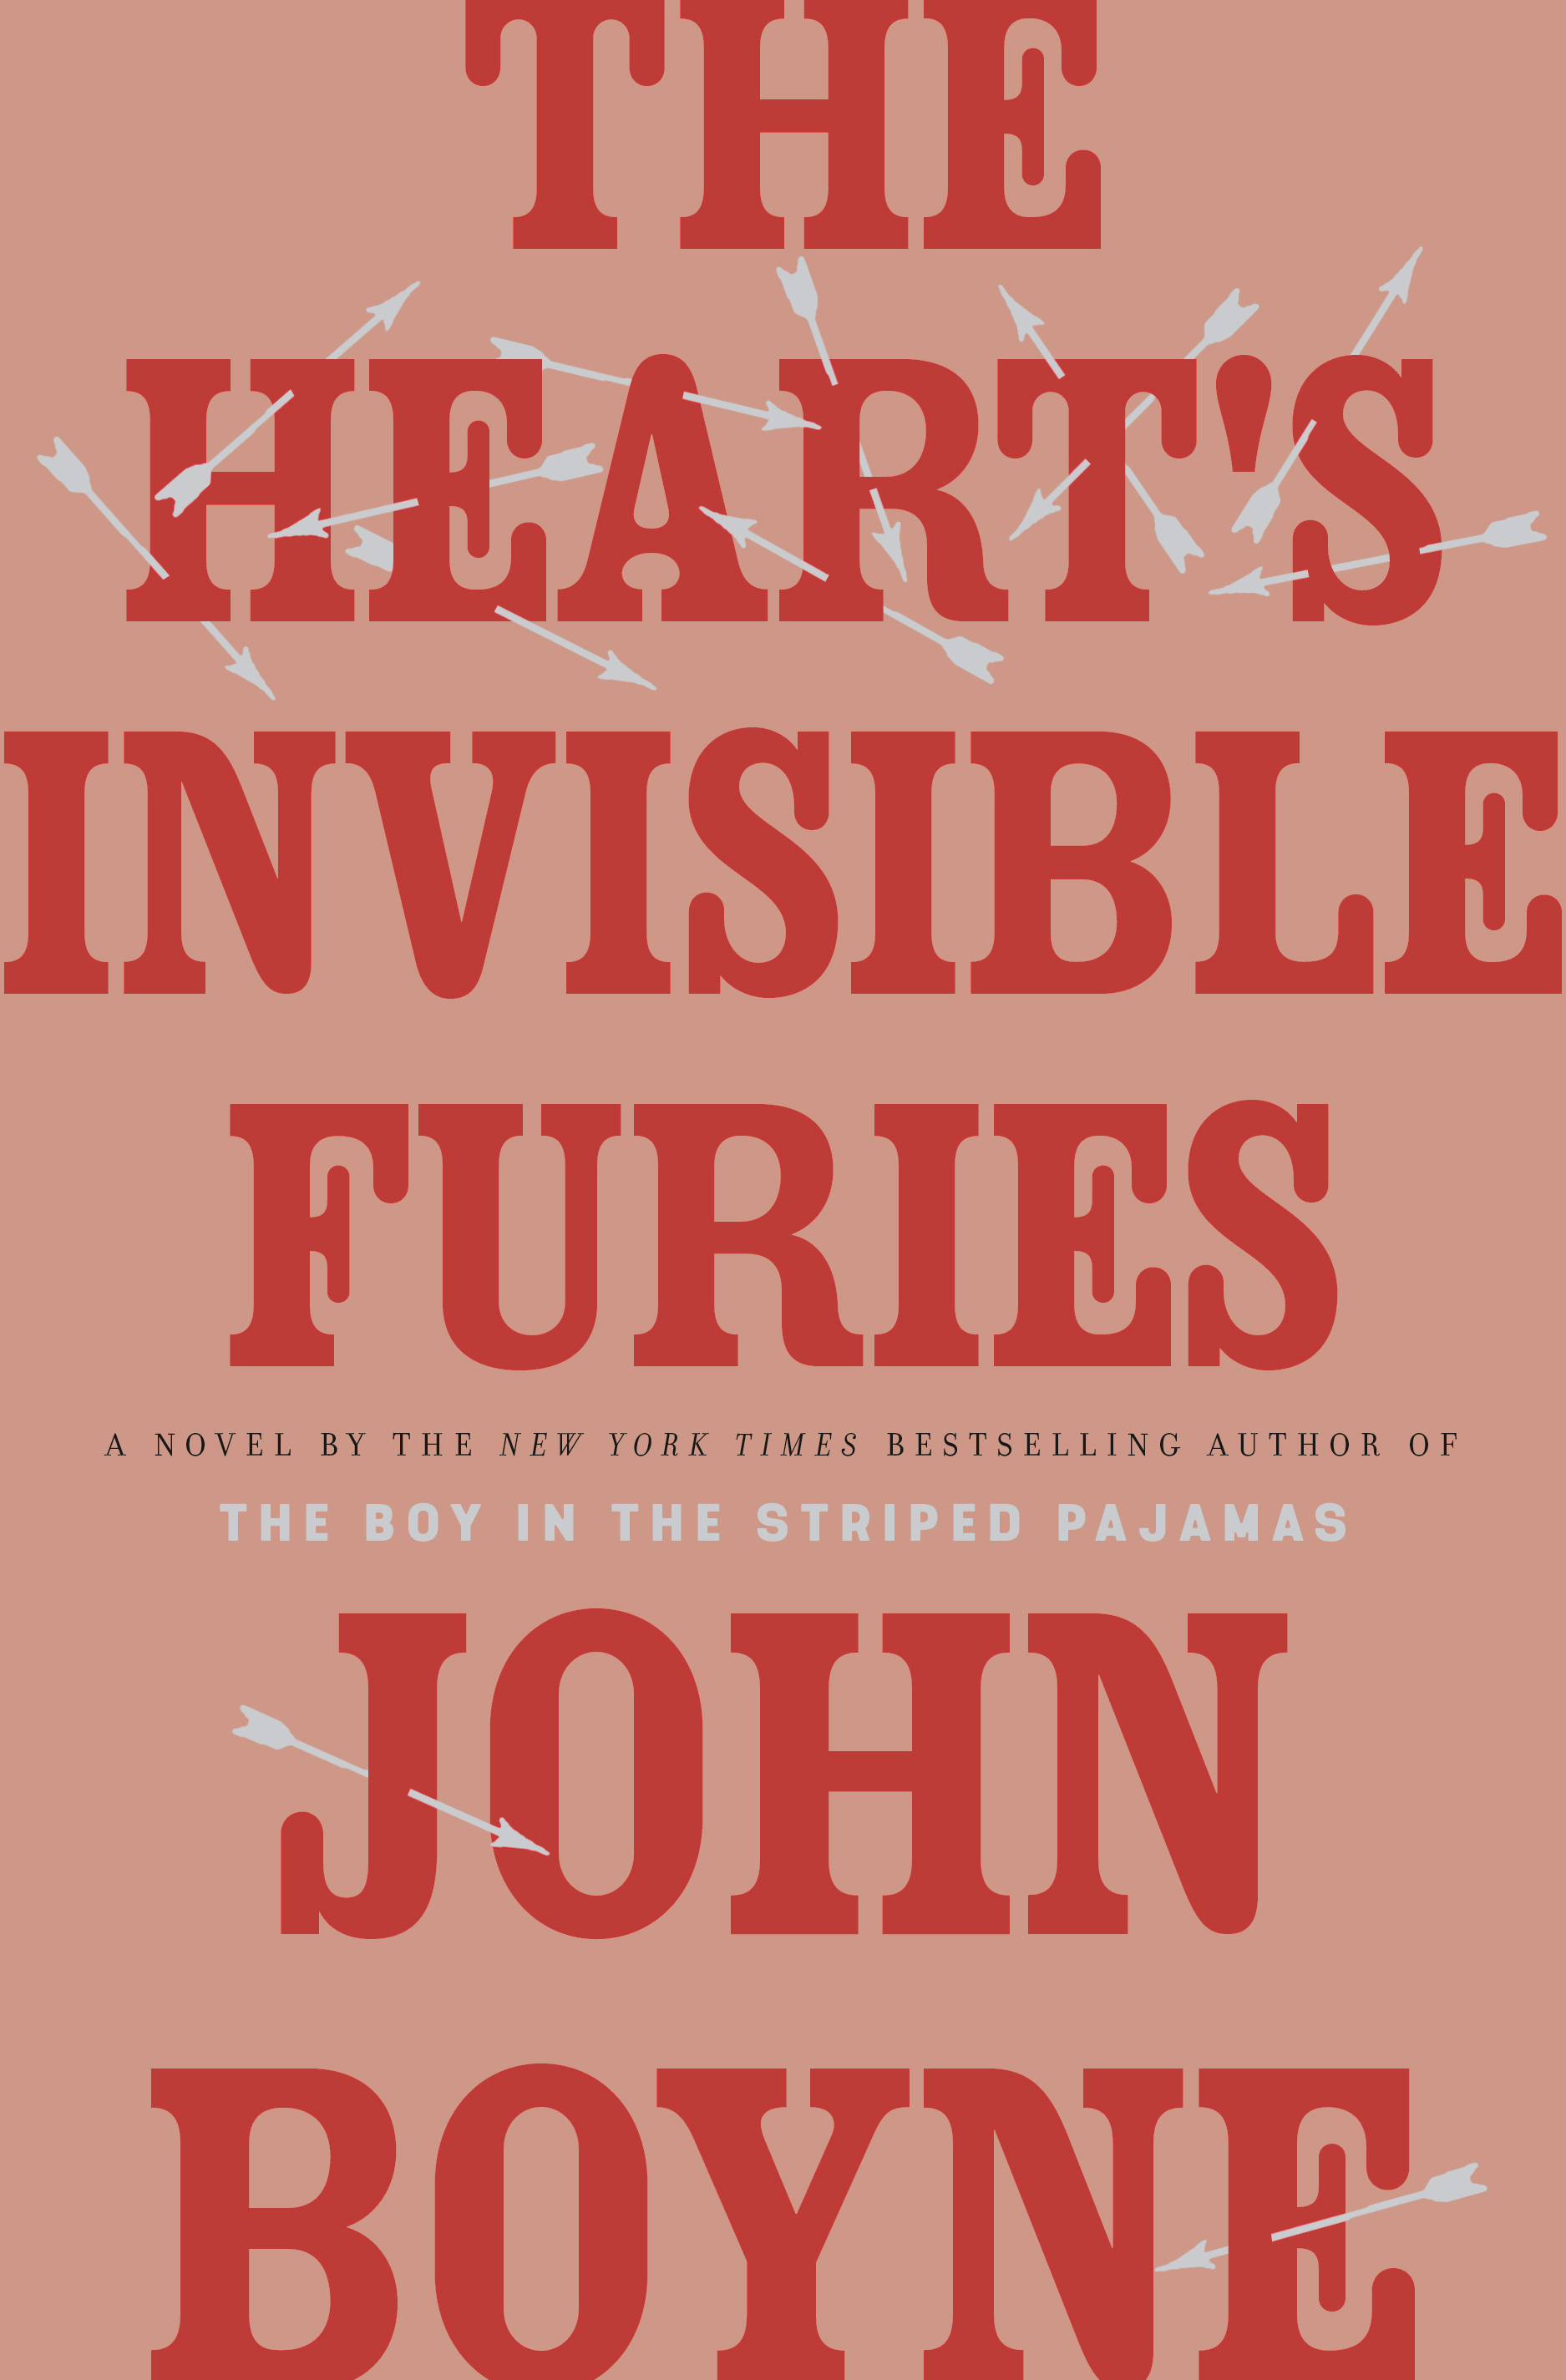
I first heard about this book on my new favorite podcast, All the Books. (Thank you, Liberty Hardy! You’re always full of excellent recommendations.) So, when I saw it in my August BOTM selections, I knew I had to select it. When it showed up in the mail, I was surprised at its heft - it’s nearly 600 pages - and set it aside for nearly enough, thinking I didn’t have time to get into a difficult, long book. I waited a couple of weeks, but when I finally picked it up, I was captivated in just the first few pages and by the end of the first chapter, I was hooked.

The novel follows Cyril Avery beginning when he is still an unborn child in his mother’s womb in a small town in 1940s Ireland. When she is cast out by a cruel priest, she finds herself in Dublin, where she must make it on her own. Her circumstances almost require her to put Cyril up for adoption, and he is taken by a hunchbacked Redemptionist nun to the home of Maude and Charles Avery, an eccentric couple who aren’t exactly cut out for parenthood. From there, Cyril’s life takes both heartwarming and heart-wrenching turns, bringing us to modern day Ireland in truly spectacular and unforgettable fashion.

This book may be 592 pages, but I couldn’t put it down. I finished it in a weekend and have been talking about it ever since. Furies is filled with complex and varied characters, all memorable in their own way. As entertaining as this novel was - it absolutely had it’s laugh out loud moments - I should probably mention that, like my last 5-star favorite, it tackles some sensitive topics and was hard to read in parts. But to me, that is the beauty of Boyne’s novel; he expertly captured all the nuances of humanity, from the mundanely everyday to unexpected tragedy in a captivating way.

Finding a recipe to pair with such a sweeping saga wasn’t as hard as I expected it to be. Several key scenes throughout take place in a parliamentary tea shop where “cream slice” seems to be a popular menu item. After doing some research, I found it’s also known as custard slice. I was able to find a recipe from RTE, or the Raidió Teilifís Éireann in Ireland, which is a real television station where Cyril finds himself working at one point in the novel.

The recipe has quite a lot of steps, but the ingredients list is small and it’s not really that complicated, so don’t let the long recipe below fool you. It’s totally doable.

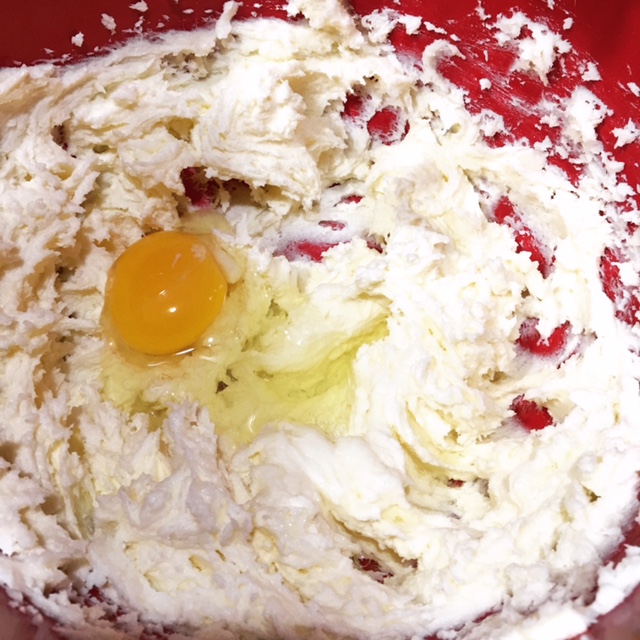
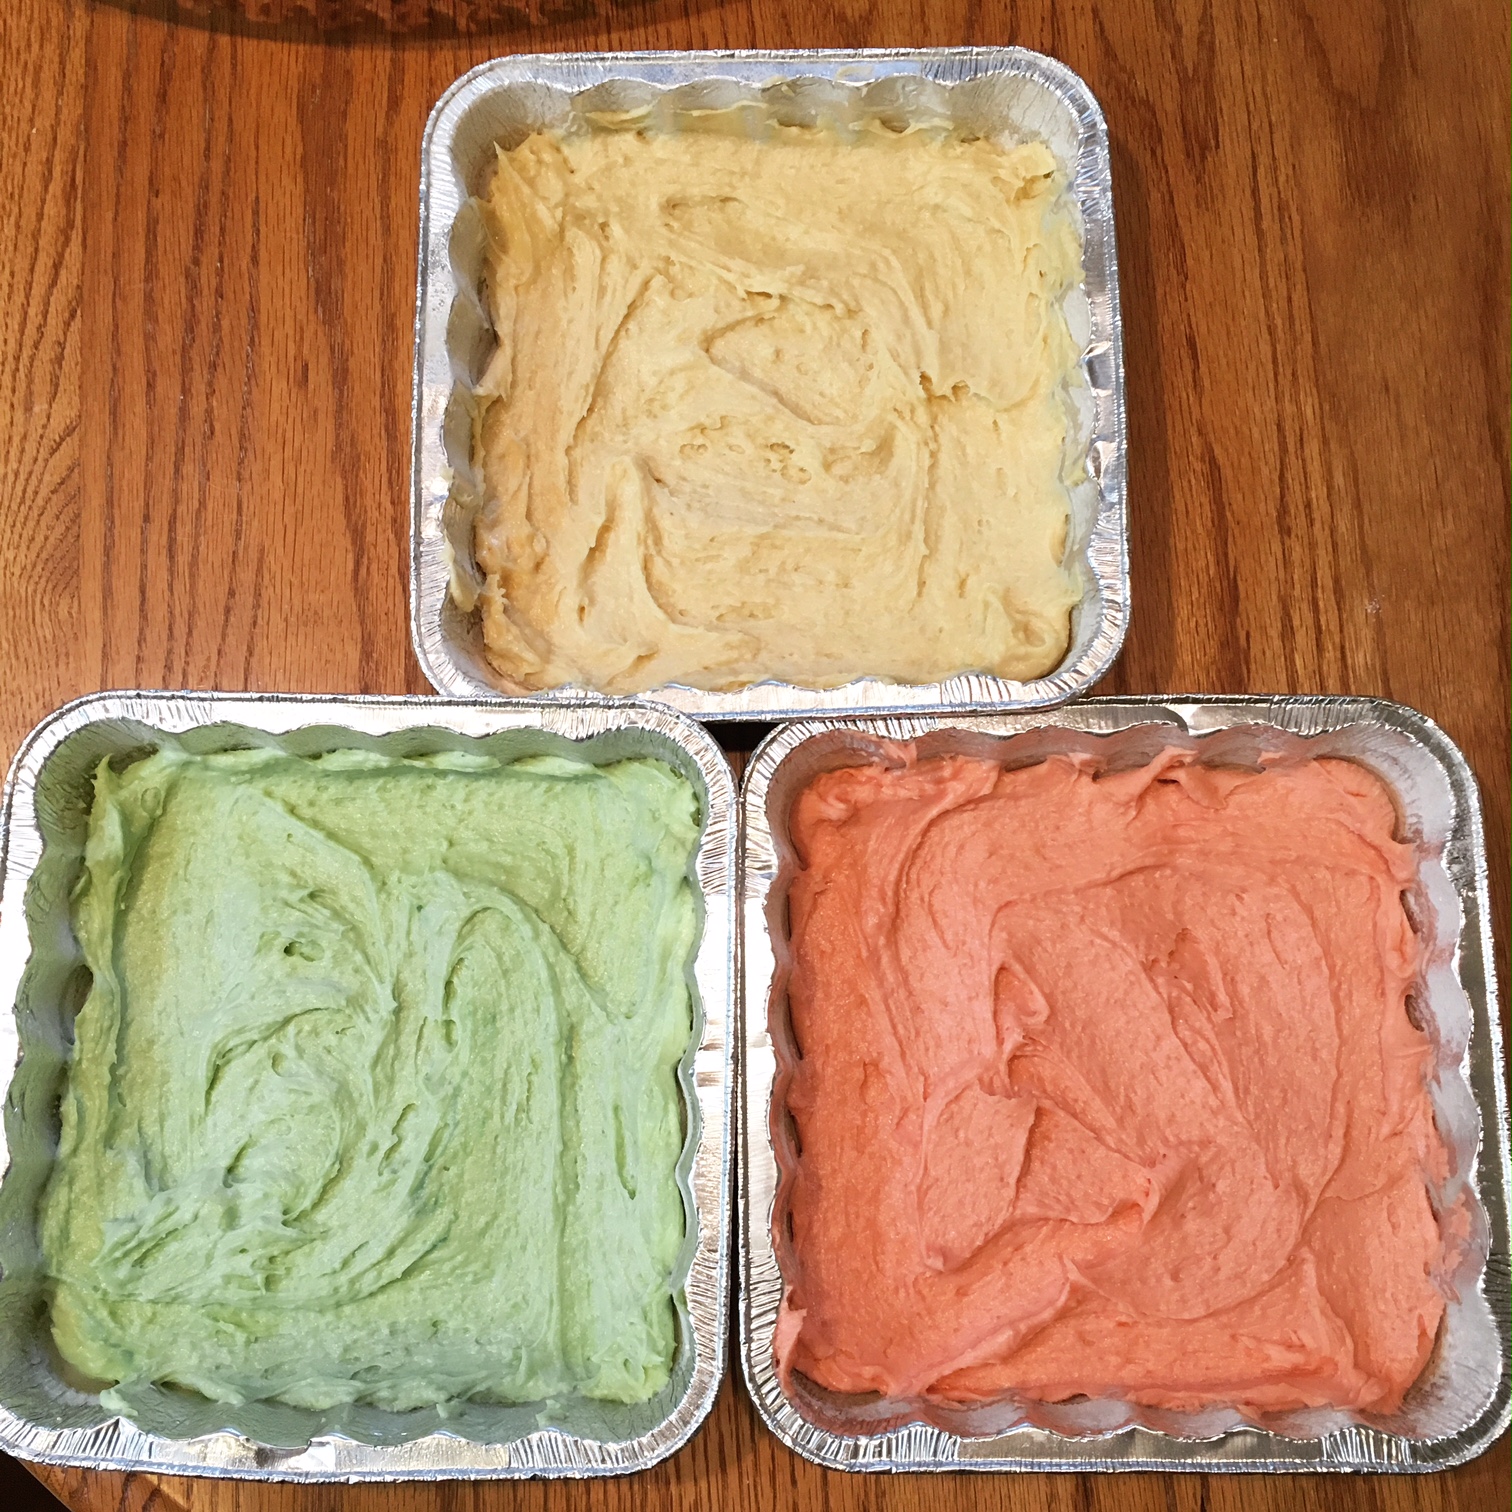
To start, I set out my frozen puff pastry sheets to thaw while I made my pastry cream. I poured the milk into a saucepan, added a vanilla pod split down the middle and let it come to a boil. In the meantime, I combined the sugar, egg yolks and cornstarch with a mixer, beating for a few minutes until it became pale and light.

Once the milk began boiling, I removed it from the heat and slowly added it to the egg mixture, whisking all the while. I added it back to the saucepan, bringing it up to a slow boil over low heat, stirring continuously. After several minutes, it thickened, so I removed it from the heat and added it to a wide bowl to cool more quickly. I covered it with cling wrap and placed it in the fridge.  

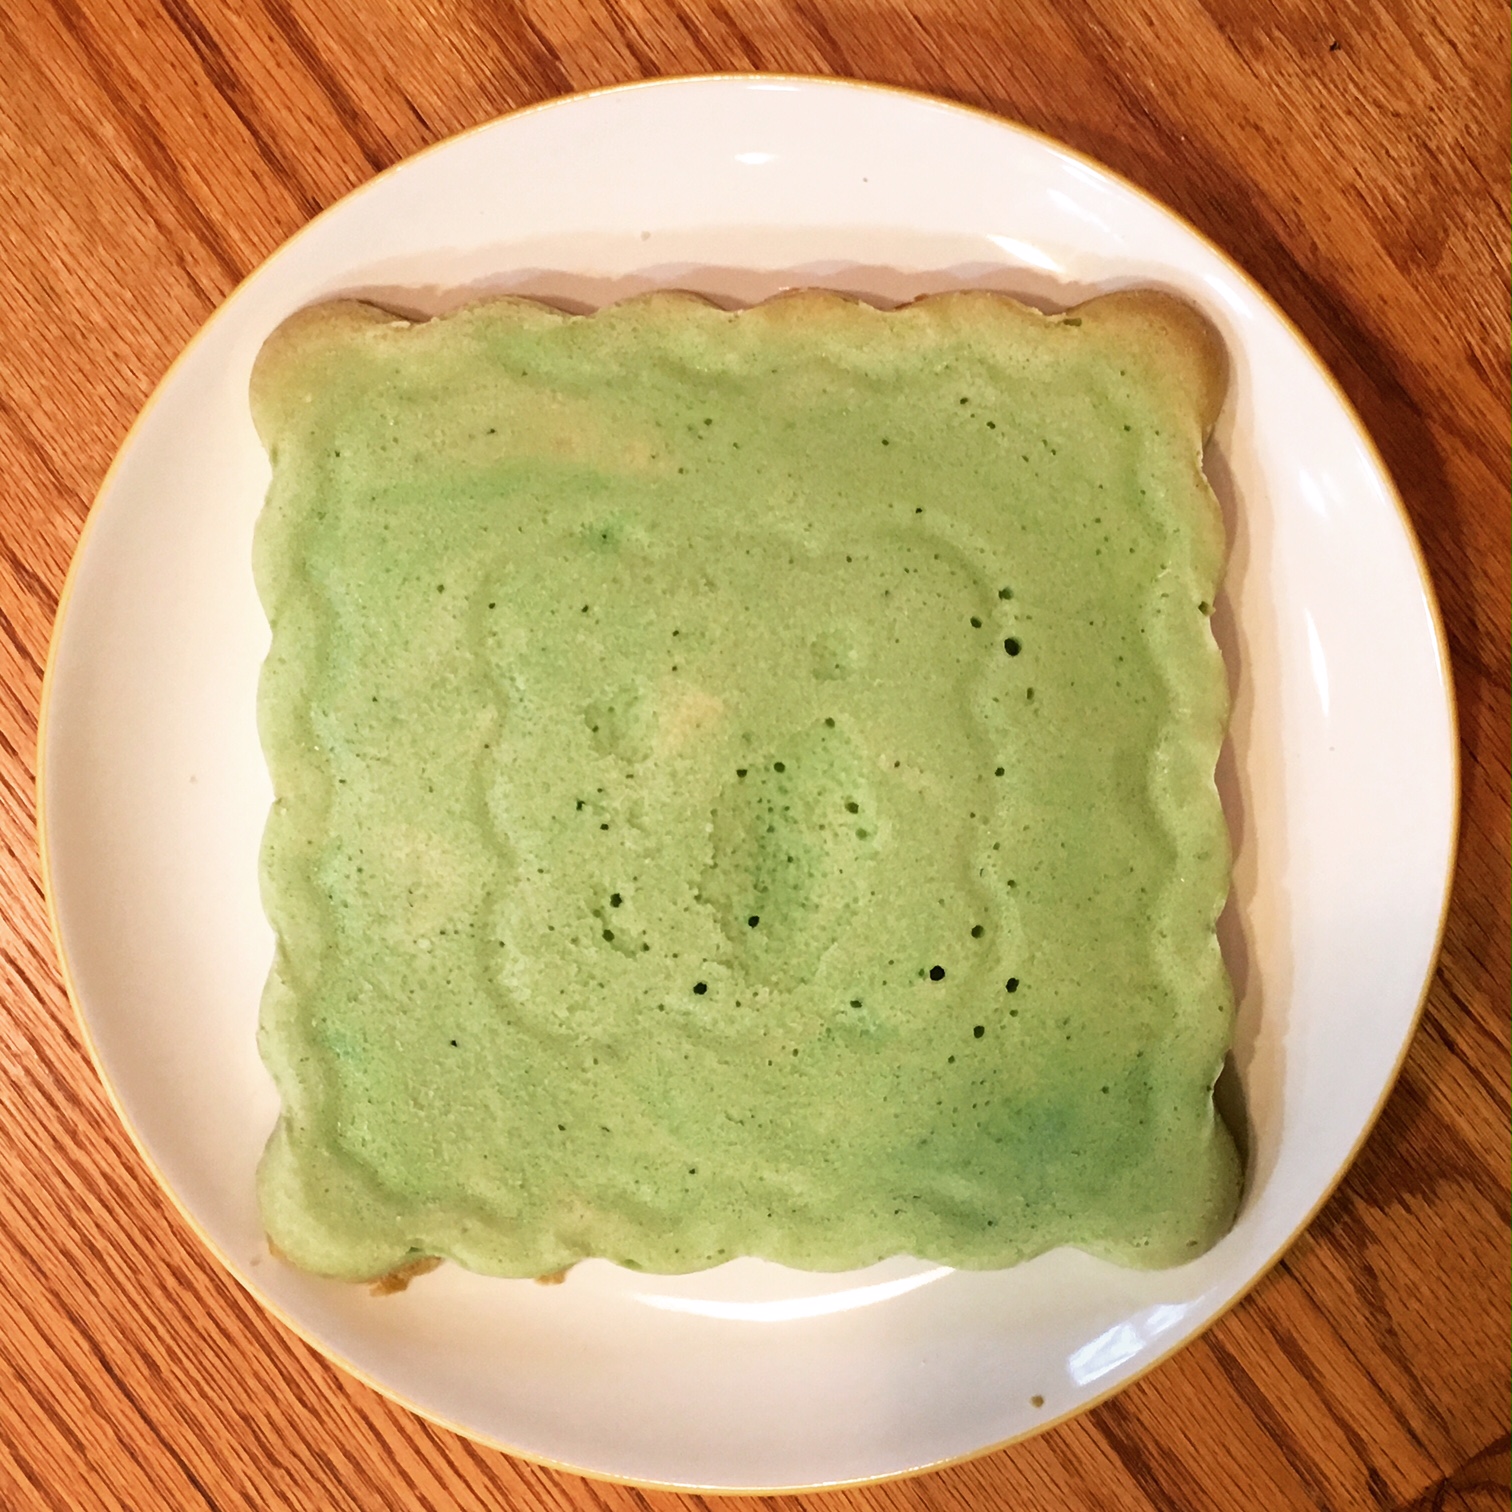
Once the puff pastry dough was thawed (able to be unfolded), I used a sharp knife to cut it down to an 8x8 square. (I don’t think this is entirely necessary, if you have a 9x9 pan, which I found I did after the fact. I’ve explained further in the recipe notes below.) Then, on two parchment-lined baking sheets, I baked them for about 10 minutes each, until they were lightly golden.

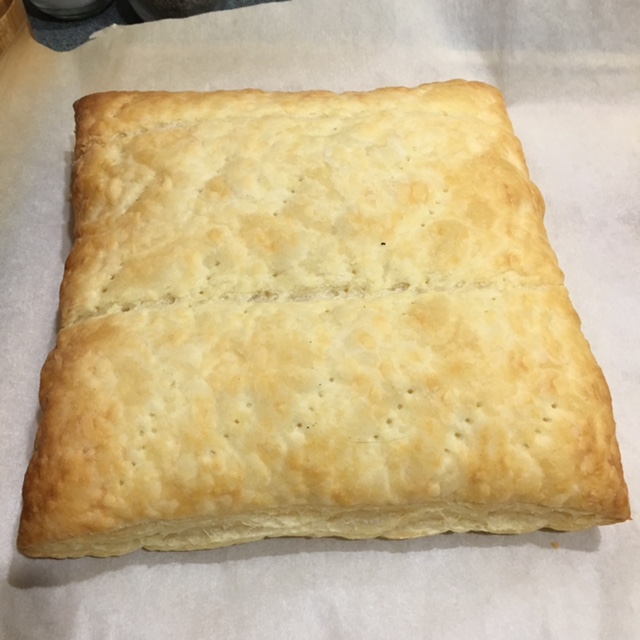
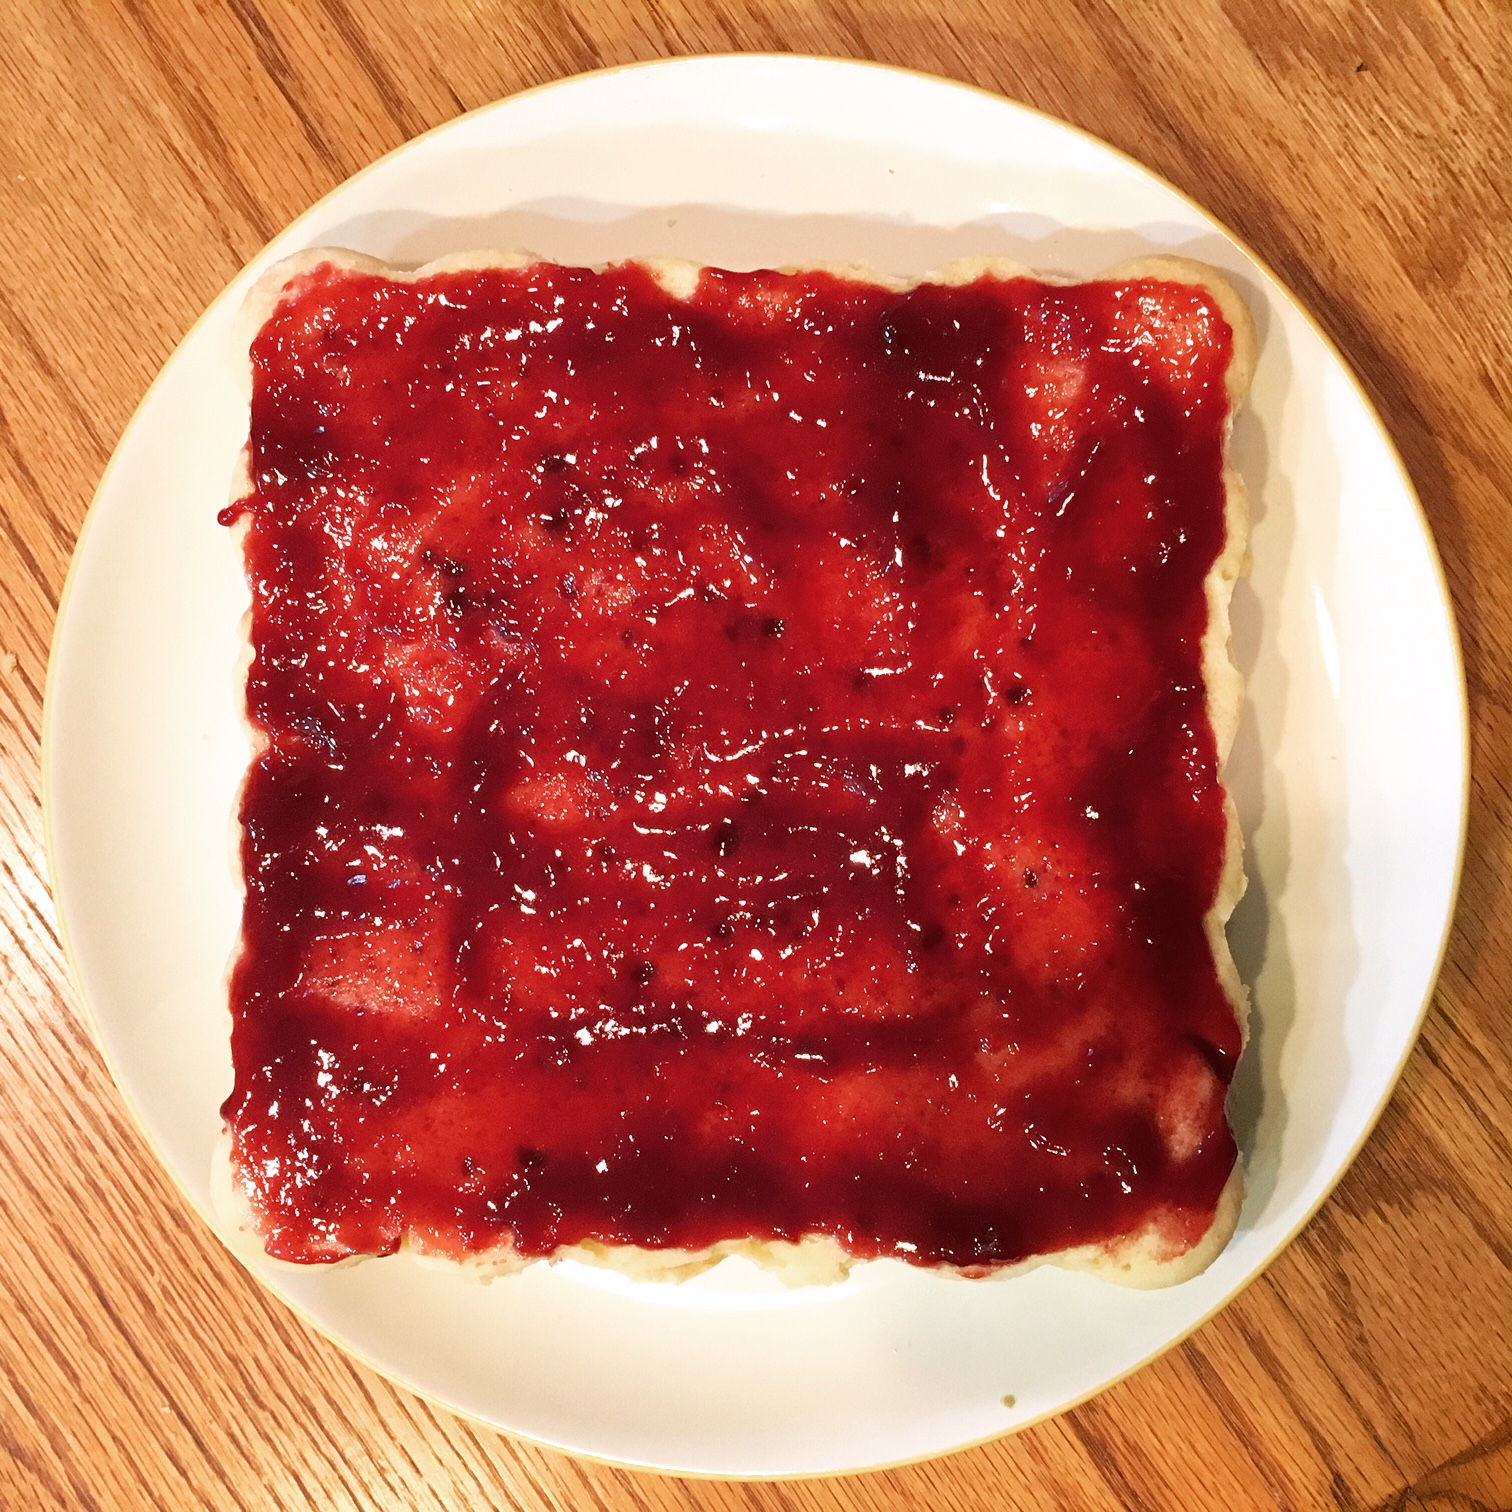
After they cooled, I placed one pastry in the bottom of my pan, which was lined with foil. Per the directions, I made sure to leave extra foil hanging out of the pan so the completed custard slice could be removed more easily later; this is definitely a big help. Then, I smoothed the cooled pastry cream over the bottom layer of puff pastry and placed the prettier looking pastry sheet on top. The assembled dessert went back into the fridge to set while I made the topping.

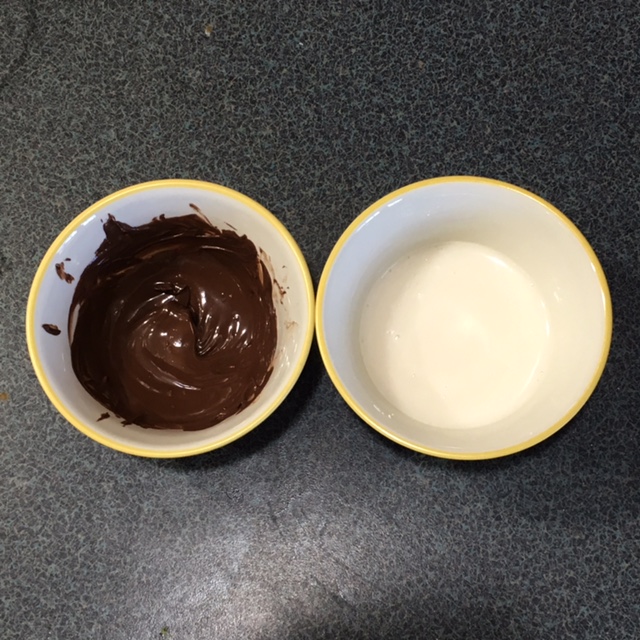
I combined powdered sugar with a small amount of cold water to create a drizzle-able icing. I also melted some dark chocolate (you could also use milk chocolate if you prefer) in a small bowl in the microwave, until it was thin enough to drizzle with a spoon.

First, I drizzled the icing diagonally across the top of the pastry. Then, turning the pastry 90 degrees, I drizzled the melted chocolate to create a criss-cross pattern with the icing.

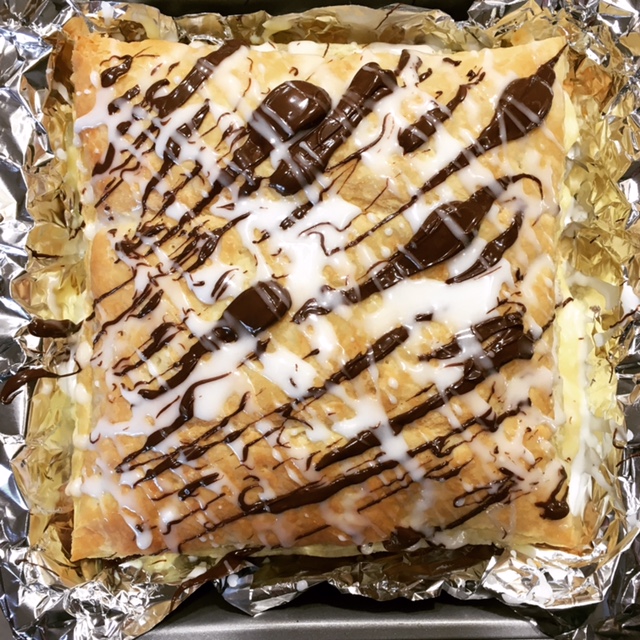
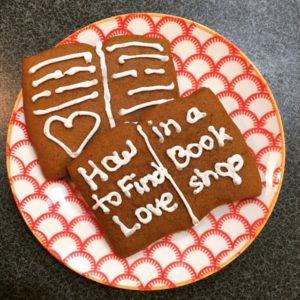
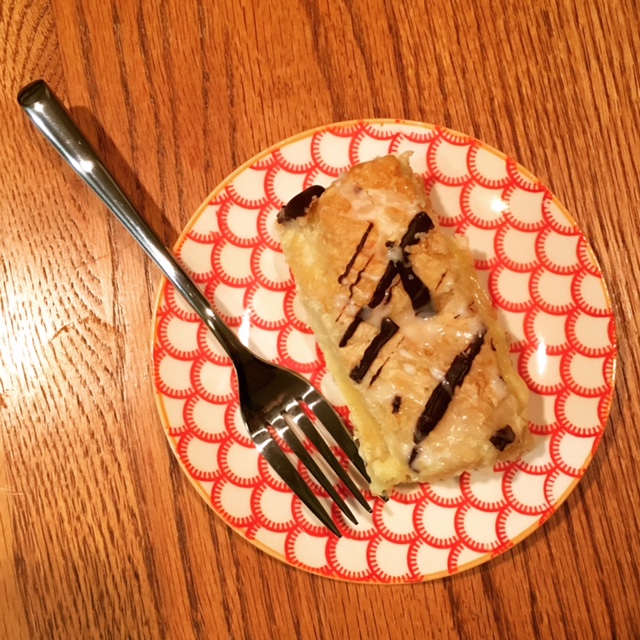
I covered the completed custard slice and put it back in the fridge to set until we were ready to give it a try. Later that evening, I cut it into 8 rectangular slices and served as our dessert. We found it to be sort of messy to eat, and I would recommend using a fork and a knife, but it certainly was tasty. If you decide to give it a go, I hope you enjoy!

Have you read John Boyne’s novel yet? What did you think?

Vanilla Custard Slice

  • Servings: 8
  • Time: 45 minutes
  • Print

Ingredients

  • 2 sheets frozen puff pastry
  • 13 fl oz whole milk
  • 1 vanilla pod, split down the middle or 1 tsp vanilla extract
  • 6 Tablespoons (3 ounces) granulated sugar
  • 3 egg yolks
  • 3 Tablespoons cornstarch
  • pinch of salt
  • 2 Tablespoons, or 1 ounce, or unsalted butter, cut into small cubes
  • ¼ cup powdered sugar
  • ¼ cup melting chocolate or chocolate chips

Directions

  1. Make the crème pâtissière to begin: Pour the milk into a saucepan and add the split vanilla pod, if using. (If using the vanilla extract, add it in with the butter at the end.) Bring the milk mixture to the boil, then remove from the heat.
  2. Whisk the sugar, egg yolks and cornstarch together in a large bowl for about 2–3 minutes using a hand-held electric mixer until pale and light.
  3. Pour the hot milk onto the egg mixture, whisking continuously, and then return the mixture to the saucepan. Cook the mixture over a low heat, stirring continuously, until the mixture becomes thick. It should just come to a boil. If it boils unevenly or too quickly, it may become lumpy, in which case use a whisk to mix until smooth again.
  4. Remove the custard from the heat and pour into a bowl (push the mixture through a sieve if there are any lumps). Add the pinch of salt and the butter (and vanilla extract if using) and stir until melted and thoroughly combined.
  5. Leave to cool, cover with cling wrap and chill before using.
  6. Preheat the oven to 425 degrees F. Line two baking trays with parchment paper.
  7. If using frozen puff pastry sheets, these should already be approximately 9x9. If you have a 9x9 pan available, you can use as-is. If you only have (or prefer to use) an 8x8 pan, cut the puff pastry sheets so they will fit the smaller pan. Cut approximately 1 inch off two of the sides, forming an 8x8 square.
  8. Place each pastry sheet onto the lined baking trays, prick each piece a few times with a fork and chill for 10-15 minutes. Then, bake the pastry sheets for 10-15 minutes or until golden brown and crisp. Set aside to cool.
  9. While the pastry bakes, line your baking pan with foil, allowing plenty of extra foil at the sides to allow you to lift out the assembled slices. If you don't have a square tin, it's not the end of the world, just use the foil to make a base and sides.
  10. Place one pastry sheet in the bottom of the lined tin (reserve the prettiest piece for the top). Spread the crème pâtissière evenly onto the pastry in the baking tray before placing the other piece of pastry on top. Refrigerate while making the icing.
  11. For the icing, sift the icing sugar into a bowl. Stir in 3-4 teaspoons cold water – just enough to give you a thick, drizzling consistency – and set aside.
  12. Place the chocolate in a bowl sitting over a saucepan with a few centimetres of water. Bring the water up to the boil, then take off the heat and allow the chocolate to melt slowly. (Another option would be to heat in the microwave at defrost or 30% power in 30 minute increments, stirring until it becomes melted enough to drizzle. If using melting chocolate, follow directions on the bag.)
  13. Take the custard slice from the fridge to decorate. First, using a spoon, drizzle the icing diagonally across the pastry. Turn the pan 90-degrees and, using a different spoon, drizzle the chocolate across the pastry forming lines that criss-cross the icing lines. Repeat with icing and chocolate as desired/until you run out.
  14. Place the slice back into the fridge to set. Later, cut the finished custard slice into 8 pieces. Using the foil, carefully lift the portioned vanilla slices out of the tray and serve.

Adapted from: Rachel Allen, via RTE

Notes: This recipe was adapted for the US from a recipe created in Ireland. Measurements were converted when necessary to accommodate American cooks.


This post contains affiliate links. Full disclosure here.

Filed Under: book review, recipe Tagged With: baking, book of the month, contemporary, dessert, drama, historical fiction, tough topics

How to Find Love in a Bookshop + Gingerbread Books

September 30, 2017 by Megan Leave a Comment

I think fall may be officially here (weather-wise), and I’m pretty excited about it. Fall is the best time of year for baking and soups and comfy sweaters and cozy books. Bring it on! Veronica Henry’s How to Find Love in a Bookshop is one such cozy book, and as chance would have it, an excellent conduit for baking as well.

From the description, Nightingale Books is an idyllic bookshop - one I definitely wouldn’t mind spending a few hours in! Set up in the Cotswolds by Julius Nightingale and now passed on to his daughter Emilia, it’s a charming little store, one that is everything to the townspeople. As the story unfolds, we discover more about Julius, Emilia, the employees of the bookstore, the local chef, the lady of the manor, and so many more.

It really is as if we’re welcomed into the town alongside them. In its entirety, it reminded me a bit of Stars Hollow crossed with Love Actually. The end wraps up quite neatly but that didn’t bother me at all. Quite the opposite, I may have been disappointed if this wonderful story didn’t leave me feeling as cozy at the end as it had throughout.  

A heartwarming novel like this one definitely deserves something welcoming to accompany it, and though the story features a magnificent chef who makes mouthwatering food throughout, the recipe that stuck out to me most was the gingerbread (cookie) books she created near the end. It just felt so perfect to create cookie books to go along with a novel about a bookshop.

I’m not the best decorator, so the descriptions of the beautiful, intricately detailed cookies made me a bit nervous, but I decided to push along anyway. I found a recipe for soft gingerbread cookies from Bless This Mess, ordered a couple of adorable book-shaped cookie cutters - an open book and a stack of books - and got to work.

To start, I put my softened butter in a large bowl and creamed it, adding the sugar gradually. Then, I added an egg, the molasses and white vinegar, beating until well-blended.

I used a mesh colander to sift the dry ingredients into the wet ingredients. Because the one I have only holds about 1 cup, first I did 2 cups of flour, followed by all of the spices, salt and baking powder, and then the remainder of the flour.

Once the cookie dough was well-blended, I wrapped it in plastic wrap and allowed it to chill in the fridge for about 45 minutes. (Note: I ended up needing an additional cup of flour because my dough was too sticky to properly roll and cut out. I realized this after refrigeration and several attempts to roll it and cut it. I then added the additional cup of flour, allowed it to chill again.)

Since I prefer my gingerbread cookies soft, I followed the suggestion from the original recipe and kept the dough approximately ¼” thick when I rolled it out. Using my adorable book-shaped cookie cutters, I ended up making just under 30 cookies. The amount of cookies you get will depend on the size of your cutters. Mine were about 3-4 inches.

I baked each batch for about 11 minutes, allowed them to cool, and set to decorating. After a few practice cookies, which Scott was only too happy to help taste-test, I decorated some cookies worth photographing. I created a tribute to this week’s book, and of course, one for the blog. 🙂

Soft Gingerbread Cookies

  • Servings: approx. 2 dozen (3-4 inch cookies)
  • Time: 50 minutes
  • Print

Ingredients

  • 1 cup butter, at room temperature
  • 1 cup sugar
  • 1 egg
  • 1 cup dark molasses
  • 2 Tablespoons white vinegar
  • 5 cups flour
  • 1½ teaspoons baking soda
  • ½ teaspoon salt
  • 2 teaspoons ground ginger
  • 1 teaspoon ground cinnamon
  • 1 teaspoon ground cloves

Directions

  1. Cream butter, adding sugar gradually. Beat until well combined and light and fluffy, about 3 minutes.
  2. Beat in egg, molasses, and vinegar.
  3. Sift all of the dry ingredients together and then blend sifted dry ingredients into the wet ingredients.
  4. Divide the dough into two even pieces, wrap each piece of dough in plastic wrap, and refrigerate for 30 to 90 minutes.
  5. When the dough is done chilling, preheat oven to 350 degrees. Working in sections, roll the dough 1/2″ thick on a floured surface; cut into desired shapes. Place shapes on a baking sheet lined with parchment paper or a baking mat.
  6. Bake at 350 degrees for 10-12 minutes. Let the cookies cool on the pan for 5 minutes and then move to a cooling rack.
  7. Repeat with remaining dough. Decorate cooled cookies with royal or buttercream icing, or eat them as they are.

From: Bless This Mess

Notes: If you like your gingerbread on the crispy side, roll it 1/4″ thick and bake for 11-12 minutes. If you like it nice and soft (though still very sturdy), roll the dough 1/2″ thick and bake for 10 minutes. If you play around with the thickness of the dough and the baking time, you’ll discover a cookie that meets your liking.


This post contains affiliate links. Full disclosure here.

Filed Under: book review, recipe Tagged With: baking, books about books, chick lit, cookies, dessert, fiction, quick read

The Summer of Impossible Things + Italian Rainbow Cookies

September 22, 2017 by Megan 1 Comment

Imagine my surprise when a few months ago, I came across another Hungry Bookworm blog since that’s my blog’s name! We bloggers introduced ourselves and I found out that she’s based in England, and where my blog was named to evoke a combination of food and books, hers was named after the beloved children’s book The Hungry Caterpillar. We decided to try our hand at a collaboration, reviewing the same book and posting our own thoughts. If you'd like to check out her post on this novel, go here. (If anyone’s visiting from Julie’s blog, welcome!)

I chose our first title, opting for a British book I had heard amazing things about: The Summer of Impossible Things by Rowan Coleman. It wasn’t easy to find over here in the states for free (fair warning, readers), but since it wasn’t in the library and I really wanted to give it a try, I bit the bullet and bought it from Amazon, which did have a few copies available. As you all know, I don’t usually buy books before knowing I like them, but I’m glad I took a chance on this one!

This book is along the lines of other “realistic time travel” love stories, as I call them - books like The Time Traveler’s Wife and movies like the lovely About Time - though it’s not exactly a traditional love story. If you’ve seen the movie Frequency, it’s more akin to that. Coleman’s novel is about a daughter’s seemingly impossible quest to save her mother - with a will and power she didn’t even realize she had.

I found this book to be very immersive, and though it’s a concept I’ve seen (and loved) in many other stories, I thought it was accomplished in its own unique way. I didn’t expect the love story that develops, but I quite enjoyed it. And not to give it away too much, but it was the inspiration behind the recipe I chose to make - at some point in 1977, our main character Luna stumbles into someone who works in (and I think eventually owns) an Italian bakery.

Though they’re not mentioned in the book, when I think of Italian pastries, I often think of the popular tri-color, or rainbow cookies, and their pop of color reminded me of the seventies. Instead of finding a recipe online, like I often do, I turned to a good friend (and fellow food lover), who graciously shared their family recipe with me. These cookies intimidated me, but I was assured they were very easy. My friend makes them every Christmas, and he’s right, I had no reason to be nervous about them.

First, I began with the almond paste and sugar, crumbling them together in the food processor. This recipe was the perfect opportunity to use some almond paste that I’d made myself, primarily because I couldn’t find it in the store when I looked for a previous recipe, but I’m told it’s not that hard to find. (Perhaps I was looking in the wrong spot, but if you have the same problem, it is quite easy to make; recipe link below.)

Then, I transferred my almond paste and sugar mixture to a bowl and beat in the softened butter (2 sticks). I also beat in the eggs, 1 at a time, making sure it was well-blended before I stirred in the flour. It was time to color the batter, so I split my batter into 3 different bowls and, using food coloring, colored one of the bowls pink and one of the bowls green. The third bowl remained uncolored.

I spread each batter evenly in its own pan before popping into a preheated 350 degree F oven for about 11 minutes.

While the layers baked, I made the chocolate glaze by heating semi-sweet chocolate and heavy cream in the microwave. I then set it aside to cool. I also heated the raspberry jam (my preferred flavor, but you can use apricot instead) in a small saucepan until it was smooth and spreadable.

I turned each layer out onto the cooling rack, and once it had cooled a bit and was no longer warm to the touch - about 10 to 15 minutes - I began assembling the final cookie. Green layer goes on the bottom.

I spread about half of the jam (I heated approximately a cup) on top of the green, added the white layer, pressed gently, and spread the rest of the jam on top of that.

Then, I added the final layer - the pink layer, pressed gently and topped with the chocolate glaze.

This does need to sit for about 30 more minutes, to make sure the glaze sets before slicing it into pieces, so I had to be patient. Once cooled, first order of business is to trim the edges and then they can be sliced, resulting in these little cookies as my final product.

Mine turned out a bit thicker than I remember them being when I had eaten them in the past. They’re still delicious, but more than a mouthful’s worth of cookie - mine are better eaten with a fork, like a tiny cake. (Please see my notes below on pan size.) These are a quite cakelike cookie, and more delicious than I recall as well, so they’re definitely worth a try. Thank you so much to my friend, for sharing their recipe with me and the blog! I hope our novel’s Italian bakery owner would be proud. 🙂

Tri-Color Cookies (Italian Rainbow Cookies)

  • Servings: 50-72 cookies
  • Time: about an hour
  • Print

Ingredients

  • 1 cup sugar
  • 1 can/tube (8 oz) almond paste*
  • 1 cup butter (no substitutions), softened
  • 4 large eggs
  • 2 cups flour
  • 6 drops red food color
  • 4 drops green food color
  • For assembly and the glaze:

  • ⅓ cup heavy cream
  • 3 oz. semi-sweet baking chocolate, chopped
  • Apricot or raspberry jam (seedless)

Directions

  1. Lightly coat three 8x8** pans foil baking pans with vegetable cooking spray and dust with flour.
  2. In a food processor, pulse the sugar and almond paste until the almond paste is crumbled and broken into small pieces. Transfer the mixture to a large bowl.
  3. Beat in butter, scraping the bowl with a rubber spatula, until smooth. Beat in eggs, 1 at a time, blending well after each addition. Stir in flour.
  4. Divide batter evenly into 3 bowls. Tint 1 bowl of batter pink (food color amounts above are a guide and can be adjusted as needed to achieve correct color) and tint 1 bowl of batter light green. The last bowl will remain uncolored.
  5. Evenly spread each type of batter onto its own prepared pan. Bake for approximately 11 minutes, or until the top springs back when gently pressed with finger. Allow each pan to cool slightly before inverting onto a cooling rack.
  6. Meanwhile, make the glaze. Microwave the heavy cream and chocolate in a small bowl on high for 1 minutes. Stir until smooth. Let cool until slightly thickened, about 30 minutes.
  7. Heat the jam in a small saucepan on the stove, until it’s no longer gloopy.
  8. Once the layers have cooled for about 10-15 minutes, place green layer on a plate or serving tray. Brush the top with half of the heated jam. Top with the white layer and gently press. Brush remaining jam over the white layer and top with the pink layer, press gently.
  9. Spread cooled glaze over the top of the layered cookie. Let stand for at least 30 minutes so the glaze can set.
  10. With a serrated knife, trim the edges. Cut crosswise into six 2-inch wide strips. Cut each strip into 12 slices.
From: A friend’s family recipe

Notes: *If you prefer to make your own almond paste, that’s what I did for a previous recipe. It’s really easy and leftovers can be frozen for up to 3 months. Use this recipe from Taste of Home. **If you are doubling the recipe, use the larger foil pans, 11½ x 16½. However, if you still want to make only a single batch, I would recommend using 9x9 pans instead so the cookies are not quite as thick as mine ended up. 😛

This post contains affiliate links. Full disclosure here.

Filed Under: book review, recipe Tagged With: baking, contemporary, cookies, dessert, fiction

When Dimple Met Rishi + Chicken Tikka Masala Pizza

September 19, 2017 by Megan Leave a Comment

In many ways, Sandhya Menon’s When Dimple Met Rishi follows the same formula as many time-tested and beloved romantic comedies. And, honestly, that’s part of what made it so enjoyable. It is unabashedly a young adult love story, and a clever, funny one at that. Dimple is a future-minded high school graduate, hoping to enroll in a web development program and forget about her mother’s matchmaking for the summer. Rishi is also a future-minded recent graduate, though he’s focused more on meeting and wooing his fated wife before heading off to MIT.

Rishi is traditional where Dimple is modern. He learned Hindi before English, strives to be a good son, and is willing to put his dreams of being a comic book artist aside to do so. Dimple wants to code apps and can’t wait to take a break from her traditional Indian parents to make her own way in the world. Rishi is looking forward to meeting the girl his parents have chosen for him to marry, and Dimple has no idea such an arrangement has been made.

In fact, when they do meet, it doesn’t go exactly as Rishi had planned. He’s a bit overzealous, to say the least. It’s hardly a meet-cute, but it’s hilarious. Somehow, Rishi recovers and gets another chance to make an impression. During their first official “hangout” at a pizza shop, a relationship between Dimple and Rishi doesn’t seem meant to be, but as we all know, some people are born to defy expectations.

In true rom-com fashion, the novel is full of ups and downs and obstacles the young couple must overcome to end up happily ever after. That said, it’s well-done, enjoyable and not as expected as you may think. As a bonus, the entire novel is quite amusing - funnier than I expected. I often found myself laughing out loud (even while Scott slept next to me, oops). I wholeheartedly recommend this to anyone looking for something lighthearted and entertaining. It’s a lovely choice to wrap up the summer.

One other thing I found quite interesting was the fact that A Wrinkle in Time, which Dimple considers one of her favorite childhood stories, played such an integral role within the story. Funnily enough, I had just read A Wrinkle in Time before picking up this book. The constant mentions of Meg and her journey stood out to me a little bit more, and it was cool that I had so recently become familiar with the story myself. Since something like that had never happened to me before, I was excited to share the coincidence. Like Dimple and Rishi, it almost seemed fated that I read them in this order.

To accompany Dimple and Rishi’s story, I decided to make pizza with an Indian spin. I knew I wanted to use naan as a crust (something I’ve done in the past with leftover pieces) and wanted to bring in the flavor of chicken tikka masala. I found a recipe from Raya Malaysia to use as a base.

First, I created the marinade for the chicken, combining a half teaspoon each of ground cumin, cayenne pepper, garam masala and minced fresh ginger; a quarter teaspoon each of salt and black pepper; one Tablespoon of lemon juice; two Tablespoons of plain yogurt; and a pinch of cinnamon. Then, I tossed the chicken in the marinade until it was well-coated, covered the bowl with plastic wrap, and set it in the fridge for about an hour.

It’s a lot of ingredients, yes, but I had all of them at home already. Most of the spices are common, especially if you cook any type of ethnic food with regularity in your home. Hopefully you won't have to buy many to make this marinade, but then again if you do, you'll have everything handy to just make it more often. 🙂

To cook the chicken, I preheated the oven to 450 degrees F. I lined a baking pan with foil and arranged the chicken in a single layer. I allowed it to bake for 6-7 minutes.

While that baked, I made the pizza sauce. First, I mixed cumin, paprika and garam masala in a small bowl. In a separate bowl, I combined the tomato sauce, yogurt and heavy cream.

In a small saucepan, I melted/warmed the ghee and added minced garlic and finely diced jalapeños, sautéing for a few minutes, until aromatic. Then I added my spice mixture and continued to heat for 1-2 minutes, stirring often.

I removed as much of the jalapeño as I could, per the original directions (see my notes with the recipe), before adding the tomato sauce mixture. I added some salt and allowed it to thicken a bit, cooking for about 2 more minutes.

At this point the chicken was finished cooking in the oven, so I took it out and began assembling my pizzas. To start, I brushed each piece of naan lightly with olive oil. Then, using a spoon, I dolloped sauce into the center of each piece of naan, and with a circular motion outward, spread the sauce until each piece was completely covered.

Then, I topped the sauce with a little less than half of the shredded cheese, before adding the chicken, thinly sliced red onion and cilantro. Finally, I added another layer of cheese, using the rest of it.

I baked the pizzas for about 10 minutes each. Since the chicken is already cooked, the pizzas are done when the cheese is melted and the naan is a bit more firm. For garnish, I added the remaining chopped cilantro to each pizza before serving.

These pizzas were absolutely delicious! If you’re a fan of Indian food and a fan of pizza, there’s no reason not to give this a try. It’s easy and so flavorful! This is definitely going down as one of my favorite recipes this year and it will absolutely be making some additional appearances in our kitchen. (I can’t wait!)

Chicken Tikka Masala Pizza

  • Servings: 3-4 personal pizzas
  • Time: 30 minutes
  • Print

Pizza Ingredients

  • 10 oz skinless and boneless (1 large) chicken breast, cut into 1/2-inch cubes and marinated
  • 3 or 4 pieces of naan (traditional or garlic; I used traditional)
  • olive oil for brushing
  • pizza sauce, recipe below
  • ¼ red onion, thinly sliced
  • 1 to 1 ½ cup shredded mozzarella cheese
  • handful of cilantro, chopped (plus some for garnish)

Chicken Marinade Ingredients

  • ½ teaspoon ground cumin
  • ½ teaspoon ground cayenne pepper
  • ½ teaspoon ground garam masala
  • ½ teaspoon minced fresh ginger
  • ¼ teaspoon salt
  • ¼ teaspoon ground black pepper
  • 1 Tablespoon lemon juice
  • 2 Tablespoons plain yogurt
  • pinch of cinnamon

Pizza Sauce Ingredients

  • 2 cloves garlic, minced
  • ½ jalapeño, deseeded and finely diced
  • 1 tablespoon ghee (or butter)
  • salt to taste
  • ½ teaspoon cumin
  • ½ teaspoon paprika
  • ½ teaspoon garam masala
  • 4 oz tomato sauce
  • 2 Tablespoons plain yogurt
  • 2 Tablespoons heavy cream

Directions

  1. In a bowl, cover the chicken with the prepared marinade and allow to marinate for at least an hour in the refrigerator.
  2. Preheat the oven to 450 degrees F and line a baking pan with foil and spread the marinated chicken in a single layer on the pan. Discard the remaining marinade. Bake for 6-7 minutes, turning halfway through if desired.
  3. While the chicken is cooking, begin to prepare the pizza sauce. Combine the cumin, paprika and garam masala in a small bowl. In a separate small bowl, combine the tomato sauce with 2 Tablespoons of yogurt and 2 Tablespoons of heavy cream.
  4. Heat a small saucepan and warm/melt the ghee (or butter). Sauté the garlic and jalapeño until aromatic. Pour in the combined spices from step 3 and sauté until fragrant over medium heat, stirring often, for about 1-2 minutes. Remove the jalapeño and discard. (If you prefer it spicier, you may leave in the jalapeño.)
  5. Add in the tomato sauce mixture and stir well to mix. Sprinkle salt to taste and continue to simmer until the sauce thickens, about 2 minutes. Turn off the heat.
  6. To prep the pizzas, lay the naan on foil-covered cookie sheets. Brush lightly with olive oil. Spread the pizza sauce onto the naan “crust,” covering evenly. Sprinkle with about half (erring on the side of less) of the mozzarella cheese. Arrange the chicken, red onions and chopped cilantro on pizza and cover with the remaining cheese.
  7. Reduce the temperature to 425 degrees F and bake the pizzas for 8-10 minutes. Remove the pizza from the oven and garnish with the remaining chopped cilantro.

Adapted from: Raya Malaysia

Notes: Pertaining to fishing the jalapeños out of the spice mixture, I don’t think this is entirely necessary - unless you’re extremely averse to spice. In that case, perhaps leave them out altogether, but if you do use them and want to remove them, it’s okay if you don’t get them all. This task can be somewhat annoying, based on my own experience. I removed about half before I decided we probably wouldn’t mind the jalapeños. Use your own judgment, based on your spice preference.

When I made my pizza sauce, I doubled amounts of tomato sauce, yogurt and cream within the pizza sauce because typically store bought cans of tomato sauce come in 8 oz and the recipe said it made up to 3 pizzas but I planned to make 4. I had quite a lot of sauce leftover after covering the pizzas to our liking, so I think as-is should be sufficient for 4 pizzas, but if you like your pizzas on the saucier side, this may be necessary.


This post contains affiliate links. Full disclosure here.

Filed Under: book review, recipe Tagged With: chicken, contemporary, dinner, fiction, quick read, spicy, young adult

A Wrinkle in Time + Hot Chocolate

September 16, 2017 by Megan 6 Comments

As you would probably expect, I read a lot when I was a kid. I remember reading my first chapter book (Black Beauty) in first grade, leading to a slight obsession with horses that continued into middle school. I have fond memories of my mom reading to my sister and me at night, with books like Stuart Little and The Borrowers that fueled my early interest in writing stories of my own. I also devoured The Baby-Sitters Club series and Nancy Drew novels, though honestly anything I could get my hands on was fair game. However, there were a few key books I’d missed (mostly because I watched the movies and/or didn’t realize they were based on books in the first place) such as The Little Princess, The Secret Garden, Little Women, and The Chronicles of Narnia. I’ve rectified many of those misses in recent years, but A Wrinkle in Time was still outstanding.

For those of you who don’t know, there’s a movie adaptation coming out next year starring Mindy Kaling, Reese Witherspoon and Oprah, which is what really prompted me to pick it up at last. That and the fact that I found out the main character is named Meg. She and her three brothers live at home with their mother, who is a scientist. Their father, also a scientist, is no longer home and (depending on who Meg is talking to, or perhaps it was how I read it) it’s implied that he’s just gone on some sort of scientific mission and will be back eventually, or that he’s dead. Two of her brothers are twins and quite athletic, and Charles, her youngest brother, has a unique way of reading people. It is because of this skill that three mysterious beings named Mrs. Whatsit, Mrs. Who and Mrs. Which come into their home and ultimately take Meg, Charles and their neighbor Calvin on an adventure that will change their lives forever.

Since it’s a children’s book, it didn’t take long to read - I think I read it in an afternoon. It was absolutely entertaining, but because it had quite a lot of science (real or otherwise) and had some really abstract concepts, I found myself wondering, “Is this something kids can really understand?” (If any of my readers who read this as a kid and as an adult can provide some perspective here, that would be helpful.)

I decided to make hot chocolate to go along with this book, because not only is it comforting, but it features prominently in the scene where Mrs. Whatsit first appears, on a dark and stormy night. It was actually quite dark and stormy the night I concocted the hot chocolate myself, so I think it worked out nicely. 🙂

I followed a recipe from Ashlee Marie for the World’s Best Hot Chocolate and thankfully it was very straightforward. (Nothing more frustrating than just wanting something quick and comforting and finding out you don't have the right ingredients or it's a hassle to make.)

First, I combined the cocoa, sugar and salt in a saucepan. Then, I added the water and brought the mixture to a boil. I allowed it to boil for 1 minute, before adding the milk. Then, I continued heating the hot chocolate until it was the temperature we like - not too hot, not too cold. Probably a few more minutes is ideal, at most.

I poured it into our mugs and topped them with whipped cream, which I always like to cool it down and break up the richness of the chocolate. We settled down in the living room while the storm boomed around us and enjoyed!

World’s Best Hot Chocolate

  • Servings: 2-4
  • Time: 10 minutes
  • Print

Ingredients

  • ¼ cup cocoa
  • ½ cup sugar
  • ½ tsp salt
  • ⅓ cup water
  • 4 cup milk
  • 1 tsp vanilla

Directions

  1. In a saucepan, mix the dry ingredients.
  2. Add the water and bring to a boil, keep boiling for one min.
  3. Then add the milk and heat until it's the temperature you like.
  4. Remove from heat. Add the vanilla, stir and serve. Top with marshmallows, whipped cream, or your preference. Enjoy!

From: Ashlee Marie

This post contains affiliate links. Full disclosure here.

Filed Under: book review, recipe Tagged With: 5 ingredients or less, children's, drink, fiction

The Art of Racing in the Rain + Chicken Dog Treats

September 9, 2017 by Megan 1 Comment

Garth Stein’s novel The Art of Racing in the Rain had a lot of promise when it was chosen as our most recent book club selection - it had a cute dog on the cover, it has over four stars on Goodreads, and oh yeah, it’s an international bestseller. Honestly, my biggest concern when I started it was that the dog would die, and after the Lily and the Octopus crying-on-a-plane debacle, I wasn’t sure I could handle that.

From the start, however, it’s quite clear that Enzo the dog (and narrator) may die. As a very old dog with what seems to be hip dysplasia, he is suffering quite a lot in the opening chapter. However, as a highly enlightened animal, Enzo doesn't seem bothered and spends much of the book talking about his ultimate goal of becoming a human through reincarnation upon his death. And, for much of the rest of the novel, he spends his time making comparisons between life and racing that were a bit of a stretch at best and boring distractions from the rest of the story at worst.

For me, honestly, the downfall of this novel was not that the dog was narrating nor that the majority of the characters were unlikeable - including Enzo, who I thought could not have been more pompous and un-doglike if he was a cat - but that it tried way too hard and missed the mark. And while all of us in book club didn’t feel exactly the same way, three of us (including the lovely lady who chose it) absolutely hated it.

It’s an interesting concept, and who doesn’t love a good dog story? But it could have been so much more. It could have felt like a dog and not a philosophy professor was leading us on this journey. It could have been packed with just slightly less drama. I guess I didn’t think the title would be so literal, but I didn’t care for the racing comparisons. Overall, though, it just didn’t feel genuine.

On the plus side, lots of dogs got to enjoy treats because of this novel, and so that brings me lots of happiness. In the novel, Enzo’s owner Denny always gives him some chicken “bedtime treats” at the end of every day, and so I set out to find a chicken treat I could make myself. I found one from Use Real Butter that is extremely homemade, fresh and delicious. I chose to make it more semi-homemade, using both canned chicken and canned sweet potato, which required less prep time.

First, I drained the chicken and popped it into my food processor, pulsing it a few times to break it down into smaller pieces.

Then, I added everything to the bowl of my standing mixer - chicken, sweet potato puree, shredded cheddar cheese, an egg and half of the flour. I used the paddle attachment to combine the ingredients partially before adding the rest of the flour. This is where you’ll need to eyeball it and likely add more flour to get a less sticky consistency. Once the dough comes together, put it on a lightly floured work surface and roll it out to a thickness of about ¼”.

I found this adorable paw-shaped cookie cutter on Amazon, but you can really use any shape you have on-hand.

Once I had 2 cookie sheets full of treats, I put them in the oven to bake. (I ended up covering 3 cookies sheets in total and made somewhere between 175 and 200 treats.) I opted for treats on the chewy side, but I have included the directions from the original recipe below so you can make them crispier if you’d like to.

Once they were cool, I gave some to Beta to taste test. She absolutely approved! In fact, she liked the smell of them so much that she had a hard time holding back while I tried to snap some pictures.

Almost 200 treats is a lot! So I also wrapped them up in little gift bags to give to my coworkers who have dogs and asked them all to take photos of their dogs enjoying them too. Quite a good looking bunch! It seemed the treats got puppy approval all around.

Chicken

  • Servings: 150+
  • Time: 40
  • Print

Ingredients

  • 12.5 oz, or one large can, of canned chicken (Premium Chunk White Chicken Meat), pulsed in a food processor
  • 10 oz (approx.) canned sweet potato purée
  • 1 cup cheddar cheese, shredded
  • 3 cups all-purpose flour (and more as needed, plus extra for rolling out)
  • 1 large egg

Directions

  1. Preheat oven to 350°F. Mix all of the ingredients together until the dough is well blended. The dough should come together without being too sticky. Add more flour as needed (by the ¼ cup) until you achieve a consistency that holds together but isn’t wet. (Additionally, more egg or sweet potato could be added if, for some reason, the dough is too dry.)
  2. Roll the dough out on a lightly floured work surface to 1/4-inch thickness. Cut out shapes and arrange on a foil- or parchment-lined baking sheet. Bake time will depend on size of the treats. For 1-inch diameter treats, start testing doneness after 15 minutes by lightly poking the center of a treat with your finger. For larger treats, allow for more baking time (but keep an eye on it the first time around). Treats should be slightly soft in the middle at which point you can remove them for soft treats. For crunchy treats, shut off the heat and leave the oven door closed. Let the treats dry out in the residual heat, but check to see that they aren’t burning at the edges.
  3. Store soft treats in a sealed container in the refrigerator for up to a week. Store hard treats in an air-tight container for up to a week. If storing for longer, refrigerate or freeze them. Makes 150+ 1-inch treats.

Adapted from: Use Real Butter

Notes: I didn’t do an exact count, but my recipe made well more than I expected. Definitely in the 150-200 range, but probably closer to 200. This will depend most of all on the size of the cookie cutter, but also on how thickly you roll the dough. The large quantity makes this a great recipe to save money and stock up on homemade treats for your own dog, or to give as gifts to other dog owners!


This post contains affiliate links. Full disclosure here.

Filed Under: book review, recipe Tagged With: 5 ingredients or less, animals, baking, book club, chicken, dog treats, fiction, quick read

  • « Go to Previous Page
  • Go to page 1
  • Interim pages omitted …
  • Go to page 25
  • Go to page 26
  • Go to page 27
  • Go to page 28
  • Go to page 29
  • Interim pages omitted …
  • Go to page 37
  • Go to Next Page »

Primary Sidebar

About

The Hungry Bookworm brings together literature and food. Megan has an insatiable appetite for both.

As C.S. Lewis said, “Eating and reading are two pleasures that combine admirably.” Enjoy!

  • Bloglovin
  • Facebook
  • Instagram
  • Pinterest

Subscribe

Don't miss out on bookish content, exclusive giveaways, and of course, book club-friendly recipes. Get notified of new posts via email.

Join 2879 subscribers.

Search for Ingredients, Recipes, or Books

Recent Posts

  • Subscriber Box Review: Literati Book Club - Roxane Gay's Audacious Book Club
  • Arsenic and Adobo + Ensaymada
  • Review of The Kindred Spirits Supper Club
  • Kids Edition: Sometimes I Like to Curl Up in a Ball + "Dirt" Pudding Cups
  • The Midnight Library + Broccoli and Ricotta Toast

Goodreads

Tags

5 ingredients or less appetizer baking book club book list book of the month books about food bread breakfast brunch chicken contemporary cookies cultural dessert dinner dinner party dystopia easy prep favorites fiction fruit historical fiction holiday ice cream linkup lunch meat memoir mini review nonfiction pasta quick read reading challenge science fiction seafood show us your books side dish snack soup TBR list thriller top ten tuesday vegetarian veggies

Archives

Other Great Book Blogs

Literary Quicksand
Never Enough Novels
Death by Tsundoku
Professional Reader 25 Book Reviews
Privacy & Cookies: This site uses cookies. By continuing to use this website, you agree to their use.
To find out more, including how to control cookies, see here: Cookie Policy

Footer Widget Header

Megan’s Instagram

Copyright © 2025 · Hungry Bookworm