• Skip to primary navigation
  • Skip to main content
  • Skip to primary sidebar
  • Home
  • Reviews
    • Book Index
    • Fiction
    • Non-Fiction
    • Top Ten Tuesdays
The Hungry Bookworm

The Hungry Bookworm

reading + eating

  • Recipes
    • Drinks
    • Snacks, Sides & Apps
    • Main Dishes
    • Desserts
    • 5 Ingredients or Less
  • About
    • Meet Megan
    • How I Rate
    • Review Policy
    • Contact

quick read

The Art of Racing in the Rain + Chicken Dog Treats

September 9, 2017 by Megan 1 Comment

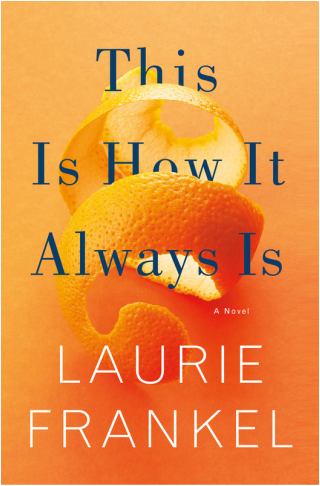
Garth Stein’s novel The Art of Racing in the Rain had a lot of promise when it was chosen as our most recent book club selection - it had a cute dog on the cover, it has over four stars on Goodreads, and oh yeah, it’s an international bestseller. Honestly, my biggest concern when I started it was that the dog would die, and after the Lily and the Octopus crying-on-a-plane debacle, I wasn’t sure I could handle that.

From the start, however, it’s quite clear that Enzo the dog (and narrator) may die. As a very old dog with what seems to be hip dysplasia, he is suffering quite a lot in the opening chapter. However, as a highly enlightened animal, Enzo doesn't seem bothered and spends much of the book talking about his ultimate goal of becoming a human through reincarnation upon his death. And, for much of the rest of the novel, he spends his time making comparisons between life and racing that were a bit of a stretch at best and boring distractions from the rest of the story at worst.

For me, honestly, the downfall of this novel was not that the dog was narrating nor that the majority of the characters were unlikeable - including Enzo, who I thought could not have been more pompous and un-doglike if he was a cat - but that it tried way too hard and missed the mark. And while all of us in book club didn’t feel exactly the same way, three of us (including the lovely lady who chose it) absolutely hated it.

It’s an interesting concept, and who doesn’t love a good dog story? But it could have been so much more. It could have felt like a dog and not a philosophy professor was leading us on this journey. It could have been packed with just slightly less drama. I guess I didn’t think the title would be so literal, but I didn’t care for the racing comparisons. Overall, though, it just didn’t feel genuine.

On the plus side, lots of dogs got to enjoy treats because of this novel, and so that brings me lots of happiness. In the novel, Enzo’s owner Denny always gives him some chicken “bedtime treats” at the end of every day, and so I set out to find a chicken treat I could make myself. I found one from Use Real Butter that is extremely homemade, fresh and delicious. I chose to make it more semi-homemade, using both canned chicken and canned sweet potato, which required less prep time.

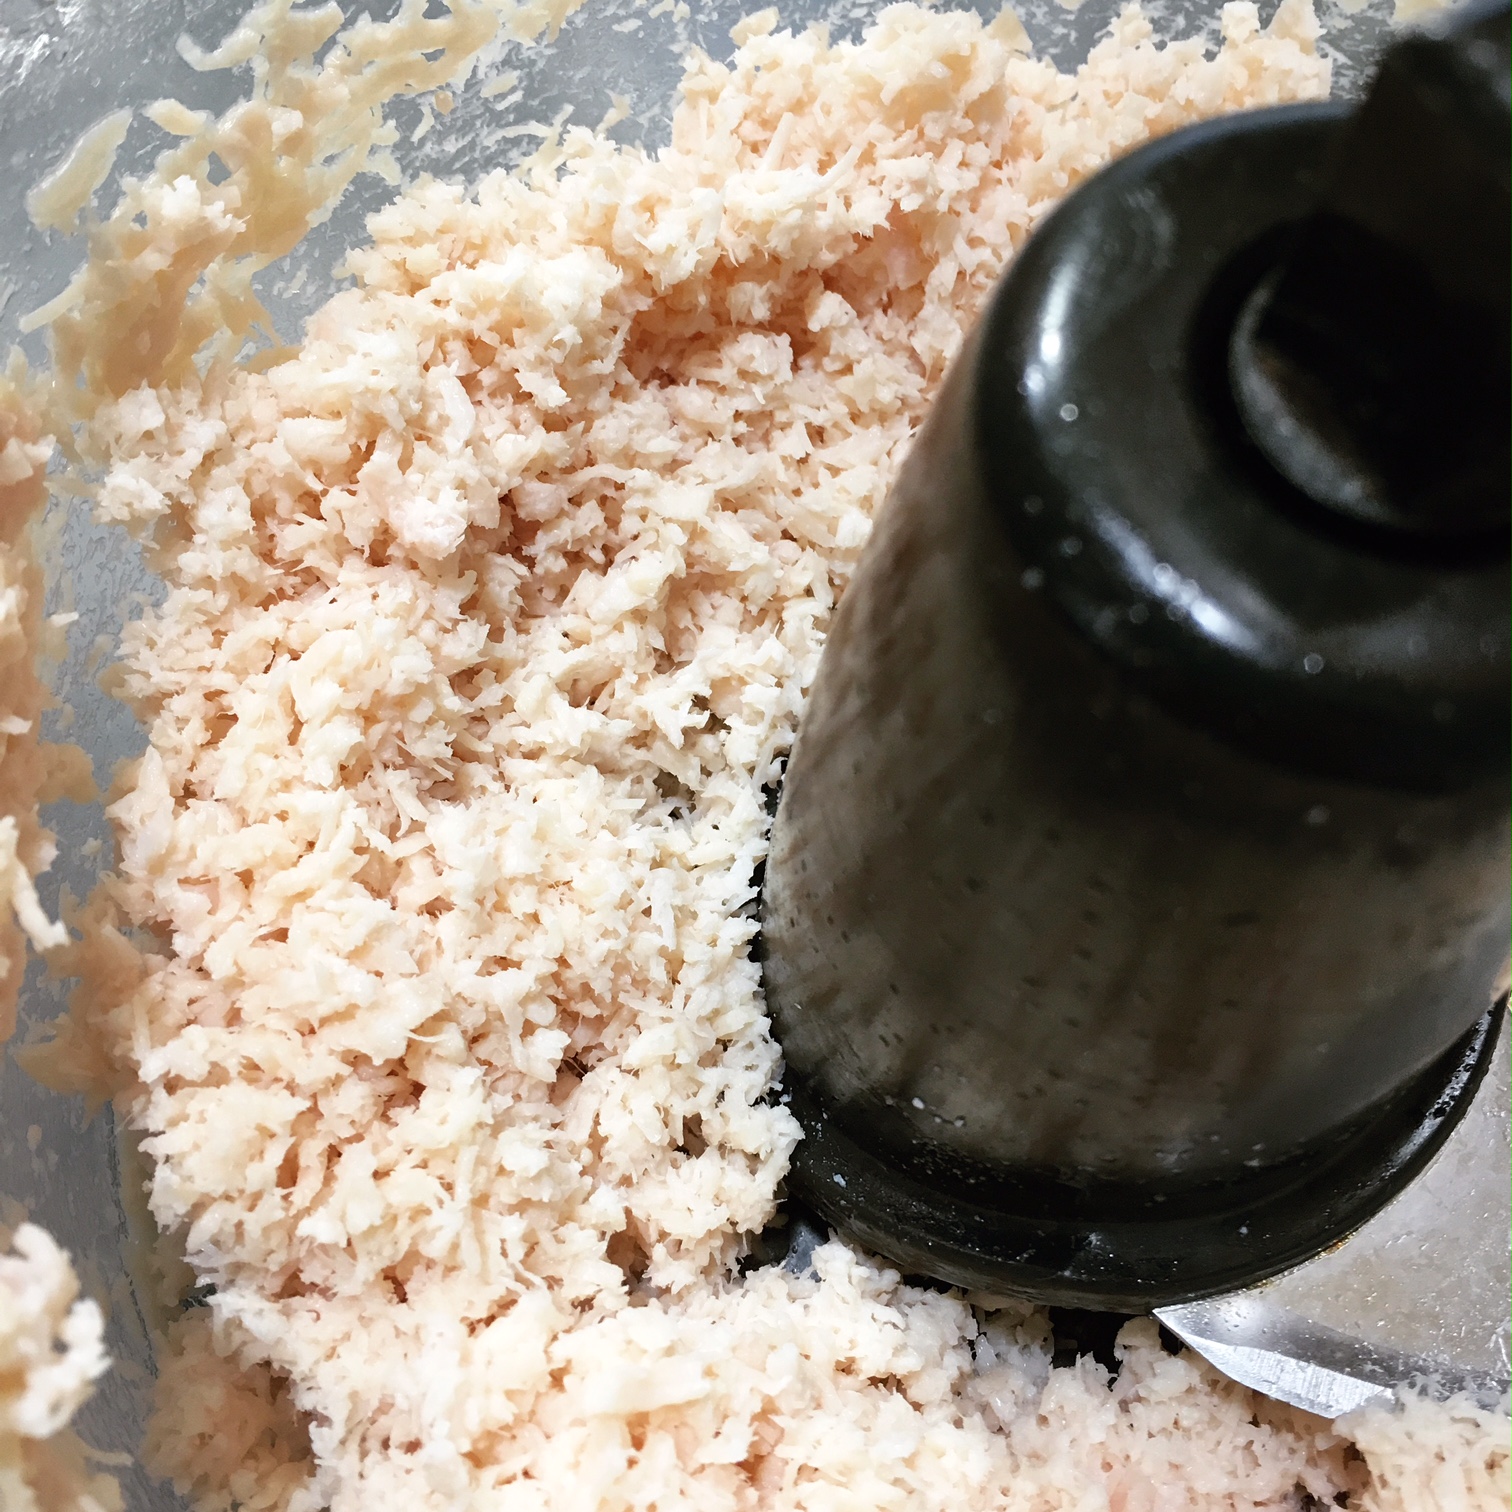
First, I drained the chicken and popped it into my food processor, pulsing it a few times to break it down into smaller pieces.

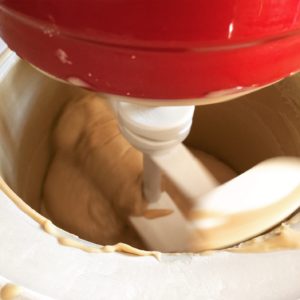
Then, I added everything to the bowl of my standing mixer - chicken, sweet potato puree, shredded cheddar cheese, an egg and half of the flour. I used the paddle attachment to combine the ingredients partially before adding the rest of the flour. This is where you’ll need to eyeball it and likely add more flour to get a less sticky consistency. Once the dough comes together, put it on a lightly floured work surface and roll it out to a thickness of about ¼”.

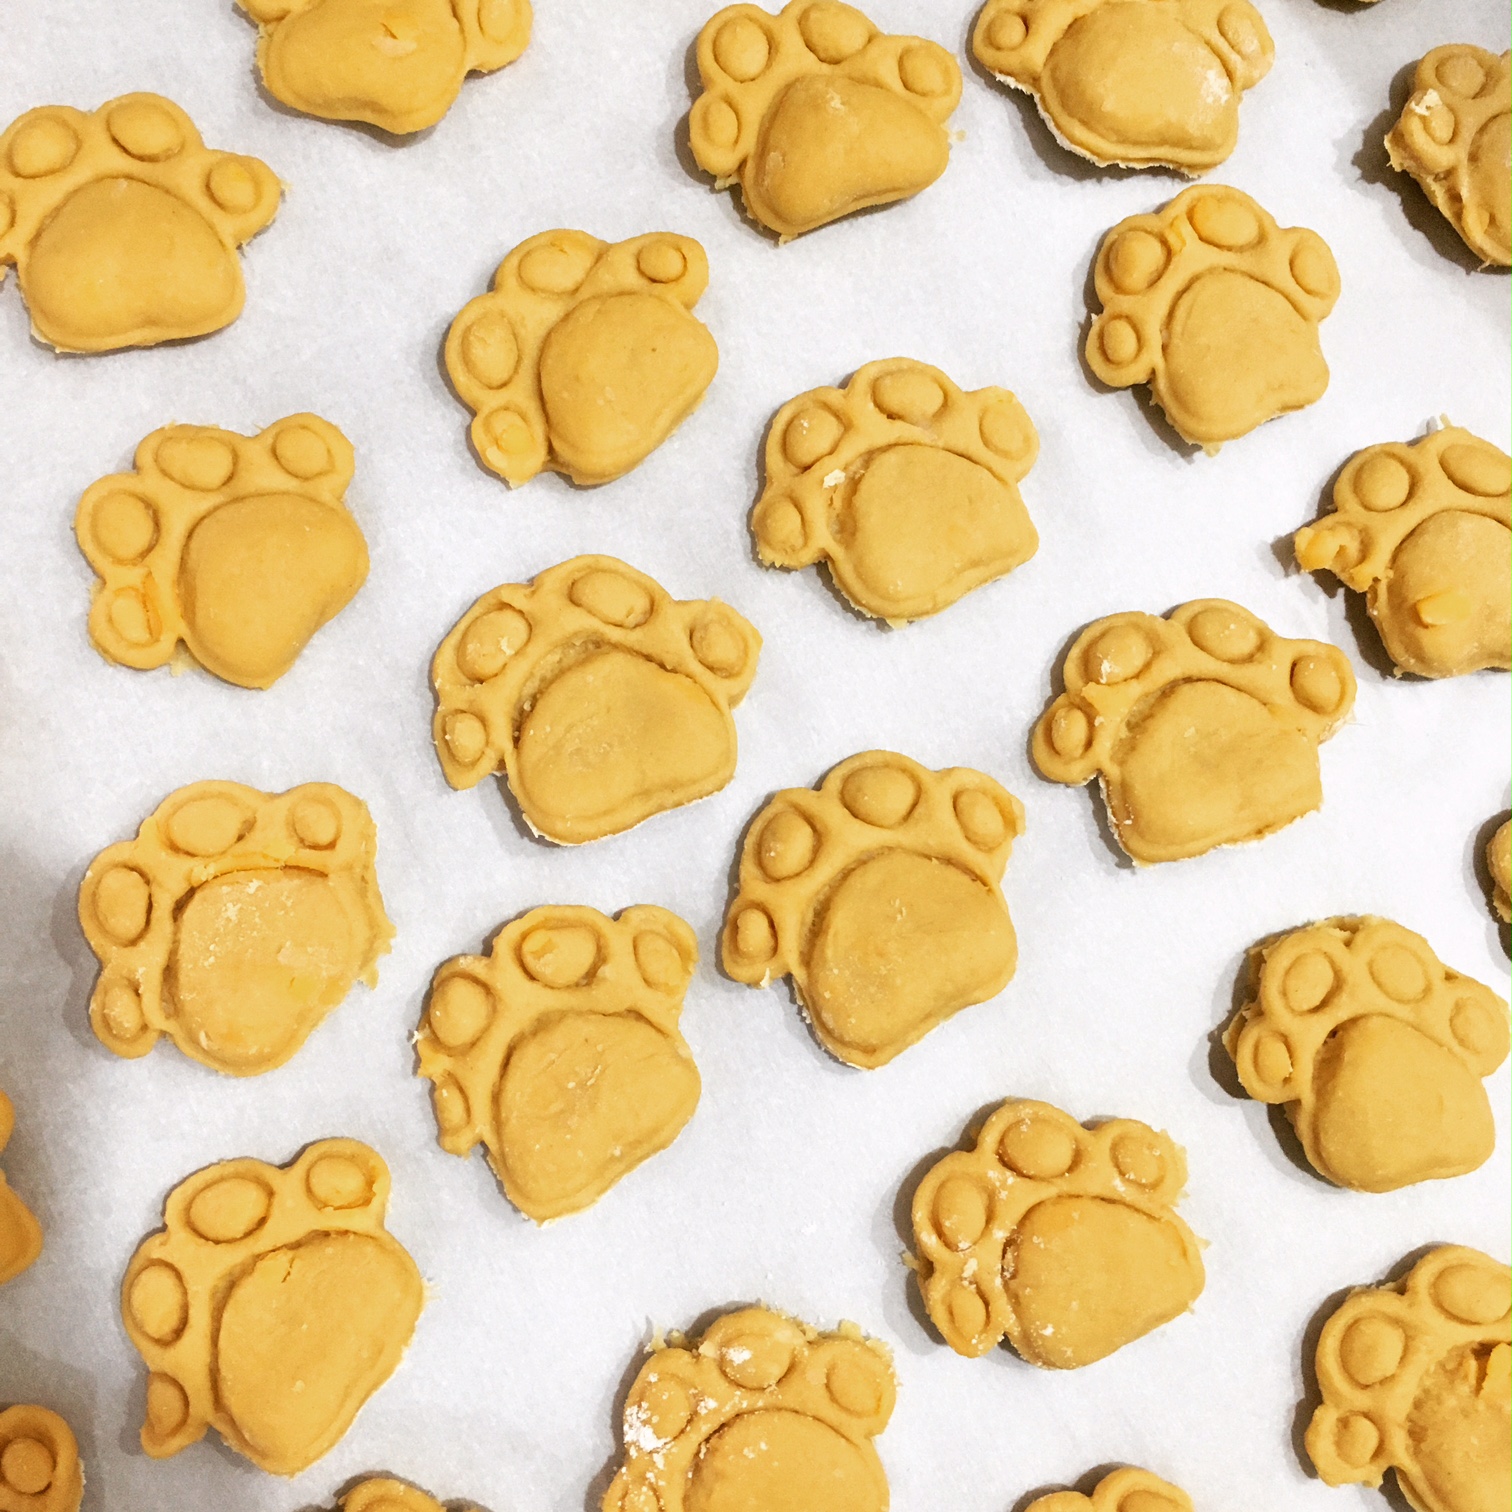
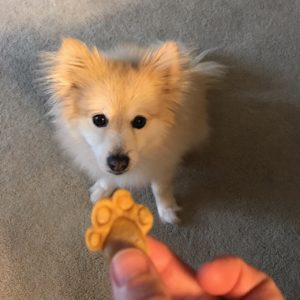
I found this adorable paw-shaped cookie cutter on Amazon, but you can really use any shape you have on-hand.

Once I had 2 cookie sheets full of treats, I put them in the oven to bake. (I ended up covering 3 cookies sheets in total and made somewhere between 175 and 200 treats.) I opted for treats on the chewy side, but I have included the directions from the original recipe below so you can make them crispier if you’d like to.

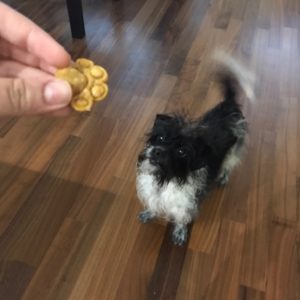
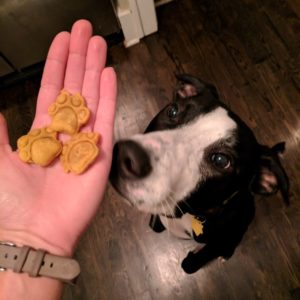
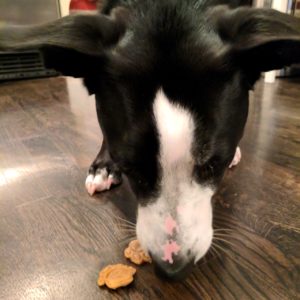
Once they were cool, I gave some to Beta to taste test. She absolutely approved! In fact, she liked the smell of them so much that she had a hard time holding back while I tried to snap some pictures.

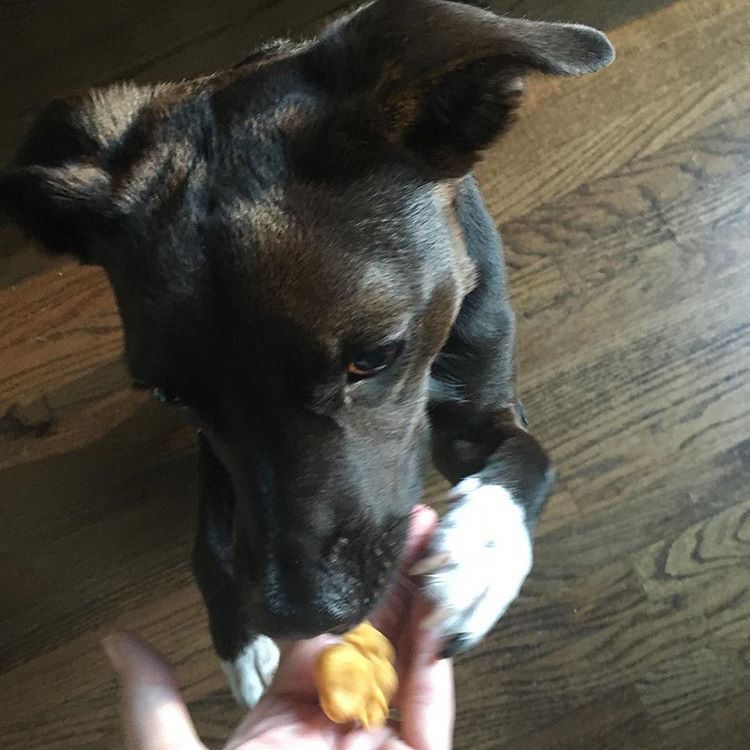
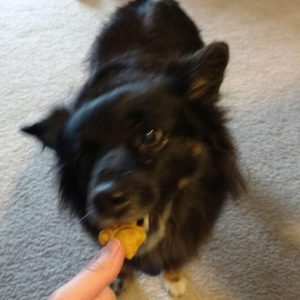
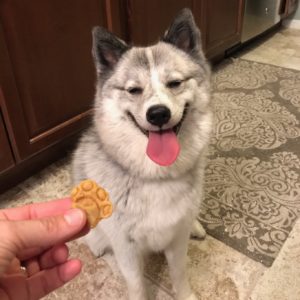
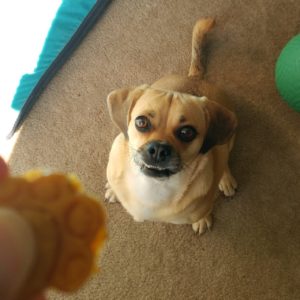
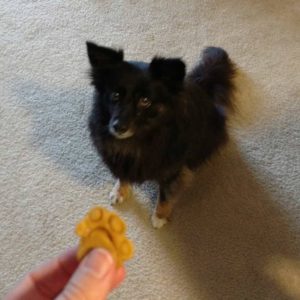
Almost 200 treats is a lot! So I also wrapped them up in little gift bags to give to my coworkers who have dogs and asked them all to take photos of their dogs enjoying them too. Quite a good looking bunch! It seemed the treats got puppy approval all around.

Chicken

  • Servings: 150+
  • Time: 40
  • Print

Ingredients

  • 12.5 oz, or one large can, of canned chicken (Premium Chunk White Chicken Meat), pulsed in a food processor
  • 10 oz (approx.) canned sweet potato purée
  • 1 cup cheddar cheese, shredded
  • 3 cups all-purpose flour (and more as needed, plus extra for rolling out)
  • 1 large egg

Directions

  1. Preheat oven to 350°F. Mix all of the ingredients together until the dough is well blended. The dough should come together without being too sticky. Add more flour as needed (by the ¼ cup) until you achieve a consistency that holds together but isn’t wet. (Additionally, more egg or sweet potato could be added if, for some reason, the dough is too dry.)
  2. Roll the dough out on a lightly floured work surface to 1/4-inch thickness. Cut out shapes and arrange on a foil- or parchment-lined baking sheet. Bake time will depend on size of the treats. For 1-inch diameter treats, start testing doneness after 15 minutes by lightly poking the center of a treat with your finger. For larger treats, allow for more baking time (but keep an eye on it the first time around). Treats should be slightly soft in the middle at which point you can remove them for soft treats. For crunchy treats, shut off the heat and leave the oven door closed. Let the treats dry out in the residual heat, but check to see that they aren’t burning at the edges.
  3. Store soft treats in a sealed container in the refrigerator for up to a week. Store hard treats in an air-tight container for up to a week. If storing for longer, refrigerate or freeze them. Makes 150+ 1-inch treats.

Adapted from: Use Real Butter

Notes: I didn’t do an exact count, but my recipe made well more than I expected. Definitely in the 150-200 range, but probably closer to 200. This will depend most of all on the size of the cookie cutter, but also on how thickly you roll the dough. The large quantity makes this a great recipe to save money and stock up on homemade treats for your own dog, or to give as gifts to other dog owners!


This post contains affiliate links. Full disclosure here.

Filed Under: book review, recipe Tagged With: 5 ingredients or less, animals, baking, book club, chicken, dog treats, fiction, quick read

Goodbye, Vitamin + The Most Dangerous Chocolate Cake in the World

September 5, 2017 by Megan 2 Comments

I finally got around to reading my July Book of the Month selection, a debut novel by Rachel Khong titled Goodbye, Vitamin, and it was such a quick read that it felt like I barely had it open before I was finished. It is both funny and touching, following a year in the life of 30-year-old Ruth as she quits her job and moves back home to spend time with her father who was recently diagnosed with Alzheimer’s.

Khong’s writing style is unassuming, and the results are comical and endearing. Ruth’s struggle isn’t one that I personally relate to, but it felt truthful and hopeful at the same time. When she arrives home just after Christmas, Ruth unhappily discovers that her mom has become afraid of cooking at home, convinced that her husband’s memory loss was caused by not only the packaged ingredients but the pots and pans themselves. After taking some time to get her bearings (and get over the heartbreak of her recently called-off engagement), Ruth throws herself into caretaking and doing whatever she can to help improve her father’s memory.

At one point, Ruth attempts to make a jellyfish-centric meal to help stave off further dementia, and while it’s not a success, it doesn’t stop her culinary adventures. In an email forward, she stumbles across THE MOST DANGEROUS CHOCOLATE CAKE IN THE WORLD, so-named because “from the moment you decide to make it until you sit down to eat is above 5 minutes!” Armed with a mug and a microwave, she makes it one day and sends a picture of the results to her forward-happy friend. I knew I wanted to make it too.

I can’t be sure, but I may have found the exact recipe Khong references in the novel. Both the one in Goodbye, Vitamin and the one I found online from the lovely Ree Drummond require 3 Tablespoons of chocolate chips, and I knew I was on the right track. Though I suppose it’s entirely possible all mug cakes have the same requirement, I was still pretty excited about it.

I actually brought all of the ingredients (and mugs) over to my sister’s house last weekend to try it out. We were belatedly celebrating her birthday together, and I thought chocolate cake was the perfect addition to our already fun-filled Sister Day.

I used a separate bowl to combine all the ingredients before scraping them into each mug, but the recipe calls for them to go straight into the mug, so do whatever you think works best. I wanted to make sure everything was well-combined (no lumps), but on the other hand, I had slightly more cleanup.

First, I mixed my dry ingredients - 3 Tablespoons each of all-purpose flour and sugar, 2 Tablespoons of cocoa powder, ¼ teaspoon of baking powder and a pinch of salt - using a mini whisk. Then, I added the wet ingredients - 3 Tablespoons each of milk and vegetable oil followed by a splash of vanilla. I made sure those were well-combined before adding 3 Tablespoons of chocolate chips.

I poured the mixture into one of the waiting mugs and put it in the microwave for 90 seconds. As Ruth remarked in the novel, “they look[ed] like beautiful souffles fresh out of the microwave.” I made 3 all together, one for each of us (my brother-in-law included), and after snapping some pictures while they cooled for a few minutes, we dug in.

They were delicious, and yes, absolutely dangerous. We finished them in a hurry!

I’m not normally a huge chocolate cake fan, but this wasn’t too decadent nor too much. It would go great with a scoop of ice cream, and it’s super easy to make for just the 2 of us - no tempting leftovers! Also, if you’re craving some chocolate in the summer, there’s no need to heat up the whole house with the oven.

The Most Dangerous Chocolate Cake in the World

  • Servings: 1
  • Time: 5 minutes
  • Print

Ingredients

  • 3 Tablespoons all-purpose flour
  • 3 Tablespoons sugar
  • 2 Tablespoons cocoa powder
  • ¼ teaspoon baking powder
  • Pinch of salt
  • 3 Tablespoons milk
  • 3 Tablespoons vegetable oil
  • Splash of vanilla extract
  • 3 Tablespoons chocolate chips

Directions

  1. Put the flour, sugar, cocoa powder, baking powder and salt in a 12-ounce microwave-safe ceramic mug. Blend thoroughly with a fork or small whisk. Add the milk, vegetable oil and vanilla and blend until smooth. Stir in the chocolate chips.
  2. Microwave on high for 90 seconds. Do not overcook or the cake will be dry. Let cool for 2 to 3 minutes before eating.

From: Ree Drummond, The Pioneer Woman

If you like your cake a little less rich, feel free to reduce the chocolate chips to 2 Tablespoons instead.


This post contains affiliate links. Full disclosure here.

Filed Under: book review, recipe Tagged With: book of the month, contemporary, dessert, fiction, quick read

Eleanor Oliphant is Completely Fine + Pasta al Pesto

August 19, 2017 by Megan 6 Comments

I first heard about Gail Honeyman’s novel Eleanor Oliphant is Completely Fine when someone suggested it for one of my book clubs. I jotted it down, added it to the poll for September, hopped on the library wait list (just in case), and didn’t think much more about it. I’m actually glad I came into it with no real expectations because the whole experience turned out to be a pleasant surprise.

Eleanor Oliphant has worked in finance in the same small company her entire career. She is socially awkward and a bit of a curmudgeon, who is very reliant on her routine. A routine which includes eating pasta with pesto for dinner every night and drinking vodka until she passes out most weekends. Despite all of her peculiarities, Eleanor on the page is quite charming. My heart warmed to her, and I found myself laughing out loud on several occasions.

I’m excited to see what the rest of the book club thinks of Eleanor. I hope they enjoy her as much as I did! And while we chose to visit an Irish pub for our book discussion (as close to a British pub as we could find), I opted to make Eleanor’s favorite staple for today’s post - pasta with pesto.

I very much doubt she makes her own, but I couldn’t exactly plop some store bought pesto onto some pasta and call it a day. (However, if I had to make a recommendation for store bought pesto, I quite enjoy Trader Joe’s Pesto alla Genovese.) The pesto recipe I chose was so easy and delicious though, that I’ve been thinking of taking up my herb-growing again, just so I could have an abundance of basil and make this more often.

Best of all, it uses walnuts which are much more affordable than pine nuts - I think Eleanor would approve of that choice. To start, I toasted the garlic until it had some little brown spots.

Then, I moved them out of the pan to cool and toasted the walnuts as well. While those cooled, I assembled the rest of my ingredients - basil, parsley, grated parmesan, olive oil and salt and pepper.

I added everything to my food processor and blended everything until smooth.

I ended up having to add just a touch more olive oil, but use your best judgment as it comes together. Taste and season with additional salt and pepper if necessary.

I tossed some ribbed penne pasta (great for the pesto to cling to) with my freshly made sauce, dished it up and topped with some extra parmesan cheese for good measure.

Use your pasta of choice, and if you have any leftover pesto, it will keep in the fridge for a short while, or it can be frozen. Enjoy!

Basil Walnut Pesto

  • Servings: 8
  • Time: 15 minutes
  • Print

Ingredients

  • 6 cloves garlic unpeeled
  • ½ cup walnuts
  • 4 cup packed fresh basil leaves
  • 2 cup packed fresh parsley
  • ½ cup Parmesan cheese
  • 1 cup olive oil
  • Salt and freshly ground pepper

Directions

  1. Toast the garlic cloves in their skin in a small skillet over medium heat, shaking often, until brown spots form, about 5 minutes. Remove to a small bowl to cool before peeling.
  2. Meanwhile, return the skillet to medium heat and add walnuts. Toast until fragrant, 5 to 10 minutes, shaking frequently to prevent scorching. Remove from heat.
  3. Combine peeled garlic, walnuts, basil, parsley, parmesan cheese, and olive oil in a blender or food processor; blend until smooth.
  4. Season to taste with salt and pepper.
  5. Serve as a topping on pasta (3/4 c. pesto per pound of pasta), as a spread on sandwiches, or as a garnish to soups.

From: Culinary Hill

This post contains affiliate links. Full disclosure here.

Filed Under: book review, recipe Tagged With: book club, contemporary, easy prep, fiction, quick read, sauce

Jane of Austin + Earl Grey Ice Cream

July 25, 2017 by Megan 2 Comments

Though I read Pride and Prejudice in high school and loved it, I haven’t explored Jane Austen beyond that. I own copies of both Persuasion and Sense and Sensibility, but have yet to crack them open! (I know, I know…) So, when I was given the opportunity to read Jane of Austin: A Novel of Sweet Tea and Sensibility through Blogging for Books, I didn’t want to pass it up. After all, it’s about tea, which I love, and it seemed like it would be a nice modern dip into another Austen classic.

Jane and her sister Celia own a successful, adorable tea shop in San Francisco. But after being forced out, they head to their cousins in Texas with their younger sister Margot in tow, hoping to start afresh and recreate their tea shop magic there. Of course, Texas brings new men and intrigue, triumphs and defeats. I can’t compare it to the original, but I recognized a lot of Austen-style plot points, and of course, the sisterly bond can’t be missed. It was a breezy, enjoyable read, perfect for summer.

Probably the best of all was that this is the novel that finally led me to ice cream, completely unexpectedly. It was sheer inspiration! Definitive proof I shouldn’t try to force it, and excellent news that I can officially-officially forever be done with The Country of Ice Cream Star.  Though the book included several recipes throughout, none of them were exactly what I was looking for. I really thought a tea-based dessert would be lovely, and given the heat of the summer, I settled on Earl Grey Ice Cream.

First, I combined the whole milk, half and half and sugar in a medium saucepan. Once that seemed heated through - but wasn’t boiling, I added my 6 Earl Grey tea bags and allowed them to steep for 20 minutes with the cover on. I stirred it approximately every 7 minutes, though you may not need to be that precise.

I removed the tea bags and turned the heat up again. In a small bowl, I whisked together 5 egg yolks and vanilla extract. When the milk mixture was warmed, I took 2 Tablespoons and added it to the eggs, whisking constantly. After about 10 seconds, I added another 2 Tablespoons, whisked and repeated. After the ratios were roughly equal (or four times), I added the milk mixture into the eggs and whisked until it was all combined.

Then, I returned the mixture to the saucepan, cooking it over medium heat, while stirring constantly. I was slightly terrified it would burn, but with constant vigilance (and scraping the bottom and the sides), it all worked out. Once it thickened somewhat - and could coat the back of a wooden spoon - I poured it into a large, wide bowl through a fine strainer. I set the bowl in the fridge to cool, uncovered.

After it had sat for a little while and was no longer steaming, I added plastic wrap. It might not be necessary, but I didn’t want to create condensation.

This was the first time I got to use the ice cream maker attachment for my KitchenAid mixer - woo hoo! The directions require you to have it freeze for at least 15 hours beforehand, which I maybe should have read prior to letting my custard mixture chill for 8 hours. Good to know for next time!

Once the ice cream bowl was frozen enough, I set to work. (You should follow your own ice cream maker’s instructions from this point forward.) I turned the mixer to Stir and began adding the custard-y liquid to the bowl, which was a little more complicated than I would’ve liked, but luckily, spilling was minimal.

The whole process after that was very easy. I let it Stir and work itself into ice cream over the next 30 minutes, only checking in on it out of curiosity and for pictures.

Once it was finished, I scraped the ice cream into my insulated ice cream container and allowed it to freeze for another 2 hours. (Seriously, ice cream making is not for the impatient… If you want ice cream in a hurry, run to the store instead.)

It looked pretty good coming out of the freezer after (almost) two hours (if I’m being honest), but my patience was undergoing a major test, and after two days in the making, I was ready to dig in!

I took two scoops and couldn’t be more excited to give it a taste. It’s definitely tea-flavored, so if you’re not a fan, this probably isn’t for you. But I loved it! The ice cream did my favorite tea justice, and I think Jane Woodward would be proud.

Earl Grey Ice Cream

  • Servings: 3-5
  • Time: 6 hours, 20 minutes (mostly inactive)
  • Print

Ingredients

  • 1 cup whole milk
  • 2 cups half and half
  • ¾ cup sugar
  • 6 Earl Grey tea bags
  • 5 egg yolks
  • 1 tsp. vanilla extract

Directions

  1. In a small saucepan, warm the milk, half and half, and sugar over medium-heat, stirring occasionally. Once the milk is steaming (but not boiling), remove pan from heat. Place the tea bags into the pan, cover and steep at room temperature for 15-20 minutes, stirring occasionally. Remove tea bags, then return to medium heat.
  2. Meanwhile, in a separate bowl, whisk together the egg yolks and vanilla until frothy. Once the milk mixture is rewarmed, add 2 TBSP of the hot milk mixture to the eggs, and quickly whisk in until combined. Repeat 2-3 more times with more of the milk mixture, then gradually pour in the remainder of the milk mixture into the egg yolks and whisk quickly until combined.
  3. Return the new milk/egg mixture to the saucepan, and cook over medium heat, stirring and scraping the bottom of the pan constantly until the mixture thickens to a custard and coats the back of a wooden spoon.
  4. Immediately strain through a fine-mesh strainer, and then refrigerate until completely cooled (at least 6-8 hours).
  5. Freeze with an ice cream maker according to manufacturer’s instructions.

From: Gimme Some Oven

I prefer Twinings Earl Grey flavor, but feel free to use whichever brand of tea you like best. If you’re unable to make the ice cream within 6-8 hours of refrigerating the custard, it will last for up to 2 days. Be sure to keep it tightly covered.

I received this book from the Blogging for Books program in exchange for this review. This post contains affiliate links. Full disclosure here.

Filed Under: book review, recipe Tagged With: chick lit, contemporary, dessert, fiction, ice cream, quick read

This Is How It Always Is + Simple Orange Salmon

July 22, 2017 by Megan 4 Comments

Often, I read a book that has been the talk of the town (so to speak), a book that everyone loves, a must-read, and I’m so excited to dig into it, convinced I will feel the same way, and then I’m disappointed. I’m sure I’ve written in the past about tempering my own expectations, though I know I’m guilty of it too - if I love a book, I can’t recommend it enough. I’ll talk about it constantly and push it on unsuspecting friends. I don’t think Laurie Frankel’s novel This Is How It Always Is falls into the disappointing category, but I think I might have liked it more had I stumbled upon it on my own - and not read it so closely behind the real life saga of a similar family in Becoming Nicole.

That being said, it’s an important novel - tackling controversial issues head on, causing you to examine how you feel and why you feel that way, but doing so in a relatable, enjoyable story - and I liked it for those reasons. The story centers around Claude, the youngest brother in an accepting, open-minded family of five boys. He wants to be a girl when he grows up - inside he feels more like Poppy than like Claude. Though Poppy’s family is fully supportive, the sacrifices they must make to keep this secret affects each of them in unique ways.

After four boys, Poppy’s mom desperately wanted a girl. On the day Claude was conceived, Rosie went through a complicated ritual concocted of random wives’ tales and legends, doing everything in her power to have a baby girl. Claude was born. I’m not entirely sure the result was what she had in mind, but ultimately, Poppy was also born, and their family was complete.

As part of her ritual, Rosie made salmon for her and her husband’s lunch, served alongside chocolate chip cookies. I decided to make the salmon as well, though without the cookies for dessert, and in honor of the orange peel on the cover, incorporate the fruit into the recipe as well.

To start, I patted my two salmon fillets dry on both sides and seasoned them with fresh ground black pepper and salt.

I heated some olive oil in a medium skillet and laid the fillets skin side down to begin cooking. After about 5-7 minutes, I flipped the fillets and added half an orange to the pan to grill alongside the fish.

The salmon cooked for another 4 or so minutes, until it was opaque throughout. I plated it with some sautéed zucchini and a wedge (or two) of orange. We squeezed the orange over the salmon just before eating.

Simple Orange Salmon

  • Servings: 2
  • Time: 15 minutes
  • Print

Ingredients

- 2 salmon fillets with skin, 4 to 6 oz each - 1 orange, halved - salt and freshly ground black pepper - olive oil

Directions

  1. Pat salmon fillets dry with a paper towel. Season each side generously with salt and freshly ground black pepper.
  2. Add 2-3 turns of olive oil to a medium or large skillet (depending on size of salmon fillets) and allow to heat through. Add salmon, skin side down. Cook for 5-7 minutes, until skin is a nice golden brown.
  3. Flip fillets and add orange half to skillet. Allow salmon to cook for an additional 3-5 minutes, until fish is opaque throughout. Watch orange and remove when it begins to char.
  4. Serve salmon immediately with orange wedges. Squeeze orange over fish before eating.


This post contains affiliate links. Full disclosure here.


Filed Under: book review, recipe Tagged With: contemporary, dinner, easy prep, fiction, quick read, seafood, tough topics

The Sisters Chase + Powdered Donuts

July 15, 2017 by Megan 2 Comments

I’m a sucker for stories about sisters. I love the relationship between Elizabeth and Jane in Pride and Prejudice. Little Women is, of course, sister-centric and wonderful. I’ve never read the book, but whenever I watch In Her Shoes, I cry. So, it will come as no surprise that for my June BOTM I chose The Sisters Chase by Sarah Healy. I probably would’ve chosen it on the name alone, but it had the added benefit of coming highly recommended in my online book group as well.

Mary and Hannah Chase grow up in a small beach motel owned by their mother, Diane. When a car accident leaves the sisters on their own, eighteen-year-old Mary becomes Hannah’s guardian and takes it upon herself to do anything in her power to protect her. While Mary is at ease living a life in flux as they travel the country, Hannah aches for a real home where she can attend school and make friends. All Mary wants is for Hannah to be happy, but giving in may mean exposing a long-kept secret and risking an unbearable loss.

As an older sister, I definitely related to Mary and her willingness to do anything for her little sister, even if it seemed to be to her own detriment. Healy’s pacing and familiarity with the characters - they felt so real - resulted in a well-crafted story that wasn’t at all what I predicted. When I finished, it had me wanting to go back for a re-read.

Instead, I made some powdered donuts, like those the sisters’ mother piled high on a plate each morning for the motel’s guests. I wanted to bake them, since it’s less messy and somewhat healthier, so it gave me the perfect opportunity to use the donut pans I’ve had since two Christmases ago (thanks to my new sister-in-law, Kelly!).

The last time I made donuts was in middle school home ec class, and I remember being freaked out by splattering oil and the cleanup being such a process. This was MUCH easier. So much so that I may start making donuts more often.

First, I mixed the dry ingredients together - flour, sugar, baking powder and salt. In a separate bowl, a combined the egg, milk, vanilla extract and melted butter. I added these to the dry ingredients and mixed together.

Then, using a spoon, I added the batter into my greased donut pans, filling them about halfway.

I popped them into a 425-degree F oven and let them bake for 12 minutes. I let them cool in the pan for about 10 minutes.

Then, I dropped them into a paper grocery bag two at a time with some powdered sugar and shook and shook until they were well coated. Honestly, this happened really quickly (a few shakes at most). It was the most fun part of donut-making by far.

Everyone at work loved them, and I can’t wait to try new and different flavors. I always love when a book leads me a recipe I can use over and over again 🙂 Hope you enjoy!

Baked Powdered Sugar Donuts

  • Servings: 10
  • Time: 25 minutes
  • Print

Ingredients

  • 1¼ cups cake flour (see notes)
  • ¾ cup granulated sugar
  • 1¼ tsp baking powder
  • ¼ tsp salt
  • 1 large egg
  • ¼ cup milk
  • 1 tsp vanilla extract
  • 3 Tbsp unsalted butter, melted
  • 3 Tbsp heavy cream
  • 1 cup powdered sugar, for coating baked doughnuts

Directions

  1. Preheat oven to 425°F. Lightly grease doughnut pan; set aside.
  2. In a medium bowl, add all of the dry ingredients (cake flour, granulated sugar, baking powder and salt). Stir until well mixed.
  3. In a separate bowl, whisk together the egg, milk, vanilla extract, melted butter and heavy cream.
  4. Add the liquid ingredients to the dry ingredients; stir until just mixed.
  5. Spoon or pipe the batter into the greased doughnut pan. (Tip: Fill each doughnut circle about half full of batter.)
  6. Bake at 425°F for 12-14 minutes, or until doughnuts begin to turn golden brown on the edges.
  7. Let doughnuts cool in the pan.
  8. Place powdered sugar in paper bag. Once doughnuts have cooled, shake doughnuts (one at a time) in the bag with the powdered sugar until well coated. Tap off any excess powdered sugar. Repeat with remaining doughnuts. Serve immediately. (Note: If you plan on serving these doughnuts later, store them uncoated in an airtight container. Shake them in powdered sugar just before serving.)

From: Spiced Blog

If you don’t have cake flour, which I didn’t, and don’t want to buy some just for this recipe, it’s easy to make your own with all-purpose flour. For each cup of flour you need, take 1 cup of all-purpose flour, remove 2 TBSP and replace with 2 TBSP of cornstarch. Mix well to ensure it’s combined. I used 1½ cups flour with 3 TBSP for this recipe (and discarded the remaining ¼ cup).


This post contains affiliate links. Full disclosure here.

Filed Under: book review, recipe Tagged With: baking, book of the month, breakfast, contemporary, fiction, quick read

  • « Go to Previous Page
  • Go to page 1
  • Interim pages omitted …
  • Go to page 5
  • Go to page 6
  • Go to page 7
  • Go to page 8
  • Go to Next Page »

Primary Sidebar

About

The Hungry Bookworm brings together literature and food. Megan has an insatiable appetite for both.

As C.S. Lewis said, “Eating and reading are two pleasures that combine admirably.” Enjoy!

  • Bloglovin
  • Facebook
  • Instagram
  • Pinterest

Subscribe

Don't miss out on bookish content, exclusive giveaways, and of course, book club-friendly recipes. Get notified of new posts via email.

Join 2879 subscribers.

Search for Ingredients, Recipes, or Books

Recent Posts

  • Subscriber Box Review: Literati Book Club - Roxane Gay's Audacious Book Club
  • Arsenic and Adobo + Ensaymada
  • Review of The Kindred Spirits Supper Club
  • Kids Edition: Sometimes I Like to Curl Up in a Ball + "Dirt" Pudding Cups
  • The Midnight Library + Broccoli and Ricotta Toast

Goodreads

Tags

5 ingredients or less appetizer baking book club book list book of the month books about food bread breakfast brunch chicken contemporary cookies cultural dessert dinner dinner party dystopia easy prep favorites fiction fruit historical fiction holiday ice cream linkup lunch meat memoir mini review nonfiction pasta quick read reading challenge science fiction seafood show us your books side dish snack soup TBR list thriller top ten tuesday vegetarian veggies

Archives

Other Great Book Blogs

Literary Quicksand
Never Enough Novels
Death by Tsundoku
Professional Reader 25 Book Reviews
Privacy & Cookies: This site uses cookies. By continuing to use this website, you agree to their use.
To find out more, including how to control cookies, see here: Cookie Policy

Footer Widget Header

Megan’s Instagram

Copyright © 2025 · Hungry Bookworm