• Skip to primary navigation
  • Skip to main content
  • Skip to primary sidebar
  • Home
  • Reviews
    • Book Index
    • Fiction
    • Non-Fiction
    • Top Ten Tuesdays
The Hungry Bookworm

The Hungry Bookworm

reading + eating

  • Recipes
    • Drinks
    • Snacks, Sides & Apps
    • Main Dishes
    • Desserts
    • 5 Ingredients or Less
  • About
    • Meet Megan
    • How I Rate
    • Review Policy
    • Contact

memoir

A Homemade Life + Turkey Meatballs

January 2, 2018 by Megan Leave a Comment

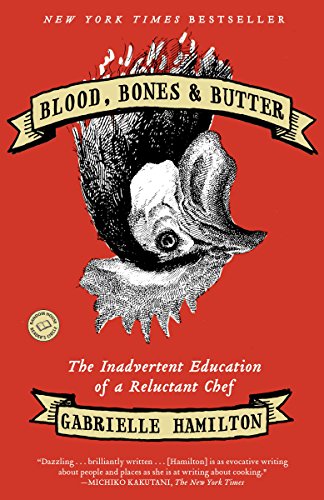
Though I read this last book about a month ago, I thought it would make the perfect post to kickoff the new year. If you love food as much as you love books, like I do, Molly Wizenberg’s food memoir - which I gushed about during the Thanksgiving Readathon - is an absolute treasure. A Homemade Life: Stories and Recipes from My Kitchen Table is full of so many mouth-watering recipes that I had an extremely hard time deciding what to make for this post.

I became familiar with Molly through a funny food podcast called Spilled Milk, which she co-hosts with fellow foodie Matthew Amster-Burton. Little did I know, she also writes a well-loved blog, Orangette, which she started in a moment of self-discovery because “whatever [she] did, it had to involve food and writing.” We’re somewhat kindred spirits in that way. Not to give away any spoilers, but one of my favorite parts of the book was discovering that Molly actually met her husband through her blog. (I met mine well before creating my blog, but I’m lucky that he has always been extremely supportive of my efforts.) Since the book is mostly food, coupled with lovely personal stories of course, let’s get right to meat of it.

I snuck Molly’s father’s French toast recipe into a blog post late last year, partially because I didn’t think one recipe did this collection justice and partially because I’m indecisive. But, as I combed back through the pages, the perfect recipe for this post jumped out at me. I decided to choose the Mediterranean-style turkey meatballs from her friend Doron because they were one of the first recipes Molly wrote about on her new blog in 2005.

The ingredient list is a bit intimidating - I didn’t have pine nuts or golden raisins on-hand - but because it’s meatballs, the grocery shopping is really the hardest part.

To start, I made the yogurt dipping sauce because in the book she recommends leaving it at room temperature while you do the rest so the flavors can develop (here, the blog version of the recipe varies). I combined all of the ingredients - plain yogurt (I used Greek, full fat), lemon juice, minced garlic, ground cumin and salt - in a small bowl with a whisk. I set it aside while I made the meatballs.

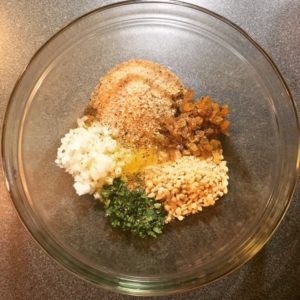
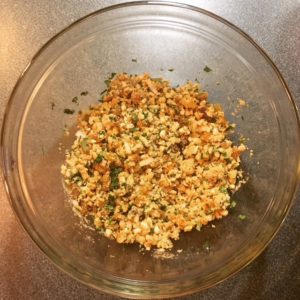
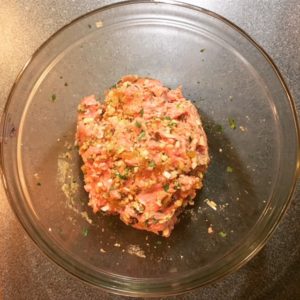
To make the meatballs, I combined the majority of the ingredients in a large bowl - minced yellow onion, fresh cilantro leaves, pine nuts, golden raisins, bread crumbs, an egg and salt, cumin and freshly ground black pepper.

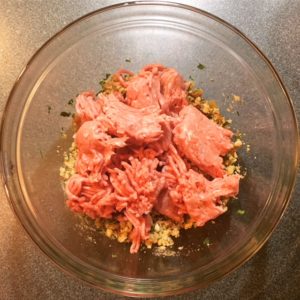
To that, I added the pound of ground turkey and used my hands to gently incorporate all of the ingredients, taking care not to overwork the meat.

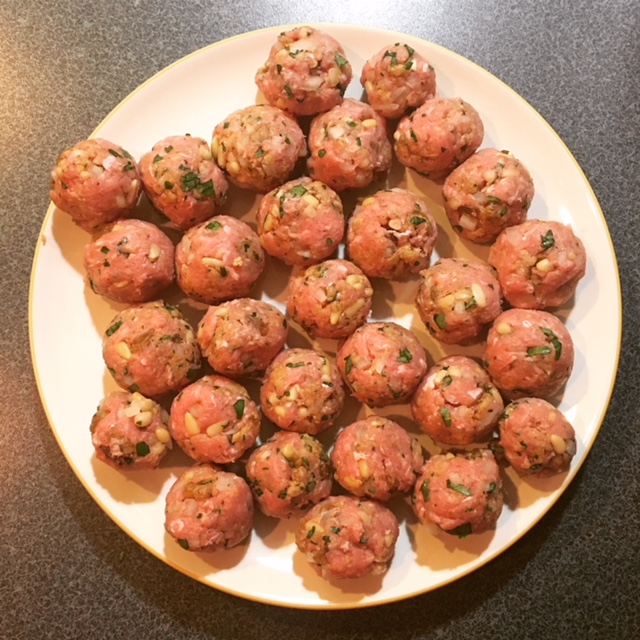
Then, I rolled the meatballs, doing my best to keep them somewhat uniform in size - about 1½ inches round.

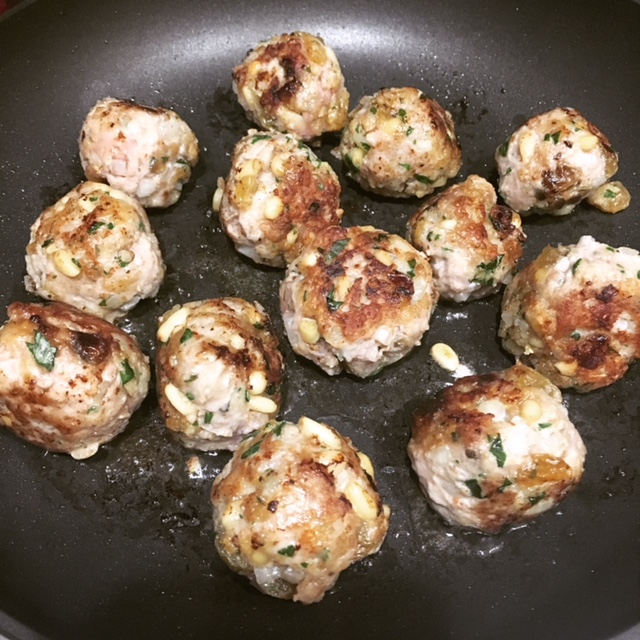
I heated a couple Tablespoons of oil in my skillet and added about half of the meatballs to begin cooking. Now, obviously it’s important to make sure poultry is cooked through and I’ll admit that the cooking part of the process gave me a touch of anxiety because it felt like it was taking forever. (Molly offered no rough time estimate in her recipe or notes.) That being said, I cooked each batch for approximately 20 minutes, checking for doneness as I went.

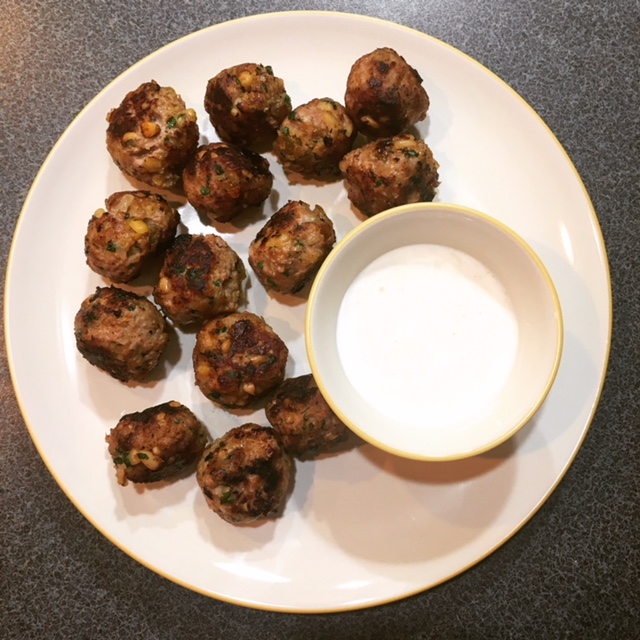
They turned out to be really delicious - no surprise there - and the yogurt sauce was the perfect complement.

The only thing left to do is to try more of Molly’s recipes, and see if I can work them into other future blog posts 😉 Have you read A Homemade Life? Do you have a favorite recipe I should try? Let me know in the comments!

Doron’s Turkey Meatballs with Pine Nuts, Cilantro and Golden Raisins

  • Servings: about 4
  • Time: 45 minutes
  • Print

Ingredients

  • ½ cup (1 small) yellow onion, minced
  • ¼ cup chopped fresh cilantro leaves
  • ½ cup chopped pine nuts
  • ½ cup golden raisins (halved or coarsely chopped if large)
  • ½ cup fine bread crumbs
  • 1 large egg, lightly beaten
  • ½ tsp salt
  • ⅛ tsp ground cumin
  • ⅛ tsp freshly ground black pepper
  • 1 lb. ground turkey, chicken or lamb (see notes)
  • about 4 TBS olive oil
  • yogurt sauce, for serving (recipe below)

Directions

  1. Mix all ingredients combine onion through black pepper in a large bowl.
  2. Add the ground meat, and using your hands, break it up into small chunks. Then massage and gently knead the meat to incorporate the ingredients. Mix until combined, but do not overmix; meat gets tough easily.
  3. With damp hands, gently pinch of hunks of the mixture and roll into 1½-inch balls. Set aside on a large plate.
  4. Warm 2 Tablespoons of the olive oil in a large heavy skillet over medium heat. Add about half the meatballs, taking care not to crowd them. As they begin to color, turn them regularly so that they are golden on all sides. They should be done when they are evenly browned and feel medium firm—but not hard—to the touch.
  5. Transfer the finished meatballs to a plate lined with a paper towel. If the skillet looks dry, add the remaining 2 Tablespoons oil. Cook the remaining meatballs.
  6. Serve hot, warm, or cold with yogurt sauce.

From: A Homemade Life by Molly Wizenberg, pages 168-169; an earlier version can also be found on Molly’s blog Orangette

Notes: Particularly if using chicken or turkey, make sure the meatballs are fully cooked before serving. You can cut one or two of them in half, if you like, to make sure they’re cooked through. Each batch of mine (using ground turkey) cooked for approximately 20 minutes.


Lemon and Cumin Yogurt Sauce

  • Servings: about 4
  • Time: 5 minutes
  • Print

Ingredients

  • 1 cup plain yogurt (not low fat or nonfat)
  • 3 TBS lemon juice (or the juice from 1 lemon)
  • 1 medium clove garlic, minced
  • ¼ tsp ground cumin
  • ¼ tsp salt

Directions

  1. In a small bowl, combine all ingredients and whisk to combine. Set aside at room temperature to let the flavors develop while you make the meatballs.

From: A Homemade Life by Molly Wizenberg, pages 168-169

This post contains affiliate links. Full disclosure here.

Filed Under: book review, recipe Tagged With: appetizer, books about food, dinner, meat, memoir

Bread & Wine + Bacon-Wrapped Dates

November 25, 2017 by Megan 1 Comment

It’s wonderful to have someone so enthusiastically recommend a book to you one day and then, because they know you’ll love it, present it the next day for you to borrow. I am forever recommending books to others, and often pushing my own copy on them unbidden at the next opportunity, but it’s rare that I have someone do the same to me. I am forever grateful to my new coworker, who upon learning about my loves of reading and cooking (and subsequently my blog), shared one of her favorite books with me during her first week on the job.

Aside from recipes - admittedly, the cover looked delicious - I had no real expectations when sitting down with Shauna Niequist’s popular food memoir, Bread and Wine: A Love Letter to Life Around the Table with Recipes. As the title suggests, Niequist’s essays are overflowing with rich descriptions of food and the community it can help create. The memoir touches on not only her family and friends, with whom she loves to share meals, but also on her relationship with God and how that nourishes her in other ways.

In a memoir peppered with meaningful recipes, it can be challenging to choose the one that most represents it. While so many of them sounded appetizing, I went with the one Niequist had me wondering about from one of the very first chapters. She mentioned bacon-wrapped dates, stuffed with goat cheese, at least twice (and maybe more) before she finally revealed the recipe on page 171. The book is only 288 pages, so I was starting to get nervous it would never appear...when suddenly, there it was!

Niequist herself says in her introduction to the recipe that this appetizer is not the most practical thing to choose, if you’re only going to make one recipe from her book. Thankfully, since my heart was already set on them, she goes on to say that “practicality has never been my strong suit, so I think you should make these.” With her blessing, I did.

She describes them as a “go-to, serve-at-every-gathering, take-to-every-party treat” that people adore, so I decided to share them at Thanksgiving dinner this week. With only 3 ingredients and a strong suggestion to serve at room temperature, they were the perfect no-fuss thing to bring to my in-laws’.

On Thanksgiving morning, I gathered my ingredients - pitted dates, goat cheese, and bacon.

I started by slicing the bacon in half and then slicing the dates open to make little “date books” (pun intended).

I stuffed each date with a proportionate spoonful (using the teaspoon from our flatware set). I recommend using the date itself to help scrape the cheese off the spoon as you close it up.

Finally, I wrapped each date with a half-slice of bacon and placed each one seam down on a foil-lined baking sheet (with sides).

I placed the pan in a 400-degree oven and let them bake for 25 minutes, until they were crispy and brown. I let them cool for a moment before transferring them to a paper-towel lined plate to drain off a bit.

Before we left for our Thanksgiving dinner, I put the still warm bacon-wrapped dates into a serving dish to bring along. Of course, they were served on a much prettier platter (thanks to my mother-in-law), but here they are just before we left the house - looking delicious and tantalizing.

Thankfully, they were as delicious as promised and everyone enjoyed their addition to the appetizer selection. I would absolutely recommend adding these to your repertoire.

I’d also recommend picking up a copy of Niequist’s memoir, so you can read about all of the other recipes that had me drooling as I read. I can’t wait to try more of them myself.

Last but not least, I hope all those celebrating had a Happy (and food-filled) Thanksgiving! If you’re following along with my Thanksgiving Readathon, I’ll be wrapping that up with a post on Monday.

Bacon-Wrapped Dates

  • Servings: approximately 32 pieces
  • Time: 40 minutes
  • Print

Ingredients

  • 8 oz. package of pitted dates
  • 4 oz. goat cheese
  • 16 oz. bacon

Directions

  1. Slice alongside one side of each date, from the top to the bottom, so you can open it like a tiny book. Scoop a small amount of goat cheese into the center of each one, and then close it back up.
  2. Cut the whole package of bacon in half, so that each long strip is now half as long. Wrap a half-slice of bacon around the outside of each date.
  3. Arrange seam side down in a baking dish or on a baking sheet with sides to catch any grease. A foil pan is really nice for no cleanup.
  4. Bake at 400-degrees F for 20 to 25 minutes, or until well browned and crispy. Drain on a paper towel, and serve warm or at room temperature, but definitely not hot, unless you want to burn the roof of your mouth so badly you don’t taste anything for days.

From: Bread and Wine: A Love Letter to Life Around the Table with Recipes by Shauna Niequist (pages 171-172)

This post contains affiliate links. Full disclosure here.

Filed Under: book review, recipe Tagged With: appetizer, books about food, dinner party, five ingredients or less, holiday, memoir, nonfiction, party

Lots of Candles, Plenty of Cake + Funfetti Cake

June 1, 2017 by Megan 5 Comments

I added Anna Quindlen’s memoir Lots of Candles, Plenty of Cake to my to-read list almost four years ago. I don’t remember my reasoning for wanting to read it back then, but I know that I decided to finally rescue it from my too-long list - which currently sits at 436 books - because I wanted to make a cake.

Quindlen_Lots-of-Candles-Plenty-of-Cake.jpg

I knew nothing of Quindlen when I began reading, and over the course of her “memoir,” I can’t say I know that much more about her. Really it seemed more like a carryover from her columns in the New York Times as she described them - a collection of her thoughts on life and aging, coupled with bits of advice.

Perhaps I wasn’t exactly the target market for this book - I am roughly half her age, really just at the beginning of my career, not yet married and currently without children. I’m still figuring a lot of things out, and while in some ways she is too, we are figuring out very different things about life. I was able to glean a few interesting insights from her writing, but ultimately, I think this book is one I’d like to try again a couple of decades down the road.

The cake I envisioned when I chose this book was a towering cake ablaze with an unsafe amount of candles. So, I began my recipe search by buying four dozen tall, skinny, colorful candles to cover my imaginary cake. (Thank you, Amazon!) After all, candles do come first in the title - lots of them - and the plenty of cake comes second.

With the candles secured, I sought out a recipe for funfetti cake and found a great one from Sugar Spun Run. The homemade, triple-layer cake suited my needs perfectly. Now, I just had to execute…

I started the night before by setting out my frozen sticks of butter to soften overnight. Between the frosting and the cake, there was so much butter (over a pound and a half!). In the morning, I preheated my oven, separated my eggs and floured the pans to get started.

Then, I added the butter for the cake (1 stick, plus 1 tablespoon) to the stand mixer and beat until creamy. In went the sugar and oil, beaten until well-combined and creamy. I used a scraper on the sides of the bowl and added in the vanilla extract.

In a separate bowl, I whisked together the flour, baking powder and salt. Then, as instructed, I alternated between adding the flour and the milk to the butter-sugar mixture in the mixer, beating on medium speed until combined.

IMG_3094

I whipped the egg whites into stiff peaks and measured out a half cup of sprinkles to add to the cake batter.

IMG_3095

I gently folded them into the batter until both the egg whites and sprinkles were well-incorporated and the funfetti batter was complete.

IMG_3097

I only had 2 cake pans, so I put my best estimate of one-third of the batter into each of my cake pans, saving the last third to bake after the first two layers were finished. I baked them together for about 35 minutes, using a toothpick to test each one before allowing them to cool. After 15 minutes, I removed each cake layer from the pan so they could finish cooling on a rack. Then, I baked my last layer.

IMG_3098

After all of the cake layers were out of the oven and cooling, I set to work on my frosting. First, allll of the butter - 6 softened sticks - went into the stand mixer. (I increased the recipe by 50%, according to the recommendation, so I wouldn’t run out. I ended up having more than enough - please read my notes in the recipe.)

IMG_3099

Once the butter was creamy, I added salt and beat for about 20 more seconds. I did my best to add the powdered sugar gradually without making a mess, but I wasn’t quite successful. My lovely red mixer looked like it had been in a snowball fight by the time I was done! I let it incorporate approximately 1 cup at a time and then added in the vanilla extract.

My cake layers weren’t 100% even because I had had to estimate, so I started with the thickest layer at the bottom. I frosted the top of that, placed the next layer and frosted that, before placing the last layer and frosting the top and sides of the entire cake. As suggested, I put the cake with the crumb coat into the freezer for about 15 minutes before finishing the frosting with a final thicker layer.

IMG_3100

The last step to decorating the cake - but certainly not the least! - was adding the sprinkles. I watched quite a few tutorials on the best way to add the sprinkles without making a mess. My frosted cake was on a cardboard cake round, so I set that on a cooling rack nested into a baking sheet with sides. I cupped my dominant hand (in my case, my left) and filled it with sprinkles, carefully tipping them onto the side of the cake. Most of the extras fell into the baking sheet as expected!

I continued to rotate and sprinkle until the entire bottom third of the cake was covered in sprinkles. Lastly, I carefully covered the outside of the top of the cake with a thick line of sprinkles to match the bottom. It was easier than I expected it to be! And, as someone who is usually terrified of cake-decorating, I found that sprinkles not only do sprinkles look super festive, they cover a lot of errors. 🙂

IMG_3101

Last but not least, it was time for the candles. I didn’t end up using all of the four dozen candles I bought, but I covered the cake pretty well. The candles looked impressive. I have honestly never been more proud of a cake I’ve made - especially from scratch. Hope you enjoy it as much as Scott, my sister and brother-in-law, and my co-workers did! (I know I didn’t have to twist any arms, but thanks to all for taste-testing.)

Triple-Layer Funfetti Cake

  • Servings: 14
  • Time: 1 hour, 30 minutes
  • Print

Cake Ingredients

  • 9 TBS butter, softened
  • 3 cups sugar
  • 1 cup canola oil (vegetable oil would also work)
  • 4 tsp vanilla extract
  • 4 cups + 2 TBS all-purpose flour
  • 4½ tsp baking powder
  • 1½ tsp salt
  • 1½ cup milk
  • 9 egg whites (room temperature preferred)
  • ½ cup sprinkles

Buttercream Frosting Ingredients

  • 1 lb unsalted butter, softened to room temperature
  • ¼ tsp salt
  • 6 cups powdered sugar
  • 6 TBS heavy cream
  • 2 tsp vanilla extract

Cake Directions

  1. Preheat oven to 350F and prepare 3 8-inch round cake pans by generously greasing and flouring. Be sure to shake out excess flour.
  2. In stand mixer, beat butter on medium-low speed until creamy.
  3. Add sugar and oil and beat until all ingredients are well-combined and creamy.
  4. Scrape down the sides and bottom of the bowl and then stir in your vanilla.
  5. In separate bowl, whisk together your flour, baking powder, and salt.
  6. Measure out your milk. Then, with mixer on medium speed, gradually alternate between adding the flour mixture and the milk, starting and ending with the flour mixture. Stir until each one is almost completely combined before adding the next. Pause occasionally to scrape down sides and bottom of bowl.
  7. In separate bowl, combine your egg whites and, with a hand-mixer on high-speed, beat until stiff peaks form.
  8. Using a spatula, gently fold your egg whites and sprinkles into your batter. Take care to scrape the sides and bottom of the bowl so that ingredients are well-combined, and take care not to over-mix.
  9. Evenly divide cake batter into prepared pans.
  10. Bake on 350F for 35-40 minutes, or until a toothpick inserted in the center of each cake layer comes out clean or with few crumbs (should not be wet). For best results, rotate your cake pans halfway through baking to ensure even baking. Cakes will be a light golden brown when done.
  11. Remove cakes from oven and allow to cool in pans for 15 minutes. Run a butter knife around the inside rim of each pan and invert each onto a cooling rack. Allow to cool completely before frosting.

Frosting Directions

  1. In stand mixer, beat butter on medium-speed until creamy.
  2. Add salt and beat again for about 20 seconds.
  3. Gradually, about 1 cup at a time, add powdered sugar, waiting until each cup is completely mixed before adding the next cup.
  4. Then, 2 tablespoons at a time, add the heavy cream on medium-high speed, waiting until each addition is well-combined before adding the next 2 tablespoons.
  5. Add vanilla extract and stir on medium-high for 30 seconds.
  6. Transfer one layer of your cooled cake to serving platter. Use frosting to ice the top. Add the next layer, ice the top of that. Add your third layer on top and ice the top, and then do a thin "crumb coating" around the entire cake.
  7. Transfer to freezer for 10-15 minutes, then remove and apply a clean, thick coat of frosting around the entire cake.

From: Sugar Spun Run

Original recipe based on this technique from I Am Baker to frost cakes. She recommended increasing the above frosting recipe by 50% to ensure full coverage, but I had a TON leftover. I don’t like overly frosted cakes, but mine was still well-frosted according to taste testers (a good amount), so it’s up to you and your preferences.

This cake may also be made in 3 9" pans, just decrease the baking time. Start checking the cakes for doneness at 25 minutes.


P.S. It will apparently take me only 8 years (a shockingly short amount of time!) to finish my TBR list...assuming I don’t add any more books. If you’d like to calculate your own TBR time, check out Read It Forward’s calculator. Let me know in the comments how many years of reading you have ahead of you!

Screen Shot 2017-05-26 at 12.40.27 PM


This post contains affiliate links. Full disclosure here. 

Filed Under: book review, recipe Tagged With: baking, celebration, dessert, memoir, quick read

Blood, Bones and Butter + Lamb Chops

October 26, 2016 by Megan Leave a Comment

I don’t just enjoy cooking and eating (and writing) about food, I also enjoy reading about it - whether it be literature, a piece of nonfiction or another blog. Most often in my case it comes in the form of a memoir, like my latest read, Blood, Bones and Butter: The Inadvertent Education of a Reluctant Chef. This was buried pretty deep on my to-read list (it’s been hanging out there since 2013) when Goodreads Deals brought it back to my attention. I finally added it to my collection and dug in.  

5170smcuhal

For me, nothing compares to extremely detailed descriptions of food that actually existed in real life, food that was often so life-changing that it has made its way to a book, tempting readers from the page. Gabrielle Hamilton’s memoir begins with one such powerful food memory.

She walks us through the preparation for her family’s annual lamb roast, which happened every spring when she was a child. Gabrielle describes her bohemian father, who brought her along to the butcher and later basted several whole lambs with a flavorful, dripping marinade over a crackling open fire. She talks lovingly of her now-estranged French mother who “instilled in [Gabrielle and her siblings] nothing but a total and unconditional pleasure in food and eating.”

Gabrielle didn’t set out to be a chef, but that’s exactly what she becomes. Out of desperation as a teenager, she begins working in a local kitchen, mostly learning on the job. A series of kitchens, a trip around the world and a Masters degree in writing later, she finds herself with an unexpected opportunity to open her own restaurant, and so she does.

Though full of descriptions that made my stomach rumble, Blood, Bones and Butter is about more than just cooking and kitchens. It’s about the family that Gabrielle came from, the family she works with, and the family she is beginning to make.

I kept coming back to the lamb roasts of her childhood. Lacking the backyard to roast an entire lamb, I found a recipe for French-inspired lamb chops and accompanied those with new potatoes and Brussels sprouts, both fresh from the farmers’ market this weekend.

The potato recipe calls for them to be peeled, and so I began there, knowing it could be a little time-consuming. It was, and it was also a little dangerous.

img_1577

Tiny potatoes leave little room to hold onto them while wielding a peeler. On top of which, once the skin is removed, they’re quite slippery. Potatoes were flying all over the counter! I eventually made it through (unscathed), cut them in half and put them in a small pot of water, covered by 1-inch.

Then I preheated the oven to 400 degrees F and began prepping the Brussels sprouts. Cut off the bottoms and remove the outer, dark green leaves, chopping the larger ones in half. (I prefer to keep small sprouts whole, but feel free to cut them in half as well.) Drizzle with olive oil and sprinkle with salt and freshly ground black pepper to taste. Toss on a foil-covered baking sheet until well-coated. They should roast for about 30-40 minutes, according to your preference. I recommend tossing/stirring about halfway through, so they brown more evenly. (Here they are pre-roasting.)

img_1579

With the sprouts in the oven, I began boiling the potatoes and focused on making the butter mixture for the lamb chops. Using a fork, I mixed together the softened butter, mustard, fresh thyme, lemon zest and salt and pepper. Once finished, I put the compound butter in the fridge to stay chilled. (Check the potatoes here and if they’re boiling, reduce heat to a simmer. Set timer for 10-12 minutes.)

img_1580

I readied my broiler pan, as directed, and placed the lamb chops on top. I seasoned generously with salt and pepper on both sides.

img_1581

With the broiler on high, I put them in for 8 minutes and set my attention to the shallot mixture for the potatoes. I minced a large shallot and mixed it with lemon juice and salt. I let this sit until the lamb chops were finished (about 15 minutes), before tossing with the chopped parsley and cooked potatoes.

img_1578

Having never made lamb chops, I found them easier to pull off than I initially expected. I also couldn’t get enough of the rich, buttery potatoes - those will definitely be going in the regular rotation!

img_1582

Happily, everything came together to make a fancier-than-usual weekend meal and the perfect addition to Scott’s birthday weekend. In a meal based on Blood, Bones and Butter, it became clear “you can never have too much butter.”*

Lamb Chops with Lemon, Thyme & Mustard Butter

  • Servings: 4
  • Time: 15 minutes
  • Print

From: Fine Cooking

Ingredients

  • 4 TBS unsalted butter, softened
  • 1 tsp whole-grain Dijon mustard
  • 1 tsp fresh thyme leaves, lightly chopped
  • ¾ tsp finely grated lemon zest
  • ⅛ tsp kosher salt; more as needed
  • ⅛ tsp freshly ground black pepper; more as needed
  • 8 lamb loin chops (1-1/2- to 2-inch-thick chops; about 3 lb.), trimmed

Directions

  1. In a small bowl, mash together the butter, mustard, thyme, zest, salt, and pepper until well combined. Refrigerate until ready to use.
  2. Position an oven rack 5 to 6 inches from the broiler element and heat the broiler to high. Line the bottom of a broiler pan with foil and replace the perforated top part of the pan. Arrange the chops on the pan. Season both sides of the lamb generously with salt and pepper.
  3. Broil until the first side is well browned, about 8 minutes. Turn the chops over with tongs and continue to broil until they’re well browned and the center is cooked to your liking, 3 to 5 minutes longer for medium rare (cut into a chop near the bone to check).
  4. Transfer the lamb to serving plates and top each chop with a dab of the flavored butter. Serve hot.

New Potatoes with Butter, Shallots & Chervil

  • Servings: 6
  • Time: 30 minutes
  • Print

Ingredients

  • 2 ¼ lb. small (2-inch) new potatoes, such as Yukon Gold or Yellow Finn, peeled and halved lengthwise (about 14 potatoes)
  • Kosher salt
  • 1 large shallot, minced (about 1/4 cup)
  • 2 tsp fresh lemon juice
  • 6 TBS unsalted butter, cut into 8 pieces, softened to room temperature
  • 2 TBS chopped fresh chervil or flat-leaf parsley
  • Freshly ground black pepper

Directions

  1. Put the potatoes in a medium pot, add water to cover by 1 inch, and season generously with about 2 TBS salt (the water should taste almost as salty as sea water).
  2. Bring to a boil, reduce the heat to a simmer, and gently cook the potatoes until tender when pierced with a fork, 10 to 12 minutes. (You want them to maintain their shape, so be careful not to overcook them.)
  3. Meanwhile, combine the shallot, lemon juice, and a pinch of salt in a small bowl, and let sit for at least 10 minutes (up to 2 hours).
  4. Drain the potatoes and return them to the warm pot. Immediately add the shallot mixture, butter, and chervil or parsley and gently stir to combine. Season with salt and pepper to taste and serve.


____

*From the wonderful movie, Julie & Julia - thank you, Nora Ephron

Filed Under: book review, recipe Tagged With: dinner, meat, memoir, nonfiction, veggies

Reading Lolita in Tehran + Cream Puffs

October 6, 2016 by Megan 3 Comments

It probably comes as no surprise that I usually adore books* about bookstores, book clubs, book nerds...you get the idea. I find the characters relatable, occasionally discover new insights into books I love, and best case scenario: I walk away with a list of books to read.

book_lolita.jpg

In Azar Nafisi’s memoir, Reading Lolita in Tehran, the books the women read were Western classics - forbidden at the time in Iran. Nafisi, a former professor, and seven of her most like-minded female students meet every Thursday morning to discuss these novels over pastries and tea. It seemed like a book I was destined to love.

Each of four sections is focused on the works of a specific author (Nabokov, Fitzgerald, James and Austen), and their works of fiction were used as a lens through which we learn about Nafisi’s life and her students’ lives. I thought it was a little unbalanced and too literature-focused, particularly in the beginning; I was left wanting more about what was going in Tehran and the lives of the women. Unfortunately, I found it hard to get through - maybe it was because it was written by a literature teacher, but at times I felt like I was back in English class, struggling to get through a required reading assignment.

During the first meeting, Nafisi suggests the “calming distraction of cream puffs and tea” to break the ice. For my recipe, I turned to Julia Child’s Mastering the Art of French Cooking. I had made cream puffs only once during culinary school about five years ago, so I was hoping it would be like riding a bike. With my brand new standing mixer** at the ready and Julia’s words of encouragement, I was up to the task. (Really, has anyone read her cookbook? It’s so cheery that it makes any recipe seem nearly impossible to fail.)

Anyway, I began by putting milk on to boil and beating the sugar and eggs until they turned pale yellow and reached the ribbon stage. Here it is just getting started:

img_1377

I beat in the flour and then carefully dripped in the boiling milk while continuing to beat the mixture, which is where the standing mixer came in handy. After it was well-combined, I transferred to a saucepan on the stovetop and whisked until it became custard-y in consistency. I removed it from the heat and added the vanilla and butter. In an attempt to cool it off, I scraped it into a bowl, covered with saran wrap (so it wouldn’t form a “skin”) and put it in the fridge.

While that cooled, I began prep for the pâte à choux, or puff paste. It is a very light dough that is used to make not only cream puffs but many kinds of puff pastries including eclairs, profiteroles and beignets. In culinary school, we were warned that it takes great attention because the number of eggs you need is not constant. It can vary based on humidity or even the size of each egg. It’s important to not use too few eggs as this can cause the dough not to puff up and form the small caverns inside that are a hallmark of any sort of puff pastry.

I doubled Julia’s recipe, so I started with 8.

img_1378

In the end, I only needed 8. This is something you can only really tell by the look (though if I hadn’t been to culinary school, this wouldn’t have been as clear to me). This website does a good job of explaining how to tell if it’s ready, and I’ve included an excerpt below:

How to Tell if Choux Paste Is Ready

This fact means that it is more important to know how the finished paste should look and feel than it is to just follow the recipe. Finished choux paste should be soft, smooth, and be able to be piped.

If you pull the paddle attachment of an electric mixer out of the paste, a "tongue" should appear at the tip of the paddle.

Similarly, if you gently scoop up a bit of the paste with a rubber spatula and let it fall back into the bowl, a "v" of paste should be left behind on the spatula.

Be sure to mix thoroughly between adding in each egg and then check the paste before adding the next one. The mixture will appear separated and gloppy in between additions, but will come back into a smooth paste as you mix.

If by the second-to-last egg, the paste is already looking smooth and forms a "v" as it falls back into the bowl, it's OK not to add the last egg. Feel like your paste is borderline and just needs a little more egg? Whisk one up and only pour in half!

Before I scooped it into my pastry bag, it looked like this:

img_1379

I didn’t take a picture of my pre-baked choux mounds, but I’ll mention that it’s important that you simply hold the tip to the baking sheet and let the paste gently round up and out until it’s the size you’re looking for. (The size is entirely up to you - puffs can be large, small or medium.) If you attempt to swirl the paste into a circular shape, it can cause your puffs to sort of snail-out and flatten as they bake. (Don’t worry, though, they still taste great! It happened to a few of mine, though they’re not pictured.)

Once all of the puffs were cooled, I used a smaller pastry tip to fill them with the previously-made pastry cream. If I had to do it again, I probably would’ve made the lighter cream that Julia suggested (see notes below), but I was still quite happy with the end result.

img_1380

Creme Patissiere (Pastry Cream)

  • Servings: makes about 2 ½ cups
  • Time: 20 minutes
  • Print


From: Julia Child's Mastering the Art of French Cooking (Anniversary Edition)

Ingredients

  • 1 cup granulated sugar
  • 5 egg yolks
  • ½ cup flour, scooped and leveled
  • 2 cups boiling milk
  • 1 tablespoon unsalted butter
  • 1 ½ tablespoons vanilla extract

Directions

  1. Put the milk in a saucepan on the stove and begin to bring to a boil.
  2. Gradually beat the sugar into the egg yolks and continue beating for 2-3 minutes until the mixture is pale yellow and forms the ribbon.
  3. Beat in the flour.
  4. Beating the yolk mixture, gradually pour on the boiling milk in a thin stream of droplets.
  5. Pour into a heavy-bottomed 2 ½ quart enameled saucepan and set over moderately high heat. Stir with whisk, reach all over bottom of pan. As sauce comes to a boil it will get lumpy, but will smooth out as you beat it. When boil is reached, beat over moderately low heat for 2-3 minutes to cook the flour. Be careful custard does not scorch in bottom of pan.
  6. Remove from heat and beat in the butter, then the vanilla extract. If custard is not used immediately, clean it off the sides of the pan, and dot top of custard with softened butter to prevent a skin from forming over the surface. It will keep for a week under refrigeration, or may be frozen. [I recommend refrigerating in a bowl covered with cling wrap pushed tightly over the top of the custard, prior to filling the puff shells.]

Pâte à Choux (Cream Puff Paste)

  • Servings: 36-40 small dessert puffs
  • Time: 1 hour
  • Print

Ingredients

  • 1 cup water
  • 6 tablespoons or ¾ stick unsalted butter, cut into pieces
  • 1 pinch salt
  • 1 teaspoon sugar
  • ⅛ teaspoon pepper [I didn’t use this in mine]
  • 1 pinch nutmeg
  • ¾ cup all-purpose flour, scooped and leveled
  • 4 large eggs
  • 1 egg, beaten with ½ teaspoon water in a small bowl

Directions

  1. In a 1 ½ quart heavy-bottomed saucepan, bring water to a boil with the butter and seasonings and boil slowly until the butter has melted. Meanwhile measure out the flour.
  2. Remove from heat and immediately pour in all the flour at once. Beat vigorously with a wooden spatula or spoon for several seconds to blend thoroughly. Then beat over moderately high heat for 1-2 minutes until mixture leaves the sides of the pan and the spoon, forms a mass, and begins to film the bottom of the pan.
  3. Remove saucepan from heat and make a well in the center of the paste with your spoon. [Here I transferred the mass to my standing mixer with paddle attachment and added the eggs one at a time while on a setting between 2 and 4.] Immediately break an egg into the center of the well. Beat it into the paste for several seconds until it has absorbed. Continue with the rest of the eggs, beating them in one by one. The third and fourth eggs will be absorbed more slowly. Beat for a moment more to be sure all is well blended and smooth.
  4. Preheat the oven to 425 degrees F and butter [or lightly spray] 2 baking sheets.
  5. Using a rubber spatula, fill a pastry bag with a ½-inch round tube opening with the warm choux paste. [If you do not have a pastry bag, drop the paste with a spoon.]
  6. Squeeze the paste onto the baking sheets, making circular mounds about 1-inch in diameter and ½-inch high. Space the mounds 2-inches apart.
  7. Dip your pastry brush into the beaten egg mixture and flatten each puff very slightly with a side of the brush. Avoid dripping egg down the puff and onto the baking sheet, as this will prevent the puff from rising.
  8. Set the sheets in the upper and lower thirds of your preheated, 425-degree oven, and bake for about 20 minutes. The puffs are done when they have doubled in size, are a golden brown, and firm and crusty to the touch. Remove them from the oven and pierce the side of each puff with a sharp knife. Then set in the turned-off oven and leave the door ajar for 10 minutes. Cool the puffs on a rack.

I filled my shells with the pastry cream recipe provided above, as I did when I was taught to make these in culinary school. The same filling and dough can also be used for eclairs, though instead of baking in mounds, you bake in longer lines.

Julia Child suggests using a Creme Saint-Honore, which is the recipe above with beaten egg whites and additional salt and sugar. It produces a fluffier filling for the cream puffs, if desired. The exact recipe can be found on page 591 of the Anniversary Edition of her cookbook.


_________

*Some that I would recommend include: The Jane Austen Book Club, The Storied Life of A.J. Fikry and Anne of Green Gables

**Once again, a very enthusiastic thank you to Scott’s mom for the thoughtful gift!

Filed Under: book review, recipe Tagged With: baking, dessert, memoir, nonfiction

  • « Go to Previous Page
  • Go to page 1
  • Go to page 2
  • Go to page 3

Primary Sidebar

About

The Hungry Bookworm brings together literature and food. Megan has an insatiable appetite for both.

As C.S. Lewis said, “Eating and reading are two pleasures that combine admirably.” Enjoy!

  • Bloglovin
  • Facebook
  • Instagram
  • Pinterest

Subscribe

Don't miss out on bookish content, exclusive giveaways, and of course, book club-friendly recipes. Get notified of new posts via email.

Join 2879 subscribers.

Search for Ingredients, Recipes, or Books

Recent Posts

  • Subscriber Box Review: Literati Book Club - Roxane Gay's Audacious Book Club
  • Arsenic and Adobo + Ensaymada
  • Review of The Kindred Spirits Supper Club
  • Kids Edition: Sometimes I Like to Curl Up in a Ball + "Dirt" Pudding Cups
  • The Midnight Library + Broccoli and Ricotta Toast

Goodreads

Tags

5 ingredients or less appetizer baking book club book list book of the month books about food bread breakfast brunch chicken contemporary cookies cultural dessert dinner dinner party dystopia easy prep favorites fiction fruit historical fiction holiday ice cream linkup lunch meat memoir mini review nonfiction pasta quick read reading challenge science fiction seafood show us your books side dish snack soup TBR list thriller top ten tuesday vegetarian veggies

Archives

Other Great Book Blogs

Literary Quicksand
Never Enough Novels
Death by Tsundoku
Professional Reader 25 Book Reviews
Privacy & Cookies: This site uses cookies. By continuing to use this website, you agree to their use.
To find out more, including how to control cookies, see here: Cookie Policy

Footer Widget Header

Megan’s Instagram

Copyright © 2025 · Hungry Bookworm