• Skip to primary navigation
  • Skip to main content
  • Skip to primary sidebar
  • Home
  • Reviews
    • Book Index
    • Fiction
    • Non-Fiction
    • Top Ten Tuesdays
The Hungry Bookworm

The Hungry Bookworm

reading + eating

  • Recipes
    • Drinks
    • Snacks, Sides & Apps
    • Main Dishes
    • Desserts
    • 5 Ingredients or Less
  • About
    • Meet Megan
    • How I Rate
    • Review Policy
    • Contact

fiction

Standard Devation + Spaghetti Marinara and Garlic Bread

January 18, 2018 by Megan Leave a Comment

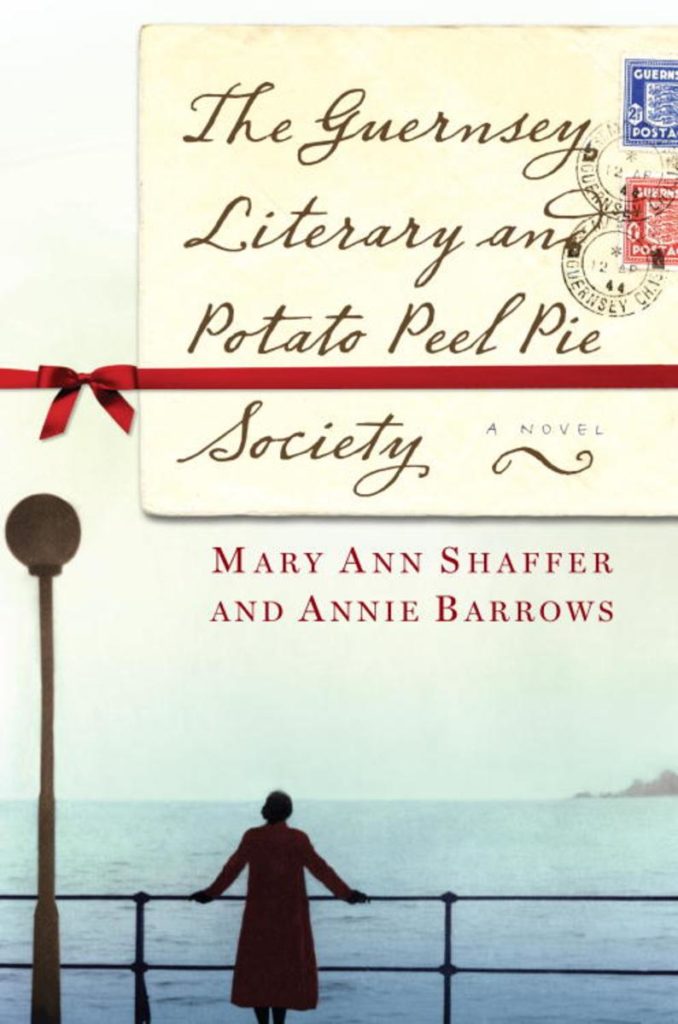
One day, Katherine Heiny’s novel Standard Deviation appeared in my library queue, ready to pick up. As I mentioned in January’s SUYB post, I can’t even remember how I heard about, but I must’ve added it to my library list right away so I wouldn’t forget about it. However it stumbled into my life, I’m glad it did; it wasn’t a life-changing novel by any means, but it was entertaining and enjoyable all the same - a bit like an indie rom-com.

Standard Deviation is about Graham, who lives in an apartment in New York City with his second wife Audra and their young son. While Graham seems to prefer to observe, his wife Audra talks constantly and makes friends wherever she goes, leading to a barrage of house guests who always seem to be underfoot.

A lesser storyteller could’ve easily painted Graham as an exasperated husband sick of his wife’s antics and Audra as a selfish busybody, and though they occasionally exhibit those qualities, on the whole they’re much more than that, and quite likeable. One of the more endearing (and amusing) storylines within the novel revolves around their son Matthew and his love of origami. Though it’s never explicitly said (that I can recall), it appears he has Asperger's, and their dedication to his passion is an excellent example of selfless parenting.

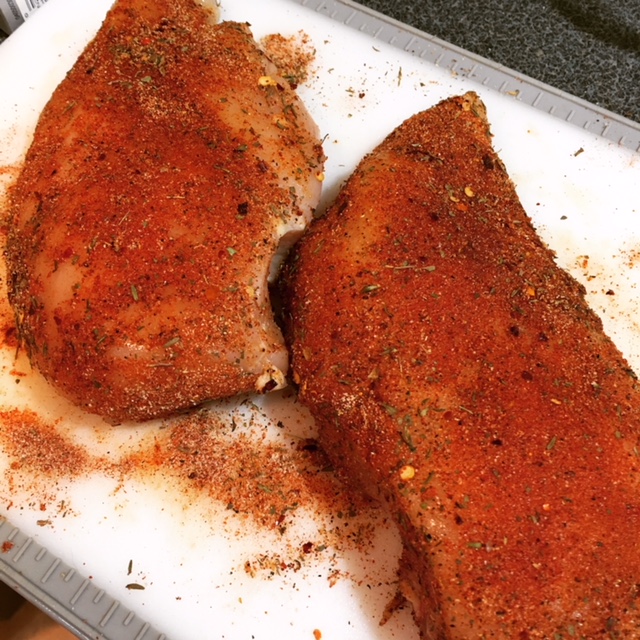
Like me, Graham loves good food and cooking at home, both for his family and their frequent guests. Also like me, he finds cooking less enjoyable when he’s forced to plan a meal around picky eaters. Unfortunately for Graham, he often found himself in such a situation, and it was in one of those moments that I drew my inspiration for today’s recipe:

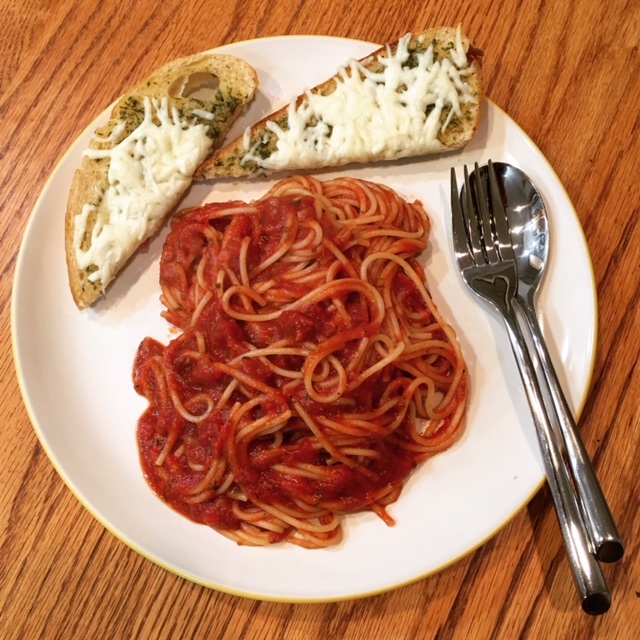
Spaghetti marinara with garlic bread was his all-purpose crowd-pleasing picky-eater dinner. Spaghetti marinara was like taking a girl on a first date, actually: nothing fancy, no surprises, best foot forward.

I personally prefer meat sauce on my spaghetti, but desperate times call for desperate measures. I took the recipe my family usually uses for spaghetti sauce and omitted the meat to make a marinara sauce. This recipe is really easy, but it’s flavorful and thick so it sticks to spaghetti really well.

To start, I added about a half cup of chopped onion to olive oil already heated in a sauce pot and cooked them until they were translucent. To the onions, I added a large can of crushed tomatoes and small cans of tomato sauce and tomato paste. Then I added salt and pepper, dried basil, dried oregano, some sugar and Parmesan cheese and gave it all a good stir.

Once the ingredients are combined, bring it up to a boil and then reduce to a simmer. Like most tomato sauce, it can get messy real quick if it starts to bubble up and pop, so I like to keep a lid offset on top to let some of the air and steam escape but keep the sauce from getting all over the stovetop. You can let it simmer for as little as long as you like, stirring occasionally, but it's best after at least 20 minutes. Of course, it's even better the second day.

While the sauce simmered, I boiled the water for my spaghetti and started on the garlic bread. Because I was just making dinner for Scott and myself, I adjusted the recipe down and only used about a third of the Italian bread loaf. I partially melted some butter in a small bowl, added the garlic powder and dried parsley, and then melted the mixture the rest of the way. With a basting brush, I applied the butter-garlic mixture generously to each slice.

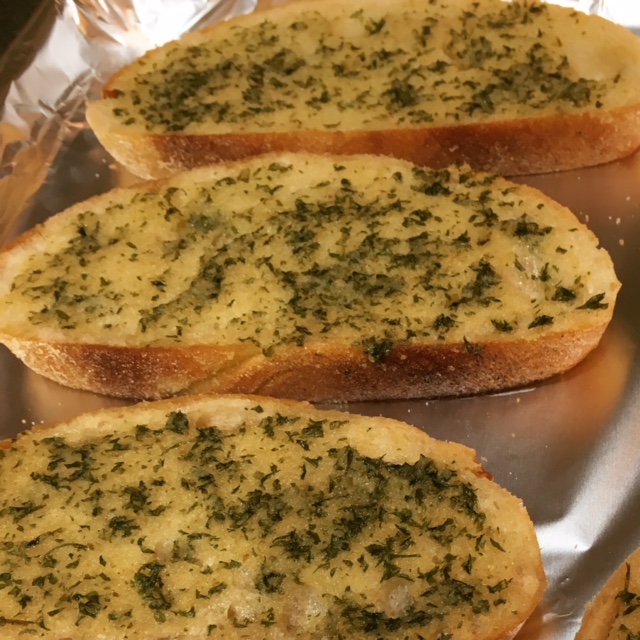
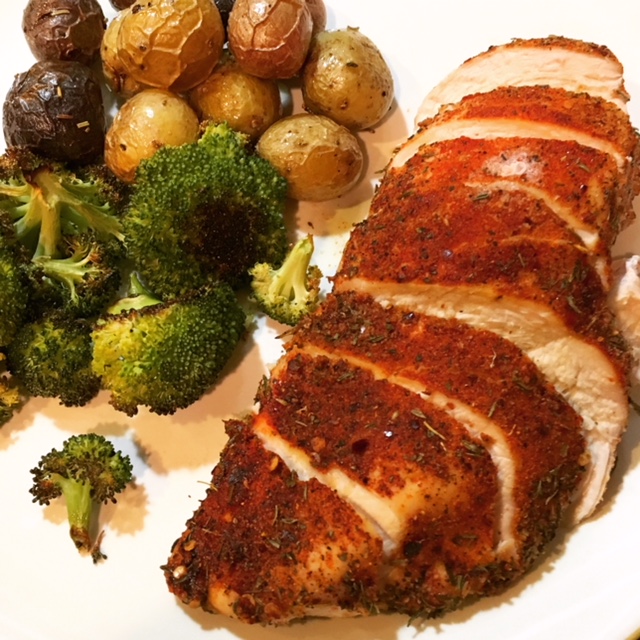
I baked the bread in the oven for about 10 minutes, covered each slice with shredded mozzarella and put the pan back in the oven for about 7 more minutes until it was melted. At this point, the spaghetti pasta was cooked al dente and the sauce was ready to go.

I need to perfect my spaghetti swirl for future fancy plating, but the taste more than makes up for the lack of finesse in that area. These crowd-pleasing recipes are as perfect for the discerning foodies in your life as they are the picky-eaters. It’s wonderful bonus that they’re easy too. Hope you enjoy!

Marinara Sauce

  • Servings: 6
  • Time: 30 minutes
  • Print

Ingredients

  • ½ cup chopped onion
  • 1 28-oz can crushed tomatoes
  • 1 8-oz can tomato sauce
  • 1 6-oz can tomato paste
  • ¼ teaspoon garlic powder
  • 1 teaspoon salt
  • ¼ teaspoon black pepper
  • ¾ teaspoon dried basil
  • ¾ teaspoon dried oregano
  • ¼ cup sugar
  • ¼ cup Parmesan cheese

Directions

  1. In a large sauce pot, preheat a bit of olive oil (about 1 Tablespoon) and add onion. Cook until translucent.
  2. Add crushed tomatoes, tomato sauce and tomato paste. Add remaining ingredients and stir.
  3. Bring to a boil then simmer. (Use a lid; it will splatter.)
  4. Serve over spaghetti or your favorite pasta.

Adapted from a family recipe

Recipe Notes: To make a meat sauce, simply add 1-lb ground beef or turkey, browning with the onion in step one.


Cheesy Garlic Bread

  • Servings: 6-8
  • Time: 25 minutes
  • Print

Ingredients

  • ½ cup butter
  • 1½ tablespoons garlic powder
  • 1 tablespoon dried parsley
  • 1 (1 pound) loaf Italian bread, cut into ½ -inch slices
  • 8 oz. shredded mozzarella cheese

Directions

  1. Preheat oven to 350 degrees F.
  2. In a small saucepan over medium heat (or the microwave), melt butter and mix with garlic powder and dried parsley.
  3. Place Italian bread on a medium baking sheet. Using a basting brush, brush generously with the butter mixture.
  4. Bake in the preheated oven approximately 10 minutes, until lightly toasted. Remove from heat. Sprinkle with mozzarella cheese and any remaining butter mixture. Return to oven approximately 5 minutes, or until cheese is melted and bread is lightly browned.

From: Noelle C on Allrecipes.com

This post contains affiliate links. Full disclosure here.

Filed Under: book review, recipe Tagged With: bread, contemporary, dinner, fiction, pasta, quick read

The Guernsey Literary and Potato Peel Pie Society + Potato Peel Pie

January 16, 2018 by Megan 9 Comments

Recently, my book club elected to read Mary Ann Shaffer and Annie Barrow’s The Guernsey Literary and Potato Peel Pie Society, a charming piece of historical fiction about life on the British Channel Islands during and after WWII. It is a bit of a book about books, but more than that it’s about how literature can bring people together, unexpectedly, even in the worst of times.

In 1946 London, a mysterious man writes to Juliet Ashton because he somehow came to be in possession of one of her books and is looking for more by the same author, who he’s come to adore. Of course, as a reader, Juliet steps in to help him get the books he needs, and with that, she launches a friendly correspondence with him - and his fellow islanders. All of them belonged to an impromptu book club during the German wartime occupation of their home on Guernsey, and Juliet is beside herself to learn more about them.

While I was expecting a potentially difficult read, as many WWII novels tend to be (including The Nightingale and Lilac Girls), I was pleasantly surprised. There are some brief descriptions of time in the concentration camps, but it mostly serves as a way to provide the characters - who’ve survived the war at that point - with some closure. Book narratives that take place solely through letters can sometimes fall flat, but in this case, my whole book club enjoyed the choice. I thought it added to the charm.

Though the Guernsey Literary Society also boasts the name of a disgusting-sounding dish, the potato peel pie is mentioned only briefly in the novel. It is described as a pie made out of potato peels and something to do with beets. As I read, I was slightly horrified to think about making such a pie for this post. Luckily, I remembered my Book Club Cookbook and thought I recalled seeing this book listed in the index.

Sure enough! It listed a recipe for an “occupied” version, using just beets, potatoes (including the peels) and a bit of milk, but it also included a “non-occupied” version, which sounded delicious. I decided to make it for our book club meeting. 

Since we were meeting during the week and I don’t have a lot of time after work before everyone arrives, I got started the night before. Since the non-occupied version still includes potato peels, I made sure to scrub them thoroughly before peeling. Here is the after photo:

I peeled them as carefully as I could and layered them into the pie dish, making sure to completely cover the bottom.

While they baked in the oven, I cut the potatoes into large chunks and got them going in a pot of salted, boiling water on the stove.

After about 20 minutes in the oven, the potato peels were looking slightly crispy, so I pulled them out before they burned. I was surprised, however, to see that they’d all curled up and no longer completely covered the bottom of the pan - a bit of a disappointing crust in look only, as it still tasted delicious later.

Once the potatoes were fully cooked, I drained them and transferred them to a large bowl with some butter to mash them up with a hand mixer (my typical method, since I don’t actually own a manual masher). Then, I stirred in the milk, and once that was absorbed, added the cheddar cheese and sour cream as well.

Finally, I spread the whole mixture in the pie dish on top of the potato skins.

Because I wasn’t serving it until the next day, I covered it with plastic wrap and stored it in the fridge overnight. Then, prior to book club, I baked it for the first time. It was still cold from the fridge (not room temperature, or slightly warm as if I’d baked it immediately), so I cooked it for longer - closer to an hour.

Once it was melty, slightly bubbly on the edges with just a touch of brown on top, I removed it from the oven. My entire book club could smell it, and we were starving, so we didn’t wait the recommended 15 minutes before serving. It ended up being more like cheesy mashed potatoes - probably the best mashed potatoes I’ve ever had, honestly - than potato “pie” but everyone enjoyed it just the same. The crispy skins throughout added a pleasing texture.

From our book club to yours, we recommend checking out this charming novel before the movie comes to theaters in April. I, for one, always look forward to the opportunity to have a lively discussion about whether the book or movie is better (even though we all know the answer going in) - and who better to do that with than your favorite book-loving friends?

Print Recipe

Annie Barrow’s Non-Occupied Potato Peel Pie

Make the potato peel pie from The Guernsey Literary and Potato Peel Pie Society. 
Prep Time15 minutes mins
Cook Time1 hour hr 30 minutes mins
Total Time1 hour hr 45 minutes mins
Course: Main Course

Ingredients

  • 1½ - 2 pounds Yukon gold potatoes about 4 medium or 6 small potatoes
  • No beets
  • ½ cup milk
  • 1 stick butter, cut into pieces
  • 1¼ cups shredded cheddar cheese
  • and maybe some sour cream too, (about ¼ cup)

Instructions

  • Preheat oven to 400 degrees F.
  • Go ahead and use the peelings as the crust, but cook them first: Scrub potatoes and pat dry. Peel potato and lay peelings evenly in the bottom of a 9-inch pie pan. Place in oven and cook for about 15-20 minutes, because it would be nice if they were a little crispy. When they’re done, reduce oven heat to 350 degrees F.
  • In the meantime, place potatoes in a large pot, cover with salted water, and boil until they’re soft, however long that takes (about 30-40 minutes). Then, drain the potatoes and mash them up with the butter until they’re nice and fluffy. Add milk slowly and stir until milk is absorbed. Stir in that delicious cheese and the sour cream, too, if you want it (and who wouldn’t?).
  • Pour the potato mixture on top of the crispy skins. Then, put the pie in the oven for about 30 minutes until it’s all melty and glorious (and lightly browned). Allow to cool for about 15 minutes, until it sets. Serve warm. To reheat: Cover with foil and heat for 15-20 minutes in an oven preheated to 300 degrees F.

Notes

From: The Book Club Cookbook, pages 162-163
If, for whatever reason (say, book club), you need to make this the night before. I recommend stopping before you put the potato peel pie in the oven. Fill pan with the mashed potato mixture, cover with plastic wrap and refrigerate. Remove from the fridge while you preheat the oven to 350 degrees F. Bake for about 45 minutes to an hour (checking as you go) to ensure it’s heated through and then allow to cool before serving, per the above directions.

This post contains affiliate links. Full disclosure here.

Filed Under: book review, recipe Tagged With: baking, book club, fiction, historical fiction, vegetarian

In the Midst of Winter + Chilean Cazuela Stew

January 13, 2018 by Megan 2 Comments

Isabel Allende’s most recent novel In the Midst of Winter really just begs to be read at this time of year. Though it was published in October last year, I wasn’t able to get a copy from the library until December, which seemed like perfect timing to me. I started it just as an early snowstorm hit Michigan...and I was catching a plane to south Florida. As I sat in the warmth of a rare perfect weather weekend, reading Allende’s vivid descriptions of bitter cold, blustery wind and mounds of snow, I was grateful to have escaped - if just for a little bit.

Like the only other Allende book I’ve read, The House of the Spirits, this novel features strong Latin American women and shines a spotlight on the unique issues they face. Lucia is a university lecturer from Chile, currently living in the bottom floor apartment of Richard, a standoffish professor at the same university. As a snowstorm overtakes Brooklyn, Richard gets in a fender bender, setting off a chain of events no one saw coming. When the other driver, Evelyn, later shows up on his doorstep and refuses to leave, he enlists Lucia’s help.

Evelyn, an illegal immigrant from Guatemala, is working as a nanny and is terrified to return to her employers with a damaged car. After hearing her out, Lucia is determined to help the girl and a reluctant Richard is brought along for the ride. Winter couldn’t be more timely with its portrayal of immigrants - both legal and illegal - as it highlights their heartbreaking stories with compassion and humanity.

When Richard goes to Lucia to request her help, she is desperately trying to stay warm in her underheated apartment. She describes a delicious, comforting Chilean stew called cazuela - full of beef, corn, potatoes and pumpkin - that she often makes to warm up. She brings it upstairs to Richard’s.

As I looked for a cazuela recipe like Lucia’s, I kept coming across ones that included chicken. While cazuela may be made with any kind of meat really, beef is used in the traditional Chilean recipe. To get exactly what I was looking for, I combined two different recipes, one from Que Rica Vida and one from Taste of Home. In the end, I included beef, corn and potatoes, like Lucia, and substituted butternut squash for the pumpkin since I already had that on-hand.

I was unable to find a small 1-pound beef brisket at my grocery store because apparently they only offer them in slabs greater than 10 pounds (at least when I was shopping). I opted for corned beef brisket instead, because they were available much closer to the weight that I needed, but I would still recommend trying to find a small cut of brisket or other non-corned beef to use. While still alright, the corned beef ended up being a bit tough and may have affected the flavor a bit.

Anyway, I cut my roughly 1-pound brisket into 6 chunks, as the recipe directed, and set it aside. Then, I cut up my onion, butternut squash, potatoes and carrots into similarly large chunks, as evenly as I could manage.

To the oil already heated in my Dutch oven, I added the meat and cooked it for about 2-3 minutes on each side, about 10 minutes total. Then, I added the onions, oregano, cumin and salt and pepper, mixing and allowing to cook for another 5 minutes or so.

To the pot, I added the rest of my prepared veggies - carrots, potatoes and squash - and covered everything with a combination of vegetable broth and boiling water, about 6 cups total. I let it come to a boil and then simmered it, uncovered, for about 15 minutes before adding the frozen ears of corn.

When the stew was almost finished, I added a handful of frozen green beans and let it continue to simmer for another 5 minutes or so.

To serve, I put a bit of already cooked rice (about ⅓ - ½ cup) in the bottom of a bowl. I plucked out a piece of beef, corn, potato and squash, along with some carrots, onions and green beans and placed them on top of the rice, covering everything with a few generous ladlefuls of broth.

This warm, vegetable-filled soup certainly made for a comforting winter dinner and I'd be interested in trying it again sometime.  

Chilean Cazuela with Beef

  • Servings: 6
  • Time: approx 45 minutes
  • Print

Ingredients

  • 1 lb. beef brisket
  • 2 tablespoons vegetable oil
  • 1 onion, cut into quarters
  • 1 teaspoon oregano
  • 1 teaspoon ground cumin
  • 4-6 pieces of fresh or frozen corn on the cob (2 inches each)
  • 3 carrots, cut into 1-inch chunks
  • 6 small red potatoes, peeled (or medium potatoes cut in half)
  • 6 small pieces of butternut squash
  • 1 handful of frozen green beans
  • Salt and pepper
  • Hot cooked rice (about 3 cups)
  • 4 cups vegetable broth
  • 2 cups boiling water
  • Fresh cilantro or parsley, to taste

Directions

  1. Cut the meat into six portions. Preheat the vegetable oil in a large pot. Cook the meat for approximately 3 minutes on each side.
  2. Add the onion, cumin and oregano. Add salt and pepper to taste. Mix well and cook for 5 minutes.
  3. When ready, place the potatoes, carrots and butternut squash in the pot. Completely cover the contents with the vegetable broth and boiling water, approximately 6 cups. Bring to a boil and simmer for 25 minutes, or until meat is cook and vegetables are tender.
  4. Add corn after approximately 15 minutes. Add frozen green beans within last 5 minutes.
  5. Sample and adjust seasonings as necessary. Serve stew over rice in a shallow soup bowl, ensuring that each person receives one piece of meat, one potato, one piece of butternut squash and a portion of corn. Serve with hot pepper sauce, salt, pepper and cilantro or parsley as desired.

Adapted from: Que Rica Vida and Taste of Home

Recipe Notes: Chilean cazuela is a very flexible homemade stew - you can use lamb, chicken or pork in the recipe, but the classic version is made with beef. Butternut squash can be swapped for pumpkin, if desired.


This post contains affiliate links. Full disclosure here.

Filed Under: book review, recipe Tagged With: cultural, dinner, fiction, meat, soup, veggies

Everything, Everything + Vanilla Bundt Cake

December 30, 2017 by Megan Leave a Comment

Though it’s not my typical choice, I’m no stranger to YA fiction. I like to pick them up for a quick read, and often - as with John Green’s Turtles All the Way Down - they bring difficult topics to the forefront and make them relatable, which I always appreciate. My latest YA read, Nicola Yoon’s Everything, Everything, tells the story of Maddy, a girl who lives in a bubble, and was captivating from the beginning.

Like many YA novels, it centers around a love story. Maddy watches from her window as new neighbors move in - one of them, Olly, a distractingly handsome teenage boy. That part of the novel was pretty predictable, in my opinion, but well-done and entertaining. Aside from the consequences of Maddy’s precarious health problem, it is with Olly - and through the window - that this novel touches on some darker real-life situations.

What made the novel worth it for me was the twist that came about two-thirds of the way through. I definitely did not see it coming, but I’m glad that it did. I won’t spoil it for those of you that haven’t read it yet, but I thought it added some welcome heft to the story.

One of the funnier series of events comes early on in the book, when Olly’s mom sends him over to Maddy’s house with what he describes as an “indestructible” bundt cake, which comes to be known as The Bundt. Olly and Maddy bond over this seemingly rock-hard inedible cake, and I found the whole thing endearing.

Obviously, I had to make my own bundt cake. Because of her illness, Maddy can only eat limited pre-approved foods and since vanilla cake is her go-to birthday dessert, I knew mine had to be vanilla as well. As funny as the cake’s indestructibility is in the novel, no one wants to fail that badly at baking. To capture the rock-hard aspect of the cake, I bought a beautifully structured hard-edged bundt pan to bake it in. (And now I have a bundt pan! I had to borrow my mom’s for the Tipsy Chocolate Cake a few months ago…) If you’re interested, I found it on Amazon here.

Like most cakes, this one wasn’t too difficult to make, but the recipe I chose has a very specific order in which ingredients need to be added, so make sure you read it through before you get started.

I preheated my oven to 350 degrees F and began mixing the batter. To start, I creamed the butter and sugar together in a large bowl. To that, I added the baking powder and salt.

At this point, I measured out the flour by scooping it into a 1-cup measuring cup and leveling it off before adding it to a medium bowl (for a total of 3 cups).

I added the first 3 eggs to the butter and sugar mixture, one at a time. Then, I added 2 Tablespoons of the pre-measured flour to that and mixed until just combined. I added another egg, mixed, and then alternated 2 Tablespoons of flour with one egg until all 6 eggs were incorporated.

I happened to have almond extract on-hand, so I added both that and the vanilla extract to the milk. To the batter, I added one-third of the remaining flour, mixing on low until combined. Then, I added half of the milk, mixing again, and began alternating with the remaining flour and milk, until all ingredients were incorporated. Finally, with the beaters on medium-high, I mixed the batter for another 30 seconds, until it became smooth and fluffy.

I used shortening to grease the bundt pan, taking great care to make sure I got all the nooks and crannies. Then, I scooped the batter - which is thicker than many traditional cake batters - into the bundt pan and leveled it off with a spatula.

I checked my cake at 50 minutes, but it wasn’t fully baked until an hour had passed. I turned it out onto a cooling rack, leaving the pan on top as it cooled for 10 minutes.

While it cooled in the pan, I made the glaze - combining the water, granulated sugar and salt in a small bowl. I used the microwave, heating it at 30 second intervals and whisking until the sugar was fully dissolved. Then, I added the vanilla extract to complete the glaze.

I removed the pan from the bundt cake and used a pastry brush to cover the cake with the glaze. (Be sure to put a plate or something else underneath the cooling rack to catch any glaze that might drip.)

I am happy to report that the finished product was not rock-hard and was actually quite delightful.

Did anyone see the recent movie version of Everything, Everything? Did The Bundt make an appearance? 

Vanilla Bundt Cake

  • Servings: 20
  • Time: 1 hour, 15 mins
  • Print

Cake Ingredients

  • 24 tablespoons (1½ cups or 3 sticks) unsalted butter, at room temperature
  • 1½ cups granulated sugar
  • 6 large eggs, at room temperature
  • 2¼ teaspoons baking powder
  • 1½ teaspoons salt
  • 3 cups unbleached all-purpose flour
  • 1 tablespoon vanilla extract or vanilla bean paste
  • ¼ teaspoon almond extract, optional
  • ¾ cup milk

Vanilla Glaze Ingredients

  • ⅓ cup granulated sugar
  • 5 teaspoons water
  • ⅛ teaspoon salt
  • 2 teaspoons vanilla extract

Directions

  1. Preheat the oven to 350°F.
  2. Place the butter and sugar in a large mixing bowl. Beat together at medium speed until the mixture lightens in color and looks fluffy. Scrape the sides and bottom of the bowl.
  3. Add the baking powder and salt, mixing just to combine.
  4. Measure the flour by gently spooning it into a measuring cup, sweeping off any excess with a straight edge. Set it aside.
  5. With the mixer running at medium speed, add the first three eggs to the butter/sugar mixture one at a time. Wait until each egg is absorbed into the mixture before adding the next.
  6. Add 2 tablespoons of the measured flour to the bowl after the third egg, and mix until combined. Add the fourth egg, mix until absorbed, then mix in another 2 tablespoons of flour. Continue in this fashion with the fifth and sixth eggs, alternating the addition of the egg with 2 tablespoons of the flour from the recipe.
  7. Add the vanilla (or vanilla bean paste) and almond extract (if using) to the milk.
  8. Add one-third of the remaining flour to the batter, beating gently to combine. Gently beat in half the milk. Mix in another third of the flour, then the remaining milk. Stir in the remaining flour. Scrape the sides and bottom of the bowl, then beat until the batter is smooth and fluffy, about 20 to 30 seconds at medium-high speed.
  9. Thoroughly grease a 10- to 12-cup Bundt pan, using non-stick vegetable oil spray or shortening (not butter; butter tends to increase sticking). Scoop the batter into the prepared pan, smoothing the top with a spatula.
  10. Bake the cake for 50 to 60 minutes, until it's starting to brown, appears set on top, and a toothpick or long skewer inserted into the center comes out clean. (If you're baking in a dark-interior pan, start checking at 45 minutes.) If the cake appears to be browning too quickly, tent it with foil for the final 15 minutes of baking.
  11. Remove the cake from the oven, and gently loosen its edges using a heatproof spatula. Turn the pan over onto a cooling rack. After 10 minutes, lift the pan off the cake, and allow it to cool completely.
  12. While the cake is cooling in the pan, make the glaze. Combine the sugar, water, and salt. Heat briefly, just to dissolve the sugar; a microwave works fine. Stir in the vanilla. Once you've turned the cake out of the pan onto a rack to cool, gently brush it all over with the glaze.
  13. Just before serving, sift a shower of confectioners' sugar over the top, if desired. A garnish of fresh berries is lovely and tasty. Store leftover cake, well wrapped, at room temperature for several days. Freeze for longer storage.

From: King Arthur Flour

This post contains affiliate links. Full disclosure here.

Filed Under: book review, recipe Tagged With: baking, dessert, fiction, young adult

My True Love Gave to Me + Chex Mix

December 19, 2017 by Megan 1 Comment

It's the most wonderful time of the year! With Christmas and New Years just around the corner, if you're looking for that special holiday-themed book, I recommend seeking out the YA short story collection My True Love Gave to Me. I don’t often read short stories (I’m not sure why), but this was exactly what I was looking for. It was quick with a wide range of stories, perfect to put me in a holiday mood.

I didn’t love every story in the collection but there were several that made picking this book up worth it. The first one I enjoyed was “Angels in the Snow” by Matt de la Peña which follows Shy, who’s at NYU on scholarship and cat-sitting for a professor because he can’t afford to go home for Christmas. A blizzard strands him in the apartment building with a neighbor, Haley, and the story can’t help but turn romantic. Still, it remains realistic and ends up being heartwarming. I also liked Jenny Han’s “Polaris is Where You’ll Find Me” about Santa’s adopted daughter, a human living among the elves. It was like the beginnings of a less goofy version of Elf, had we hung out with Buddy the Elf as a teenager.

“It’s a Yuletide Miracle, Charlie Brown” by Stephanie Perkins was probably my favorite. Marigold Moon lives across the street from a Christmas tree lot and it’s there that she heard the perfect voice for a video she’s producing; it happens to belong to a boy named North. In trying to get him to agree to narrate her video, Marigold walks away with a Christmas tree and ends the night a lot more hopeful than she started it.

Gayle Forman’s “What the Hell Have You Done, Sophie Roth?” was also charming. Sophie is stuck alone at a school where no one else is celebrating the last day of Hanukkah. As she tries to fit in, she stumbles into fellow outcast Russell and they embark on a memorable evening together. The surprisingly titled “Beer Buckets and Baby Jesus” by Myra McEntire reminded me a bit of one of my favorite novels, A Walk to Remember. Bad boy Vaughn’s antics land him a job helping out with the church nativity play, whether he wants to or not. He brings a unique point of view to the task, something both the pastor and his daughter are thankful for. Though both of these were a bit cliche, the combination of a little romance alongside a little something deeper made them satisfying reads.

Lastly, “Welcome to Christmas, CA” by Kiersten White about a Californian town that takes the meaning of its name to a whole other level. The story’s originality was an unexpected breath of fresh air in this collection. A diner in the middle-of-nowhere isn’t the most likely setting for a holiday story, but White managed to infuse it with plenty of holiday spirit and it definitely left me feeling Christmas-y!

I didn’t make a recipe today but wanted instead to share a recipe my mom’s been making for years. She makes it every year around Christmas, often giving it as an extra gift to friends and family. It always tastes delicious when you want a snack on New Years Eve, if it lasts that long. I thought it would work well with this short story collection because it’s mentioned on literally the first page in the first story:

Now, no offense, to Alicia’s mom - who I’m sure makes a fine Chex Mix (certainly better than the store bought bagged stuff) - but I like to think my mom makes the best Chex Mix. My mom claims her recipe is straight from Chex cereal itself, but when I tried looking it up, I couldn’t find one that matched exactly.

So, without further ado, here is my mom’s version of Chex Mix… the actual best Chex Mix.

Chex Party Mix

  • Servings: 20 (½ cup servings)
  • Time: 1 hour, 15 minutes
  • Print

Ingredients

  • ½ cup (1 stick) butter
  • 1¼ teaspoon seasoned salt
  • 4½ teaspoons Worcestershire sauce
  • 2⅔ cups corn Chex
  • 2⅔ cups wheat Chex
  • 2⅔ cups rice Chex
  • 1 cup salted mixed nuts
  • 1 cup pretzel rods

Directions

  1. Preheat oven to 250 degrees F. Heat butter in large shallow roasting pan in oven until melted (or melt in microwave and add to pan). Remove.
  2. Add seasoned salt and Worcestershire sauce to butter and stir. Add cereal and nuts. Mix gently until all pieces are coated.
  3. Heat in oven for 1 hour, stirring every 15 minutes.
  4. Spread on absorbent paper towels to cool. Once cooled, store in airtight containers.


From: Mom’s recipe, based on Chex Mix Original Recipe

Notes: You can use whichever combination of Chex “flavors” (or Crispix or similar cereal) you prefer, as long as they add up to 8 cups. You can also reduce Chex by 1 cup and add in 1 cup of Cheerios instead if desired.


This post contains affiliate links. Full disclosure here.

Filed Under: book review, recipe Tagged With: celebration, fiction, holiday, mini review, short story, snack, young adult

Little Fires Everywhere + Blackened Chicken

December 16, 2017 by Megan 2 Comments

Celeste Ng’s latest novel Little Fires Everywhere has been one of the hottest reads of the year (pun intended). As a big fan of her previous novel, Everything I Never Told You, I was excited to see what all the fuss was about when my hold recently came through at the library. Ng immerses us in the planned community of Shaker Heights, Ohio, a town she herself grew up in, and shines some light on the not-so-perfect lives of those that live there.

The story revolves primarily around the Richardsons, an exemplary Shaker Heights family, and Mia and Pearl Warren, a single mother and daughter who become their tenants. All four Richardson children - two girls and two boys, as varied as you could possibly imagine - are drawn to Pearl and her mother, who is an artist and a bit of a mystery. When the Richardsons’ family friend attempts to adopt a Chinese-American baby, who was found abandoned, it divides the town and pits Mia against Elena, the Richardson matriarch, threatening to topple the precarious status quo.

Little Fires Everywhere is full of the quiet drama of everyday life but also tackles something bigger. As Elena digs deep into Mia’s past and the Richardson children exist with little oversight, we’re along for the ride, discovering secrets and taking sides along with the rest of them.

Today’s recipe is inspired not only by the novel’s title but this quote, which stood out to me as I read: “Sometimes you need to scorch everything to the ground and start over. After the burning, the soil is richer, and new things can grow. People are like that, too. They start over. They find a way.” I decided to make a blackened chicken, traditionally covered heavily in spices and cooked on high heat on the stove top until the seasoning becomes dark.

I debated between two recipes, one from Pop Culture, a more classically prepared blackened chicken, and one from Gal on a Mission, which is baked. Though a baked version doesn’t get quite as “black” as one cooked on the stovetop, I ultimately went with that option. It’s just as flavorful and the fact that it’s hands-off made it appealing when I was cooking it after work the other day. Additionally, I was easily able to roast some small potatoes and broccoli alongside it, completing the meal in 30 minutes, with minimal prep.

To start, I preheated the oven to 450 degrees F, and combined all of my spices in a small bowl. This recipe uses a lot of spices - salt, cayenne pepper, crushed red pepper, garlic powder, paprika, black pepper, onion powder, dried oregano and dried thyme - but thankfully, none of them are obscure; I already had them all in my cupboard.

I covered each chicken breast with generously with the spices, making sure each was thickly coated. If you’re using 3 large breasts or 6 small breasts, you shouldn’t have any of the spice mixture left. (I only used 2 breasts but still used most of it.)

Then, I put the chicken in an 8x8 glass baking dish and popped them in the oven for 23 minutes. For the last 5 minutes of the bake time, cover the dish with foil and allow to continue baking while covered. My chicken breasts were definitely larger than average and needed to bake for an additional 10 minutes before they reached 165 degrees F.  

While these pictures probably aren’t my best, the chicken was delicious, very flavorful and moist (thanks to the foil cover). To top it off, it’s easy and hands-off, almost impossible to mess up.

Baked Cajun Chicken Breasts

  • Servings: 6
  • Time: 25 minutes
  • Print

Ingredients

  • 1 teaspoon salt
  • ½ teaspoon cayenne pepper
  • ¼ teaspoon crushed red peppers
  • 1 teaspoon garlic powder
  • 1 teaspoon paprika
  • ½ teaspoon black pepper
  • ½ teaspoon onion powder
  • ½ teaspoon dried oregano
  • ½ teaspoon dried thyme
  • 3 large chicken breasts or 6 small chicken breasts

Directions

  1. Preheat oven to 450 degrees. Grease an 8x8 baking sheet or dish. Set aside.
  2. Mix together the salt, cayenne pepper, crushed red peppers, garlic powder, paprika, pepper, onion powder, dried oregano, and dried thyme in a small bowl.
  3. Rub the spice mix onto the chicken breasts.
  4. Bake for 18 minutes. Remove the chicken breasts from the oven and cover with aluminum foil and bake for another 5 minutes.
  5. Once cooked through, allow the chicken to rest for 3-5 minutes before slicing to serve.

From: Gal on a Mission

Notes: Check the temperature of your chicken to ensure it’s cooked all the way through, particularly if you’re using large breasts. Mine had to bake for an additional 10 minutes to reach 165 degrees F.


This post contains affiliate links. Full disclosure here.

Filed Under: book review, recipe Tagged With: baking, chicken, contemporary, dinner, easy prep, fiction

  • « Go to Previous Page
  • Go to page 1
  • Interim pages omitted …
  • Go to page 17
  • Go to page 18
  • Go to page 19
  • Go to page 20
  • Go to page 21
  • Interim pages omitted …
  • Go to page 30
  • Go to Next Page »

Primary Sidebar

About

The Hungry Bookworm brings together literature and food. Megan has an insatiable appetite for both.

As C.S. Lewis said, “Eating and reading are two pleasures that combine admirably.” Enjoy!

  • Bloglovin
  • Facebook
  • Instagram
  • Pinterest

Subscribe

Don't miss out on bookish content, exclusive giveaways, and of course, book club-friendly recipes. Get notified of new posts via email.

Join 2879 subscribers.

Search for Ingredients, Recipes, or Books

Recent Posts

  • Subscriber Box Review: Literati Book Club - Roxane Gay's Audacious Book Club
  • Arsenic and Adobo + Ensaymada
  • Review of The Kindred Spirits Supper Club
  • Kids Edition: Sometimes I Like to Curl Up in a Ball + "Dirt" Pudding Cups
  • The Midnight Library + Broccoli and Ricotta Toast

Goodreads

Tags

5 ingredients or less appetizer baking book club book list book of the month books about food bread breakfast brunch chicken contemporary cookies cultural dessert dinner dinner party dystopia easy prep favorites fiction fruit historical fiction holiday ice cream linkup lunch meat memoir mini review nonfiction pasta quick read reading challenge science fiction seafood show us your books side dish snack soup TBR list thriller top ten tuesday vegetarian veggies

Archives

Other Great Book Blogs

Literary Quicksand
Never Enough Novels
Death by Tsundoku
Professional Reader 25 Book Reviews
Privacy & Cookies: This site uses cookies. By continuing to use this website, you agree to their use.
To find out more, including how to control cookies, see here: Cookie Policy

Footer Widget Header

Megan’s Instagram

Copyright © 2025 · Hungry Bookworm