• Skip to primary navigation
  • Skip to main content
  • Skip to primary sidebar
  • Home
  • Reviews
    • Book Index
    • Fiction
    • Non-Fiction
    • Top Ten Tuesdays
The Hungry Bookworm

The Hungry Bookworm

reading + eating

  • Recipes
    • Drinks
    • Snacks, Sides & Apps
    • Main Dishes
    • Desserts
    • 5 Ingredients or Less
  • About
    • Meet Megan
    • How I Rate
    • Review Policy
    • Contact

recipe

Little Fires Everywhere + Blackened Chicken

December 16, 2017 by Megan 2 Comments

Celeste Ng’s latest novel Little Fires Everywhere has been one of the hottest reads of the year (pun intended). As a big fan of her previous novel, Everything I Never Told You, I was excited to see what all the fuss was about when my hold recently came through at the library. Ng immerses us in the planned community of Shaker Heights, Ohio, a town she herself grew up in, and shines some light on the not-so-perfect lives of those that live there.

The story revolves primarily around the Richardsons, an exemplary Shaker Heights family, and Mia and Pearl Warren, a single mother and daughter who become their tenants. All four Richardson children - two girls and two boys, as varied as you could possibly imagine - are drawn to Pearl and her mother, who is an artist and a bit of a mystery. When the Richardsons’ family friend attempts to adopt a Chinese-American baby, who was found abandoned, it divides the town and pits Mia against Elena, the Richardson matriarch, threatening to topple the precarious status quo.

Little Fires Everywhere is full of the quiet drama of everyday life but also tackles something bigger. As Elena digs deep into Mia’s past and the Richardson children exist with little oversight, we’re along for the ride, discovering secrets and taking sides along with the rest of them.

Today’s recipe is inspired not only by the novel’s title but this quote, which stood out to me as I read: “Sometimes you need to scorch everything to the ground and start over. After the burning, the soil is richer, and new things can grow. People are like that, too. They start over. They find a way.” I decided to make a blackened chicken, traditionally covered heavily in spices and cooked on high heat on the stove top until the seasoning becomes dark.

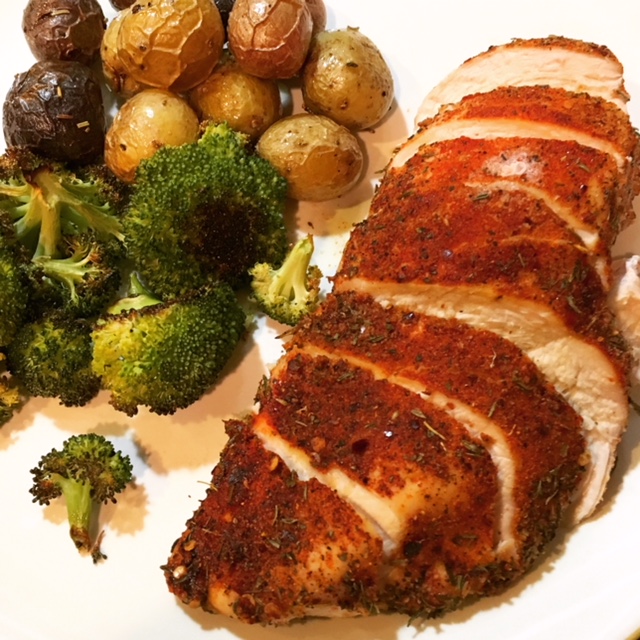
I debated between two recipes, one from Pop Culture, a more classically prepared blackened chicken, and one from Gal on a Mission, which is baked. Though a baked version doesn’t get quite as “black” as one cooked on the stovetop, I ultimately went with that option. It’s just as flavorful and the fact that it’s hands-off made it appealing when I was cooking it after work the other day. Additionally, I was easily able to roast some small potatoes and broccoli alongside it, completing the meal in 30 minutes, with minimal prep.

To start, I preheated the oven to 450 degrees F, and combined all of my spices in a small bowl. This recipe uses a lot of spices - salt, cayenne pepper, crushed red pepper, garlic powder, paprika, black pepper, onion powder, dried oregano and dried thyme - but thankfully, none of them are obscure; I already had them all in my cupboard.

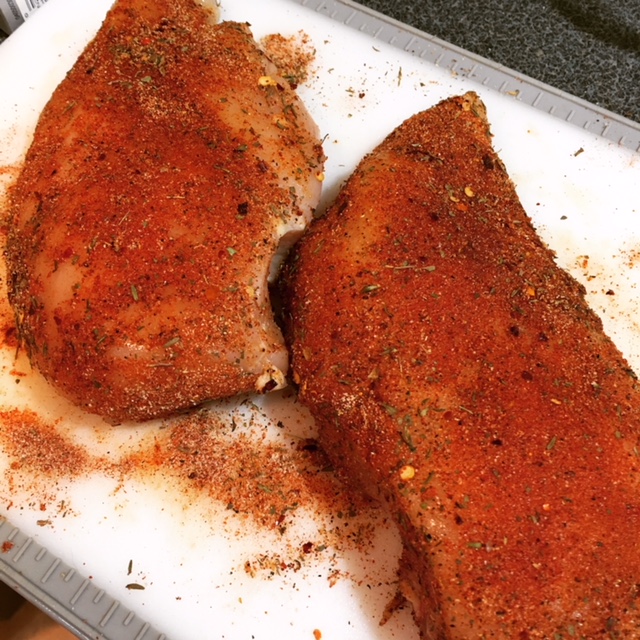
I covered each chicken breast with generously with the spices, making sure each was thickly coated. If you’re using 3 large breasts or 6 small breasts, you shouldn’t have any of the spice mixture left. (I only used 2 breasts but still used most of it.)

Then, I put the chicken in an 8x8 glass baking dish and popped them in the oven for 23 minutes. For the last 5 minutes of the bake time, cover the dish with foil and allow to continue baking while covered. My chicken breasts were definitely larger than average and needed to bake for an additional 10 minutes before they reached 165 degrees F.  

While these pictures probably aren’t my best, the chicken was delicious, very flavorful and moist (thanks to the foil cover). To top it off, it’s easy and hands-off, almost impossible to mess up.

Baked Cajun Chicken Breasts

  • Servings: 6
  • Time: 25 minutes
  • Print

Ingredients

  • 1 teaspoon salt
  • ½ teaspoon cayenne pepper
  • ¼ teaspoon crushed red peppers
  • 1 teaspoon garlic powder
  • 1 teaspoon paprika
  • ½ teaspoon black pepper
  • ½ teaspoon onion powder
  • ½ teaspoon dried oregano
  • ½ teaspoon dried thyme
  • 3 large chicken breasts or 6 small chicken breasts

Directions

  1. Preheat oven to 450 degrees. Grease an 8x8 baking sheet or dish. Set aside.
  2. Mix together the salt, cayenne pepper, crushed red peppers, garlic powder, paprika, pepper, onion powder, dried oregano, and dried thyme in a small bowl.
  3. Rub the spice mix onto the chicken breasts.
  4. Bake for 18 minutes. Remove the chicken breasts from the oven and cover with aluminum foil and bake for another 5 minutes.
  5. Once cooked through, allow the chicken to rest for 3-5 minutes before slicing to serve.

From: Gal on a Mission

Notes: Check the temperature of your chicken to ensure it’s cooked all the way through, particularly if you’re using large breasts. Mine had to bake for an additional 10 minutes to reach 165 degrees F.


This post contains affiliate links. Full disclosure here.

Filed Under: book review, recipe Tagged With: baking, chicken, contemporary, dinner, easy prep, fiction

They Both Die at the End + French Toast

December 9, 2017 by Megan 2 Comments

Imagine a world where you knew exactly which day you would die but not how - on the morning of your death, you get a phone call with the warning and are instructed to make the most of it. That’s the premise behind Adam Silvera’s They Both Die at the End, a young adult dystopian novel. I devoured it in a single day.

On the morning of September 5, a representative from Death-Cast calls both Mateo and Rufus - two teenage boys - and informs them that their End Day is here. They each set off to live their best life on their last day on Earth, not knowing exactly how or when it will come to an end. Interestingly (and one of the things I loved most about Silvera’s concept), a whole economy has grown up around this knew End Day phenomenon, and it is through the app Last Friend, that Mateo and Rufus find each other.

Together, they set about tying up loose ends, experiencing new things and enjoying a last meal to fuel them through their adventures. Some may not appreciate knowing how it all ends before even picking up the novel, but don’t let that hold you back. The ending was not what I was expecting, and I found that the anticipation of the end-point kept the momentum going as I read. If you enjoyed the movie Stranger Than Fiction, which I very much did, that’s the closest approximation I can think of to knowing a plot point and not having it ruin the rest of the experience for you.

Of course, knowing a recipe would end up tagging along with my review, Rufus and Mateo’s most memorable meal on their End Day was important to me. At a hole-in-the-wall diner, they order what I can only hope was an amazing grilled chicken salad (which wouldn’t be my first choice, to be honest) and French toast with a side of French fries (now we’re getting somewhere…).

The French toast obviously stood out to me - yes, grilled chicken salad can be very delicious, but I would really rather not endure a last day without carbs. For those of you who followed my Thanksgiving Readathon, you’ll know I adored Molly Wizenberg’s A Homemade Life. Coincidentally, in it, she included a recipe for her father’s French toast, alongside a whole chapter describing its deliciousness. I knew this had to be the recipe I used here, because a last meal absolutely has to be the best. It did not disappoint, and I can only hope the boys’ French toast was just as amazing.

To start, I dug out my cast iron skillet and glugged in some canola oil, making sure to completely cover the bottom, per Molly’s instruction. Then, I cracked 3 eggs into a Pyrex pie dish, which I would ultimately use to coat the bread.

To the eggs, I added milk, sugar, vanilla, salt and nutmeg, whisking it all together. While the oil heated up, I added two slices of bread to the egg mixture, letting it soak for about 45 seconds or so on each side. (I unfortunately was unable to find a loaf of bread that wasn’t pre-sliced, so they weren’t cut diagonally, but I still think it worked well.)

Then, carefully, using tongs, I placed each slice into the hot oil. It bubbled as it should’ve, which was a good sign. I let it cook for between 1 and 2 minutes on each side.

When each pair of slices was finished, I placed them on a plate lined with paper towels. We had these for a quick dinner one night after work, but they were so easy, that I wouldn’t hesitate to make them on a sleepy weekend morning. I haven’t made a lot of French toast myself, but I have eaten it quite often at restaurants, and this was probably the best I’ve ever had. I can definitely see us adding it to the rotation, especially when we’re looking for a little simple indulgence.

To finish, I dusted the slices with some powdered sugar, which is something I love from years of ordering French toast at restaurants. I’m actually always disappointed when it appears on my table without a white dusting. Of course, we also covered them with syrup and dug right in.

Last Meal French Toast

  • Servings: 6-8 slices
  • Time: 20 minutes
  • Print

Ingredients

  • 3 large eggs
  • 1 cup whole milk
  • 1 tablespoon sugar
  • 1 teaspoon vanilla extract
  • ¼ teaspoon salt
  • pinch of freshly ground nutmeg
  • canola or other flavorless oil, for frying
  • 6 to 8 slices day-old bread, cut on the diagonal, about ¾ inch thick
  • pure maple syrup, for serving
  • powdered sugar, for serving (optional)

Directions

  1. Break the eggs into a wide, shallow bowl or an 8-inch square Pyrex dish. Whisk the eggs to break up the yolks. Add the milk, sugar, vanilla, salt and nutmeg and whisk to blend.
  2. Place a heavy large skillet - preferably cast iron - over medium-high heat, and pour in enough oil to completely cover the bottom of the skillet. Let the oil heat until you can feel the warmth radiating from it when you hold your hand close over the pan. To test the heat, dip the tip of a finger into the egg mixture - not the oil! - and flick a drop into the oil. If it sizzles, it’s ready.
  3. Meanwhile, when the oil is almost hot enough, put 2 to 3 slices of bread into the egg mixture, allowing them to rest for 30 seconds to 1 minute per side. They should feel heavy and thoroughly saturated, but they shouldn’t be falling apart.
  4. Carefully, using tongs, place the slices in the skillet. They should sizzle upon contact, and the oil should bubble busily around the edges. Watch carefully: with hot oil like this, the slices can burn more quickly than you would think. Cook until the underside of the each slice is golden brown, 1 to 2 minutes. Carefully flip and cook until the second side is golden, another 1 to 2 minutes. Remove to a plate lined with paper towel, and allow to sit for a minute or two before serving.
  5. Repeat with remaining bread. If, at any point, the bread starts to burn before it has a chance to brown nicely, turn the heat back a little. You want to keep it nice and hot, but not smoking.
  6. If desired, dust with powdered sugar. Serve with maple syrup.

Slightly adapted from: Molly Wizenberg’s A Homemade Life, featured on pages 39 - 40 as Burg’s French Toast

Recipe Notes: Bread should always be a day or two old. Make sure it has a soft, light crumb and isn’t too dense. When pouring in the oil, make sure it completely coats the bottom of the pan.


This post contains affiliate links. Full disclosure here.

Filed Under: book review, recipe Tagged With: bread, breakfast, dystopia, fiction, vegetarian, young adult

Turtles All the Way Down + Spiral Mac 'n' Cheese

December 5, 2017 by Megan Leave a Comment

John Green has written many young adult novels, including one of my favorites, The Fault in Our Stars. He has a unique way of tackling both the everyday and the unexpected parts of the lives of teenagers. His latest novel, Turtles All the Way Down, is no exception. Like other teenagers, Aza tries her best in school, has an understanding best friend, and doesn’t know exactly what to do when she finds herself in a relationship. Aza also lives with obsessive-compulsive disorder and an often crippling level of anxiety, much of which was drawn from Green’s own experiences.

Because of that, Turtles tells an excellent, unique story. Admittedly, some of the scenes where Aza is having obsessive thoughts were hard to read. It almost felt like I was in her head, and in those moments, I read as if hiding behind split fingers - not wanting to go on but wanting to know what happened all the same. I admire Green’s willingness to not only discuss his own mental health issues but to write about them too, in a way that’s real.

Stories like these help to make mental health something that’s okay to talk about. The existence of a likeable character that readers can connect to and empathize with can help teenagers (and adults) realize that mental illness is not something to be embarrassed or ashamed of. In Green’s own words, “it’s important for people to hear from [those] who have good fulfilling lives and manage chronic mental illness as part of those good fulfilling lives.” And because of that, it is absolutely a book worth picking up - even if you aren’t familiar with John Green, even if you don’t usually read YA.

Honestly, the first thing I thought of when I looked at this book's cover was spiral macaroni and cheese. I think they eat it once over the course of the story, but in the end, I couldn’t get it out of my head and no other foods really stood out to me. So, no surprise, that’s what I decided to make. I found an easy recipe from Famished Fish and set to work for a quick, easy dinner one night.

To start, I brought my water to a boil and cooked my noodles according to the package instructions. The original recipe called for rotini, but I also think cavatappi would work great here.

While the noodles cooked, I made the sauce. I melted butter in a pan and then added flour to create a roux. To that, I added the dried mustard and paprika, slowly stirring in 1 cup of milk, so that it could fully incorporate with the roux and remain thick.

Then, I added in the remaining 2 cups of milk slowly, along with the salt and a dash of Worcestershire sauce. I continued cooking the sauce, stirring occasionally for about 5 minutes more or so, until it thickened. I stirred in three-quarters of the cheese so it melted and became incorporated.

I drained the finished noodles and poured the cheese sauce on top, stirring until the noodles were fully covered. To serve, I spooned the mac 'n' cheese into bowls and topped each with a sprinkling of shredded cheese.

It was delicious! And so easy that I’ll definitely be adding it to my repertoire.

Creamy Spiral Mac 'n' Cheese

  • Servings: 4-6
  • Time: 15 minutes
  • Print

Ingredients

  • 16 oz uncooked spiral noodles (rotini or cavatappi)
  • ¼ cup butter
  • ¼ cup flour
  • ½ tsp mustard
  • ½ tsp paprika
  • 1 tsp salt
  • dash of Worcestershire sauce
  • 3 cups milk, divided
  • 2 cups sharp cheddar cheese, divided

Directions

  1. Add uncooked pasta to a large pot of boiling water. Cook 9-11 minutes, according to package directions.
  2. Meanwhile, in a medium saucepan set over medium heat, melt the butter. When butter has melted, stir in flour to create a roux.
  3. Slowly stir in 1 cup of milk along with the mustard and paprika. Stir and cook until the mixture thickens. Add the remaining 2 cups of milk and the salt and Worcestershire sauce. Cook and stir 5 minutes until has thickened.
  4. Stir in 1½ cups of the sharp cheddar cheese. Stir the sauce until the cheese has melted.
  5. Drain the pasta and return to large pot. Carefully pour the cheese sauce over the cooked pasta. Stir gently to combine the cheese sauce and pasta.
  6. Ladle the macaroni and cheese spirals into a large serving bowl and sprinkle with the remaining ½ cup of sharp cheddar cheese.
  7. Serve immediately.

Adapted from: Famished Fish

This post contains affiliate links. Full disclosure here.

Filed Under: book review, recipe Tagged With: contemporary, dinner, easy prep, fiction, lunch, pasta, quick read, tough topics, vegetarian, young adult

The Music Shop + French Onion Soup

December 2, 2017 by Megan Leave a Comment

If there are any music lovers out there, this book is for you. Rachel Joyce’s The Music Shop was similar in feel to The Storied Life of AJ Fikry, which I adored, except in place of a bookshop and bookworms you have a music shop and musicians (or at the very least, those who appreciate music). Though this book doesn’t hit shelves until January, I was lucky enough to get an early copy.


In a rundown neighborhood that smells of cheese and onion, in 1988, Frank is struggling to keep his music shop open. It is the age of the CD and though records are losing their appeal, Frank’s shop is something special. As a true connoisseur of music, he is able to recommend exactly the tracks his customers need, even if they didn’t know it was what they were looking for.

One day, a mysterious woman enters his shop, arousing the interest of the surrounding shop owners, who often congregate at Frank’s. He begins teaching her about music and everything begins to change. This novel has a wonderful, quirky set of characters and tells a heartwarming story. I only wish I was more into music, because I would have appreciated it that much more.

Though the book made the neighborhood’s pervasive smell of cheese and onion sound like a bad thing, I’ll admit it really just had me craving French onion soup. Full of caramelized onions and covered with melty cheese, nothing could be more delicious! I pulled out my trusty recipe from The Pioneer Woman, which I’ve been using for a few years now, and got to work creating my own cheesy, onion-y smells in the kitchen.

To start, I always slice my onions, since it takes a bit of time and I usually can’t finish slicing them all in the time it takes the butter to melt. I used 6 medium yellow onions, because that’s what I had on-hand, but if you’re buying them specifically for this recipe, you can substitute a few less large onions.

I melted a half stick of butter in my Dutch oven. (Ree uses a whole stick of butter, but over time I’ve adapted the recipe and use just half of that. Since we usually have leftovers, I’ve found that that much butter creates a pretty thick - and unappetizing - layer of solidified fat on top of the soup when it gets cold. It tastes just as good with half a stick, and is probably healthier too!)

To the melted butter, I added my sliced onions, which take up quite a lot of room in the Dutch oven - don’t worry! They’ll cook down considerably. I stir/toss the onions with a spoon to make sure they’re all pretty well coated in the butter and then I let them cook for about 20 minutes over medium-low heat while covered.

After they’ve cooked down a bit, it’s time to put them into a 400 degree oven, where they’ll cook for an hour minimum. I like to cook mine for closer to an hour and a half to really allow them to caramelize. My favorite thing about this recipe is that it’s perfect for lazy weekend days - it takes a while to make, but most of that time is hands-off. What you get in the end is a delicious, comforting soup.

Back on the stovetop, over medium heat, I used a wooden spoon to scrape off some of the brown bits, which are full of flavor. Carefully add a generous cup of dry white wine to the pot, all while scraping the flavor off the bottom and sides. (If you’re concerned about potential fire hazard, since alcohol is flammable, you can briefly turn off the heat, add the wine, and turn the heat back on. With such a large/deep pot, I don’t find that to be necessary.) I let that mixture cook down until the alcohol is mostly cooked off, about 5 minutes.

To the onions, I added the chicken and beef broths, minced garlic and a dash of Worcestershire sauce. I allowed the soup to simmer for between 30 and 45 minutes.

Meanwhile, with about 15 minutes left on the soup, I prepped the bread to use on top of the soup. I sliced about half of a baguette, making sure to keep them on the thicker side. (I like to freeze the other half of the baguette for the next time I make the soup, or for another recipe.) I put them under the broiler for a few minutes, until they began to brown and get crispy.

When the soup was finished, I ladled it into a bowl for each of us, set two pieces of bread on top and covered that generously with grated cheese. (I used a nutty Swiss from Trader Joe’s, since they were out of my usual shredded mix - see notes. If the mix is unavailable or you’re not near a TJs and budget is a factor, Swiss is a great substitute for Gruyere, which usually runs $10/lb or more.)

Since my bowls aren’t oven safe, I used my old trick of popping each bowl into the microwave for a minute or less - I suggest watching through the door - until the cheese is melted. You don’t get the nice browning that you get under the broiler, but the meltiness is really what I’m looking for in a French onion soup anyway. Hope you enjoy!

French Onion Soup

  • Servings: 6
  • Time: 2 hours, 20 minutes
  • Print

Ingredients

  • ½ stick butter
  • 4 large or 6 medium yellow onions, halved root to tip and thinly sliced
  • 1 cup (generous) dry white wine
  • 4 cups low sodium chicken broth
  • 4 cups beef broth
  • 4 cloves minced garlic
  • dash of Worcestershire sauce
  • Several thick slices of baguette
  • 5 ounces weight (to 7 Ounces) Gruyere cheese, grated

Directions

  1. Melt butter in a heavy soup pot or Dutch oven over medium-low heat. Add onions and cook, covered, for 20 minutes. Meanwhile, preheat oven to 400 degrees.
  2. Place pot into the oven with the lid slightly ajar to ensure the onions will brown. Allow onions to cook in the oven for 1 to 1 ½ hours, stirring at least once during the cooking process so onions won’t stick and burn.
  3. Remove pot from oven and place back on stovetop over medium heat. Stir, scraping off all the brown, flavorful bits. Turn off heat and pour in wine. Turn heat back to medium. (If you do this carefully, you don’t need to turn off the heat.) Cook wine for 5 minutes, allowing it to reduce. 4. Add broths, Worcestershire sauce and minced garlic and reduce heat to low. Simmer for 30 to 45 minutes.
  4. Butter one side of the bread slices and broil over low heat, allowing bread to brown and become crispy.
  5. When soup is ready, ladle into bowl or ramekin. Place crispy bread on top, and then sprinkle generously with grated cheese. Broil until cheese is melted and bubbly. (Alternatively, if you don’t have oven-safe bowls, you can place in microwave for 30 - 60 seconds, or until melted.)
  6. Serve immediately.

Adapted from: The Pioneer Woman

Notes: I prefer the Swiss/Gruyere shredded cheese mix from Trader Joe’s, if there is one near you. It’s more cost effective and saves you the trouble of grating. Additionally, you can substitute vegetable broth for the chicken broth if you prefer. If you only have stocks on-hand, I’ve also used them in place of the broth(s), and the result is much the same - just check the taste and adjust seasoning as needed.


This post contains affiliate links. Full disclosure here.

Filed Under: book review, recipe Tagged With: bread, comfort food, dinner, fiction, lunch, quick read, soup, veggies

The Word Exchange + Mini Pineapple Upside-Down Cakes

November 29, 2017 by Megan 1 Comment

For those of you who read my recent Top Ten Tuesday, where I covered books I’m thankful for, you’ll recognize today’s title. Alena Graedon’s debut novel is a dystopia called The Word Exchange. It had been on my TBR list for a little while now, but I forget how it got there. I remember adding it to the consideration set for our office’s Diversity Book Club when we were selecting from various dystopias one month. It didn’t win then, and honestly, it may have taken me a lot longer to get to it if not for my good friend Deanna suggesting it for our most recent book club meeting (outside of work).

Though I ended up loving The Word Exchange, it wasn’t an instant hit for me. I struggled a bit through the first couple of chapters; I even warned our book club to get started sooner rather than later and break out the dictionary. The language was complicated (purposefully, I found out later) and those chapters were dense. But, after about 50 pages or so, I began getting into the story and was suddenly hooked.

Graedon describes a near-future where the death of print has happened and handheld devices are taking over society. Furthermore, people begin to rely on something called The Word Exchange, where people makeup definitions and words in a sort of online marketplace. Anana works with her father at the North American Dictionary of the English Language, and when he goes missing, she finds herself in a world where language is quickly losing meaning. She enlists her bookish coworker Bart in the search for her father and answers - trying to avoid contracting the rapidly spreading “word flu” all the while.

The combination of the importance of language and our reliance on technology was done quite skillfully, in a way that still haunts me whenever the novel comes to mind. I’ve tried to be more conscious of my use of technology - particularly my cell phone and social media - since finishing this book. Not that any of it is bad in and of itself, just that it’s important to me to not become dependent on these, particularly as a way of passing time. As I learned over the recent Thanksgiving Readathon, putting down my phone gives me a lot more time to focus on something more worthwhile - like spending time with family or reading.

Anana’s father’s favorite fruit is a pineapple, and if you’re wondering why I know that, it’s actually a bit of thing throughout the book. Anana’s name, in fact, means pineapple when an s is added to the end. I knew almost immediately they would be a huge part of what I made to go along with the book. If I’m remembering correctly, pineapple upside-down cake was his favorite dessert. I decided to make it in mini form, thinking that would be easier. (In the end, I don’t think that’s the case.)

It was really important to me to find a recipe that used the rings rather than the chunks, and so after a bit of research, I found this one from Baker by Nature. I started the whole process by ordering some jumbo muffin tins from Amazon - the jumbo ones are required so that the pineapple rings can fit in the bottom.

They arrived in time for me to make the mini cakes for our book club meeting, so I got to work the night before. I preheated the oven and greased the jumbo tins.

Then I mixed together the cake batter. I combined the eggs with the sugars and rum, beating until smooth. To that I added the pineapple juice, just stirring it in. Separately, I sifted together the dry ingredients, and then added them into the wet ingredients, whisking until just combined.

In a small saucepan, I made the topping for the cakes. I melted butter and then added brown sugar, rum and salt, stirring while it cooked.

I added the topping to the bottom of the jumbo tins (because they’ll be flipped upside-down later!) to start.

Then, I added in the pineapple rings on top of that, with a maraschino cherry in the middle of each.

Finally, I added the cake batter, filling them roughly ¾ of the way full.

I baked the cakes for about 20 minutes and then pulled them out of the oven to cool.

They cooled in the pan for 5 minutes before it was time to turn them out to cool on a rack. I want to caution you to be very careful when flipping your pans. If you have two tins of 6 cakes each, please do them individually and not at the same time - even if you think you can manage it. The topping is VERY hot and still ooey gooey, which I can tell you from personal experience makes a huge mess if something goes awry and it happens to get all over the kitchen.

It is important to place the cooling rack within a baking pan with a lip. Place that upside down on top of the muffin tin and then quickly and carefully flip that over so that the pan and cooling rack are on the bottom. Repeat with the other rack/pan/muffin tin.

I hadn’t had pineapple upside-down cake before, and I was pleasantly surprised at how much I liked it. Anana’s dad was onto something!

Mini Pineapple Upside-Down Cakes

  • Servings: 12
  • Time: 30 minutes
  • Print

Ingredients

  • 4 large eggs, at room temperature
  • 1¼ cups granulated sugar
  • ¼ cup dark brown sugar, packed
  • ½ cup pineapple juice
  • 2 teaspoons rum (or pure vanilla extract)
  • 1½ cups all purpose flour
  • 2¼ teaspoons baking powder
  • ½ teaspoon cinnamon
  • ¼ teaspoon salt
  • 2 tablespoons cornstarch
  • 6 tablespoons unsalted butter
  • 1½ cups dark brown sugar (packed)
  • 1 teaspoon rum (or vanilla extract)
  • ⅛ teaspoon salt
  • 12 pineapple rings
  • 12 maraschino cherries

Directions

  1. Preheat oven to 350 degrees (F). Generously spray a 12-mold jumbo muffin tin with non-stick cooking spray; set aside.
  2. Crack the eggs into a large mixing bowl; whisk smooth. Add in the granulated sugar, brown sugar, and rum (or vanilla), and beat smooth. Stir in pineapple juice and set aside.
  3. In a separate bowl, sift together the flour, baking powder, cinnamon, salt, and cornstarch. Gradually add the dry ingredients into the wet ingredients and whisk until just combined. Be sure not to over mix here! Set mixture aside while you make the topping.
  4. For the topping: In a small sauce pan, melt the butter over medium heat. Add in the brown sugar, rum, and salt, and cook for 1 minute, whisking constantly. Remove from heat.
  5. Spoon 2 tablespoons of the topping mixture into the bottom of each muffin tin; place a pineapple ring on top, then place a cherry in the middle of each pineapple ring. Divide the cake batter evenly among the prepared tins, fill each muffin tin 3/4 of the way full.
  6. Bake for 20-22 minutes, or until the tops are puffed and golden brown, and a toothpick inserted in the center of the cake comes out clean.
  7. Remove from the oven and cool in pan for 5 minutes. Gently run a knife around the edge of each cake to help loosen any stuck bits, then gently place a wire cooling rack on top and quickly flip over. You will want to place the cooling rack on a large sheet pan before doing this, to help make it less messy. Serve cakes warm or at room temperature.

From: Baker by Nature

Recipe Notes: Rum may be substituted with pure vanilla extract. Cakes are best eaten the day they are made, but may be stored in the fridge, in an airtight container, or on a plate covered tightly with plastic wrap, for up to 3 days.


Filed Under: book review, recipe Tagged With: baking, dessert, dystopia, fiction, fruit

Bread & Wine + Bacon-Wrapped Dates

November 25, 2017 by Megan 1 Comment

It’s wonderful to have someone so enthusiastically recommend a book to you one day and then, because they know you’ll love it, present it the next day for you to borrow. I am forever recommending books to others, and often pushing my own copy on them unbidden at the next opportunity, but it’s rare that I have someone do the same to me. I am forever grateful to my new coworker, who upon learning about my loves of reading and cooking (and subsequently my blog), shared one of her favorite books with me during her first week on the job.

Aside from recipes - admittedly, the cover looked delicious - I had no real expectations when sitting down with Shauna Niequist’s popular food memoir, Bread and Wine: A Love Letter to Life Around the Table with Recipes. As the title suggests, Niequist’s essays are overflowing with rich descriptions of food and the community it can help create. The memoir touches on not only her family and friends, with whom she loves to share meals, but also on her relationship with God and how that nourishes her in other ways.

In a memoir peppered with meaningful recipes, it can be challenging to choose the one that most represents it. While so many of them sounded appetizing, I went with the one Niequist had me wondering about from one of the very first chapters. She mentioned bacon-wrapped dates, stuffed with goat cheese, at least twice (and maybe more) before she finally revealed the recipe on page 171. The book is only 288 pages, so I was starting to get nervous it would never appear...when suddenly, there it was!

Niequist herself says in her introduction to the recipe that this appetizer is not the most practical thing to choose, if you’re only going to make one recipe from her book. Thankfully, since my heart was already set on them, she goes on to say that “practicality has never been my strong suit, so I think you should make these.” With her blessing, I did.

She describes them as a “go-to, serve-at-every-gathering, take-to-every-party treat” that people adore, so I decided to share them at Thanksgiving dinner this week. With only 3 ingredients and a strong suggestion to serve at room temperature, they were the perfect no-fuss thing to bring to my in-laws’.

On Thanksgiving morning, I gathered my ingredients - pitted dates, goat cheese, and bacon.

I started by slicing the bacon in half and then slicing the dates open to make little “date books” (pun intended).

I stuffed each date with a proportionate spoonful (using the teaspoon from our flatware set). I recommend using the date itself to help scrape the cheese off the spoon as you close it up.

Finally, I wrapped each date with a half-slice of bacon and placed each one seam down on a foil-lined baking sheet (with sides).

I placed the pan in a 400-degree oven and let them bake for 25 minutes, until they were crispy and brown. I let them cool for a moment before transferring them to a paper-towel lined plate to drain off a bit.

Before we left for our Thanksgiving dinner, I put the still warm bacon-wrapped dates into a serving dish to bring along. Of course, they were served on a much prettier platter (thanks to my mother-in-law), but here they are just before we left the house - looking delicious and tantalizing.

Thankfully, they were as delicious as promised and everyone enjoyed their addition to the appetizer selection. I would absolutely recommend adding these to your repertoire.

I’d also recommend picking up a copy of Niequist’s memoir, so you can read about all of the other recipes that had me drooling as I read. I can’t wait to try more of them myself.

Last but not least, I hope all those celebrating had a Happy (and food-filled) Thanksgiving! If you’re following along with my Thanksgiving Readathon, I’ll be wrapping that up with a post on Monday.

Bacon-Wrapped Dates

  • Servings: approximately 32 pieces
  • Time: 40 minutes
  • Print

Ingredients

  • 8 oz. package of pitted dates
  • 4 oz. goat cheese
  • 16 oz. bacon

Directions

  1. Slice alongside one side of each date, from the top to the bottom, so you can open it like a tiny book. Scoop a small amount of goat cheese into the center of each one, and then close it back up.
  2. Cut the whole package of bacon in half, so that each long strip is now half as long. Wrap a half-slice of bacon around the outside of each date.
  3. Arrange seam side down in a baking dish or on a baking sheet with sides to catch any grease. A foil pan is really nice for no cleanup.
  4. Bake at 400-degrees F for 20 to 25 minutes, or until well browned and crispy. Drain on a paper towel, and serve warm or at room temperature, but definitely not hot, unless you want to burn the roof of your mouth so badly you don’t taste anything for days.

From: Bread and Wine: A Love Letter to Life Around the Table with Recipes by Shauna Niequist (pages 171-172)

This post contains affiliate links. Full disclosure here.

Filed Under: book review, recipe Tagged With: appetizer, books about food, dinner party, five ingredients or less, holiday, memoir, nonfiction, party

  • « Go to Previous Page
  • Go to page 1
  • Interim pages omitted …
  • Go to page 23
  • Go to page 24
  • Go to page 25
  • Go to page 26
  • Go to page 27
  • Interim pages omitted …
  • Go to page 37
  • Go to Next Page »

Primary Sidebar

About

The Hungry Bookworm brings together literature and food. Megan has an insatiable appetite for both.

As C.S. Lewis said, “Eating and reading are two pleasures that combine admirably.” Enjoy!

  • Bloglovin
  • Facebook
  • Instagram
  • Pinterest

Subscribe

Don't miss out on bookish content, exclusive giveaways, and of course, book club-friendly recipes. Get notified of new posts via email.

Join 2879 subscribers.

Search for Ingredients, Recipes, or Books

Recent Posts

  • Subscriber Box Review: Literati Book Club - Roxane Gay's Audacious Book Club
  • Arsenic and Adobo + Ensaymada
  • Review of The Kindred Spirits Supper Club
  • Kids Edition: Sometimes I Like to Curl Up in a Ball + "Dirt" Pudding Cups
  • The Midnight Library + Broccoli and Ricotta Toast

Goodreads

Tags

5 ingredients or less appetizer baking book club book list book of the month books about food bread breakfast brunch chicken contemporary cookies cultural dessert dinner dinner party dystopia easy prep favorites fiction fruit historical fiction holiday ice cream linkup lunch meat memoir mini review nonfiction pasta quick read reading challenge science fiction seafood show us your books side dish snack soup TBR list thriller top ten tuesday vegetarian veggies

Archives

Other Great Book Blogs

Literary Quicksand
Never Enough Novels
Death by Tsundoku
Professional Reader 25 Book Reviews
Privacy & Cookies: This site uses cookies. By continuing to use this website, you agree to their use.
To find out more, including how to control cookies, see here: Cookie Policy

Footer Widget Header

Megan’s Instagram

Copyright © 2025 · Hungry Bookworm